SER. MANUAL UPDATE WINDSHIELD AND BACK GLASS REPLACEMENT

SUBJECT: SERVICE MANUAL UPDATE - WINDSHIELD AND BACK GLASS REPLACEMENT
VEHICLES AFFECTED: 1991 "C" MODELS -----------------------------------------------------------------------------
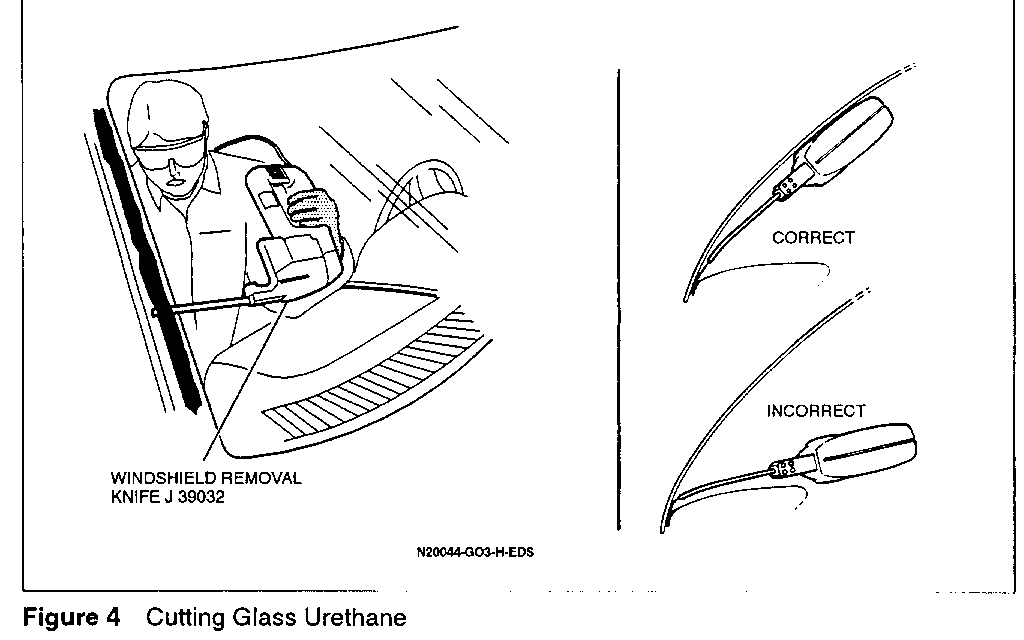
When replacing the windshield or back glass on the 1991 C Model, it will be necessary to cut the urethane adhesive from inside the vehicle. Since there is not adequate room inside the vehicle to use a standard urethane cutting cold knife, a Windshield Removal Knife J-39032 or equivalent should be used. Complete replacement of the adhesive is necessary, which is also known as the "extended method".
CAUTION:
WHEN REPLACING A WINDSHIELD OR BACK GLASS, URETHANE ADHESIVE GM PART NUMBER 12345633 OR EQUIVALENT MUST BE USED TO MAINTAIN ORIGINAL INSTALLATION INTEGRITY. FAILURE TO USE URETHANE ADHESIVE WILL RESULT IN POOR RETENTION OF THE GLASS WITH RESULTING PERSONAL INJURY. TO PREVENT PERSONAL INJURY, GLOVES AND SAFETY GLASSES SHOULD BE WORN WHEN REMOVING GLASS.
ADHESIVE SERVICE KIT
Adhesive Kit GM part number 12345633 (urethane adhesive) or equivalent contains some of the items needed to replace any adhesive installed glass using the extended method. Additional items required:
Solvent for cleaning edge of glass (preferably alcohol)
Pneumatic type caulking gun
Commercial type utility knife
Windshield Removal Knife J-39032, or equivalent
WINDSHIELD AND BACKGLASS REPLACEMENT
Windshield Preparation
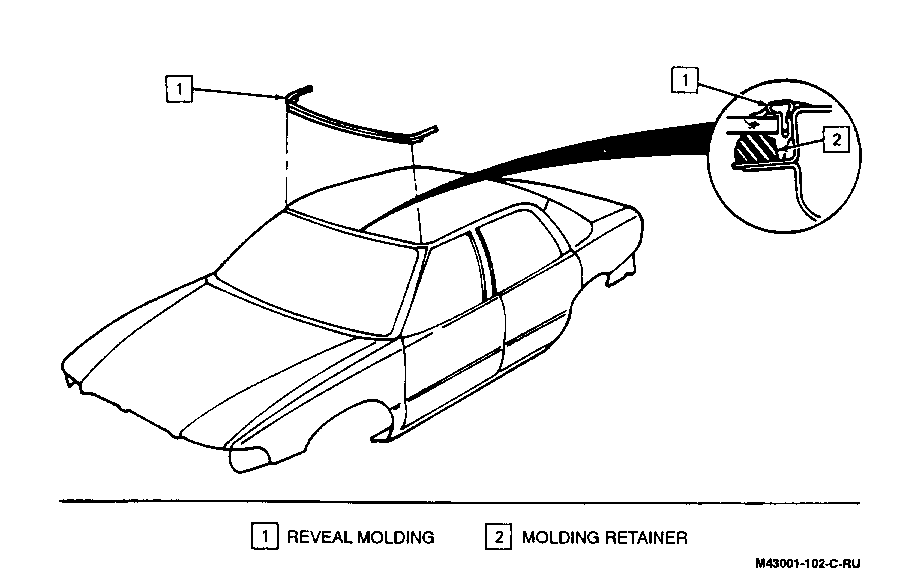
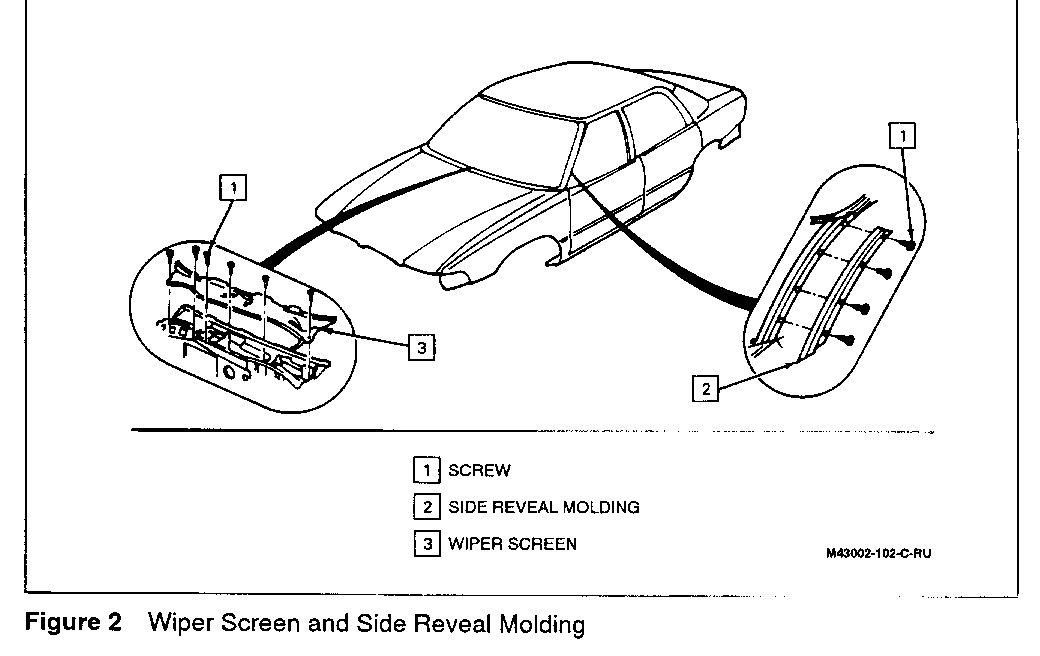
Remove or Disconnect 1. Wiper arm and blades. 2. Washer hose. 3. Cowl screen assembly. 4. Wiper down stops from cowl screen. 5. All reveal moldings from around windshield. 6. Front screws at drip rails. 7. Tape off painted areas. 8. Inside garnish moldings. 9. Rearview mirror. 10. Heated windshield connector (if equipped). 11. Protect upper I/P with cloth.
Back Glass Preparation
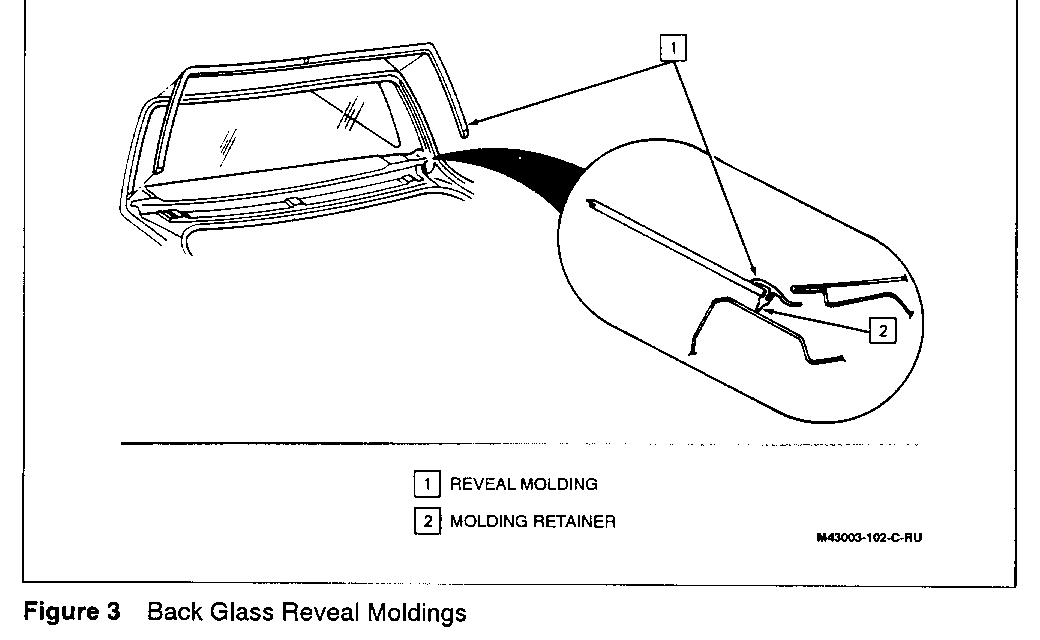
Remove or Disconnect 1. Decklid (Oldsmobile only) 2. Reveal molding. 3. Seat cushion 4. Seatback. 5. Upper quarter trim panels. 6. Rear defogger connectors. 7. Center high mount stop lamp.
Glass Cut-Out
Using Windshield Removal Knife J 39032, carefully cut urethane around glass. Follow the instructions that come with the tool kit and keep in mind the following important points:
- Keep blade and sheath clean.
- Install blade so that the flat side will ride against the glass.
- Select the proper blade/sheath and adjust so the blade will not hit the pinch weld on the outside of the car after it has cut through the urethane.
- Keep blade moving so it will not produce excess heat buildup.
- If reusing glass, be careful not to cut heated windshield wires.
- Allow for proper ventilation inside the vehicle and follow all safety information in the kit.
Cleaning and Preparation
1. Using a utility knife, trim excess urethane from pinch weld flange. It is not necessary that all traces of material be removed, but there should not be any mounds or loose pieces left.
2. Repair any areas on pinch weld flange nicked during glass removal using touch-up paint of the appropriate color. Do not get paint or any other contamination on remaining urethane base.
3. After touch-up paint is dry, apply a urethane bonding body primer to any painted metal that urethane will adhere to. Do not get primer or any other contamination on remaining urethane base.
IMPORTANT: It is important that urethane have either old urethane or a primer as a surface to adhere to. Urethane does not adhere very well to unprimed painted metal or glass.
Glass Installation
1. Apply suction cups to glass if necessary.
2. With the aid of a helper, position glass in opening.
3. Check relationship of glass to urethane on pinch-weld flange. Gaps in excess of 3mm (1/8") must be corrected by applying more adhesive than specified.
4. Apply a piece of masking tape over each edge of glass and adjacent body pillar and roof. Slit tape vertically at edge of glass. During installation, tape on glass can be aligned with tape on body to guide glass into desired position. Remove glass.
5. Clean surface of glass to which adhesive will be applied (around edge of inside surface ) by wiping with a clean, alcohol dampened cloth. Allow to air dry.
6. (windshield only) Apply sound insulator to bottom of glass just above etched line in glass. If line is not visible, apply insulator strip 62mm (2 7/16") from bottom edge of glass. NOTICE: Failure to install acoustic strip could cause windshield breakage.
7. (windshield only) Align centering marks on windshield and upper reveal molding retainer and press onto edge of glass.
8. Install cowl screen assembly with wiper down stops removed.
IMPORTANT
Two glass primers are provided in the urethane adhesive kit, a clear and a black primer. The first and most important primer is the clear. Once applied, it is important to wipe off excess immediately. This primer dries almost instantly and will stain the viewing area of the glass, so be sure to apply evenly and keep away from viewing area. Do not apply clear primer over black primer. The black primer is always applied after the clear primer.
9. Using a clean cloth, apply clear primer around all edges of glass and 15mm wide on inner surface, then immediately wipe off from where it was just applied.
10. Using a small brush, apply black primer from the adhesive kit in the same locations as clear primer.
11. Install reveal molding retainers to glass.
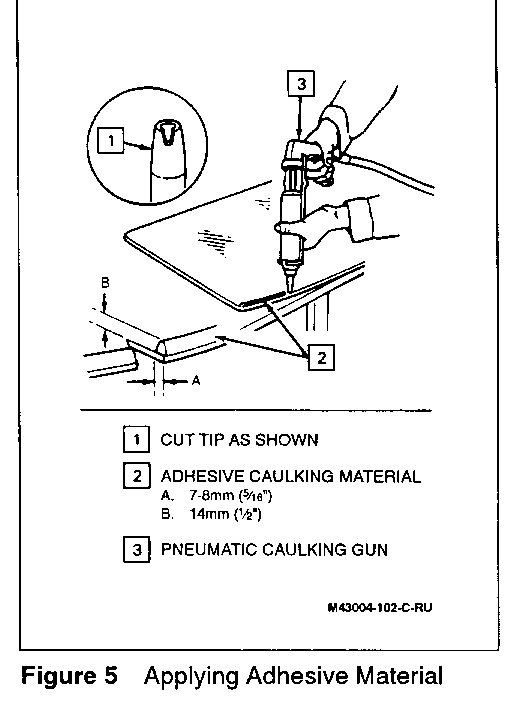
12. Apply a smooth continuous bead of urethane around inside surface of glass, where it was previously primed. Stay close to the edge and refer to bead dimensions in Figure 5. Bottom bead on windshield is applied just below etched line in glass. If etched line is not visible, apply urethane 54mm (2 1/8") from bottom edge of glass, just below acoustic strip.
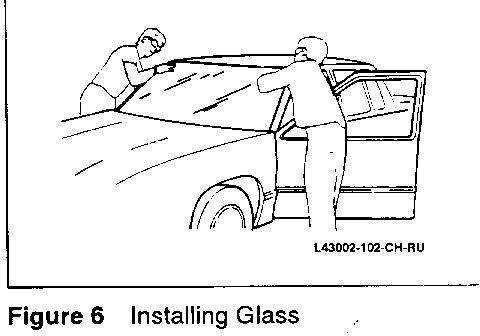
13. With aid of a helper, lift glass into window opening. On back window installations it will be necessary to use suction cups to position glass in opening. Windshield glass can be positioned without aid of carrying devices. As shown in Figure 6, carry glass with one hand on inside of glass and one hand on outside. At window opening, put glass in horizontal position. While one man holds glass in this position, second man can reach one arm around body pillar and support glass while other man assumes same position.
14. With glass centered in opening, use tape guides to carefully place glass in proper position.
15. Press glass firmly to "wet-out" and set adhesive. Use care to avoid excessive squeeze out which would cause an appearance problem. Using small disposable brush or flat-blade tool, paddle material around edge of glass to ensure watertight seal. If necessary, paddle additional material to fill voids in seal.
16. Watertest car at once using soft spray Use warm or hot water if available. Do not direct hard stream of water at fresh adhesive material. If any leaks are found, paddle in extra adhesive at leak point using a small disposable brush or flat-blade tool. Water applied on top of urethane adhesive, either during watertest or as a separate operation, will speed up the cure of the urethane.
Completion - Windshield
1. Install all reveal moldings.
2. Tape glass and moldings to hold position.
3. Install wiper down stops to cowl screen assembly.
4. Install windshield wipers and blades.
5. Vehicle must remain at normal room temperature for six hours to complete proper curing of adhesive.
6. After curing is complete, clean up tape and excess sealant.
Completion - Backglass
Install or Connect 1. Install all reveal moldings.
2. Tape glass and moldings to hold position.
3. Center high mount stop lamp.
4. Rear defogger connectors.
5. Upper quarter trim panels.
6. Seatback.
7. Seat cushion.
8. Decklid (Oldsmobile only).
9. Vehicle must remain at normal room temperature for six hours to properly cure the urethane adhesive.
10. After curing is complete, clean up tape and excess sealant.
General Motors bulletins are intended for use by professional technicians, not a "do-it-yourselfer". They are written to inform those technicians of conditions that may occur on some vehicles, or to provide information that could assist in the proper service of a vehicle. Properly trained technicians have the equipment, tools, safety instructions and know-how to do a job properly and safely. If a condition is described, do not assume that the bulletin applies to your vehicle, or that your vehicle will have that condition. See a General Motors dealer servicing your brand of General Motors vehicle for information on whether your vehicle may benefit from the information.
