For 1990-2009 cars only
Removal Procedure
Tools Required
| • | J 28467-A Engine Support Fixture |
| • | J 28467-90 Engine Support Adapter |
| • | J 36462 Engine Support Adapter Leg Set |
- Disconnect the battery ground (negative) cable. Refer to Battery Negative Cable Disconnection and Connection .
- Remove the throttle body air inlet duct. Refer to Throttle Body Assembly Replacement in Engine Controls.
- Install the Engine Support Fixture. Refer to Engine Support Fixture in Engine Mechanical.
- Remove the engine mount struts. Refer to Engine Mount Strut Replacement and Engine Mount Strut Replacement .
- Disconnect the wiring harness connectors from the transaxle.
- Remove the automatic transaxle range selector cable from the PNP switch. Refer to Range Selector Lever Cable Replacement .
- Remove the automatic transaxle range selector cable bracket with cable from transaxle. Refer to Range Selector Lever Cable Bracket Replacement .
- Remove the PNP switch. Refer to Park/Neutral Position Switch Replacement .
- Remove the fluid filler tube. Refer to Transmission Fluid Filler Tube Replacement .
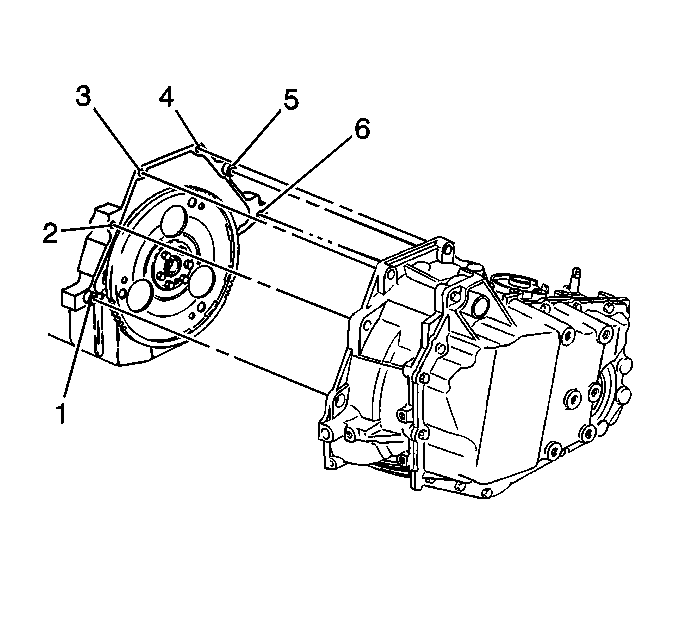
- Remove the upper transaxle bolts (3, 4 and 5) and stud (2).
- Remove the wiring harness grounds.
- Raise and support the vehicle.
- Remove the front tires and wheels. Refer to Tire and Wheel Removal and Installation in Tires and Wheels.
- Remove the engine splash shields. Refer to Engine Splash Shield Replacement in Body Front End.
- Remove both tie rod ends from the steering knuckles. Refer to Steering Knuckle Replacement .
- Remove the power steering gear to frame retaining bolts. Refer to Steering Gear Replacement in Power Steering System.
- Use wire to secure the power steering gear to the vehicle. Remove the power steering gear from the frame. Refer to Steering Gear Replacement in Power Steering System.
- Remove the power steering cooler line clamps from the frame.
- Remove the engine mount lower nuts. Refer to Engine Mount Replacement .
- Remove the lower ball joints from the lower control arms. Refer to Lower Control Arm Replacement .
- Remove the torque converter cover. Refer to Torque Converter Cover Replacement .
- Remove the starter motor. Refer to Starter Motor Replacement .
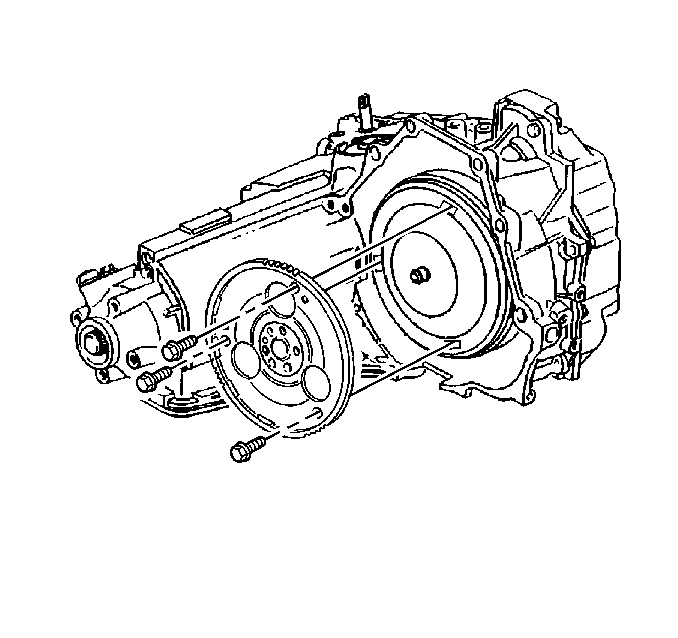
- Remove the torque converter bolts.
- Drain the transaxle fluid.
- Remove the transaxle oil cooler hoses from the transaxle. Refer to Automatic Transmission Oil Cooler Hose Replacement .
- Disconnect the drive axles from the transaxle. Refer to Wheel Drive Shaft Replacement .
- Secure the drive axles to the steering knuckle and struts.
- Disconnect the wheel speed sensors wiring harness connectors. Refer to Wheel Speed Sensor Jumper Harness Replacement in ABS.
- Disconnect the vehicle speed sensor wiring harness connector. Refer to Vehicle Speed Sensor Replacement .
- Use the transaxle table to support the transaxle and frame.
- Remove the transaxle brace. Refer to Transmission Brace Replacement .
- Remove the lower transaxle bolt (6) and stud (1).
- Remove the frame to body bolts. Refer to Frame Removal in Frame and Underbody.
- Lower the transaxle and frame from the vehicle.
- Remove the transaxle from the frame to the bench. Refer to the Transmission/Transaxle/Transfer Case Unit Repair Manual.
- Refer to Transmission/Transaxle/Transfer Case Unit Repair Manual for the inspection procedure and for the overhaul procedure.
- Flush the transmission cooler lines whenever the transaxle is removed for overhaul or whenever the torque converter pump or the case is replaced. Refer to Transmission Fluid Cooler Flushing and Flow Test .


Installation Procedure
Tools Required
| • | J 28467-A Engine Support Fixture |
| • | J 28467-90 Engine Support Adapter |
| • | J 36462 Engine Support Adapter Leg Set |
- Install the transaxle to the frame on the transaxle table.
- Raise the transaxle and frame assembly to the vehicle.
- Install the frame to body bolts. Refer to Frame Removal in Frame and Underbody.
- Install the lower transaxle bolt (6) and stud (1).
- Install the transaxle brace. Refer to Transmission Brace Replacement .
- Remove the transaxle table.
- Connect the vehicle speed sensor wiring harness connector. Refer to Vehicle Speed Sensor Replacement .
- Connect the wheel speed sensors wiring harness connectors. Refer to Wheel Speed Sensor Jumper Harness Replacement in ABS.
- Connect the drive axles to the transaxle. Refer to Wheel Drive Shaft Replacement .
- Install the transaxle oil cooler hoses to the transaxle. Refer to Automatic Transmission Oil Cooler Hose Replacement .
- Install the torque converter bolts.
- Install the starter motor. Refer to Starter Motor Replacement with 3.1L and Starter Motor Replacement with 3.8L.
- Install the torque converter cover. Refer to Torque Converter Cover Replacement .
- Install the lower ball joints to the lower control arms. Refer to Lower Control Arm Replacement .
- Install the engine mount lower nuts. Refer to Engine Mount Replacement .
- Install the power steering cooler line clamps to the frame.
- Install the power steering gear to the frame. Refer to Steering Gear Replacement in Power Steering System.
- Install the power steering gear to frame retaining bolts. Refer to Steering Gear Replacement in Power Steering System.
- Install both the tie rod ends to the steering knuckles. Refer to Steering Knuckle Replacement .
- Install the engine splash shields. Refer to Engine Splash Shield Replacement in Body Front End.
- Install the front tires and wheels. Refer to Tire and Wheel Removal and Installation .
- Install the fluid filler tube. Refer to Transmission Fluid Filler Tube Replacement .
- Remove the vehicle support.
- Lower the vehicle.
- Install the upper transaxle bolts (3, 4 and 5) and stud (2). and install the wiring harness grounds.
- Install the PNP switch. Refer to Park/Neutral Position Switch Replacement .
- Install the automatic transaxle range selector cable bracket with cable to transaxle. Refer to Range Selector Lever Cable Bracket Replacement .
- Install the automatic transaxle range selector cable to the PNP switch. Refer to Range Selector Lever Cable Replacement .
- Install the wiring harness connectors to the transaxle.
- Install the engine mount struts. Refer to Engine Mount Strut Replacement and Engine Mount Strut Replacement .
- Remove the Engine Support Fixture. Refer to Engine Support Fixture in Engine Mechanical.
- Install the throttle body air inlet duct. Refer to Throttle Body Assembly Replacement in Engine Controls.
- Connect the battery ground (negative) cable. Refer to Battery Negative Cable Disconnection and Connection
- Adjust the toe-in, if required. Refer to Wheel Alignment.
- Adjust the fluid level.
- Use the J 35944-A or equivalent to flush the following components whenever the transaxle is removed for overhaul or whenever the torque converter pump or the case is replaced:
- Inspect for proper completion of the repairs.
- Inspect for fluid leaks.
Notice: Refer to Fastener Notice in the Preface section.

Tighten
Tighten the lower transaxle to engine and engine to transaxle bolts to 75 N·m
(55 lb ft).

Tighten
Tighten the torque converter bolts to 63 N·m (46 lb ft).

Tighten
Tighten the upper transaxle bolts and stud to 75 N·m (55 lb ft).
Notice: Do NOT overfill the transaxle. The overfilling of the transaxle causes foaming, loss of fluid, shift complaints, and possible damage to the transaxle.
| • | Flush the transaxle oil cooler(s). |
| • | Flush the hoses. |
| • | Flush the pipes. |
| • | Refer to Transmission Fluid Cooler Flushing . |
