Removal Procedure
Tools Required
J 29810 Stub Shaft Seal Protector
- Remove the rack and pinion steering assembly from the vehicle.
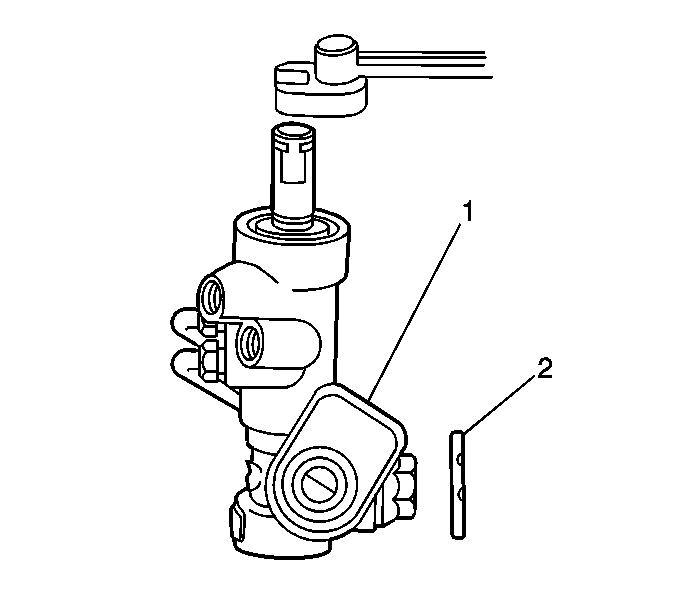
- Remove the adjuster plug lock nut (2) from the adjuster plug (1).
- Remove the adjuster plug (1) from the rack and pinion housing.
- Remove the adjuster spring and rack bearing with the O-ring seal attached.
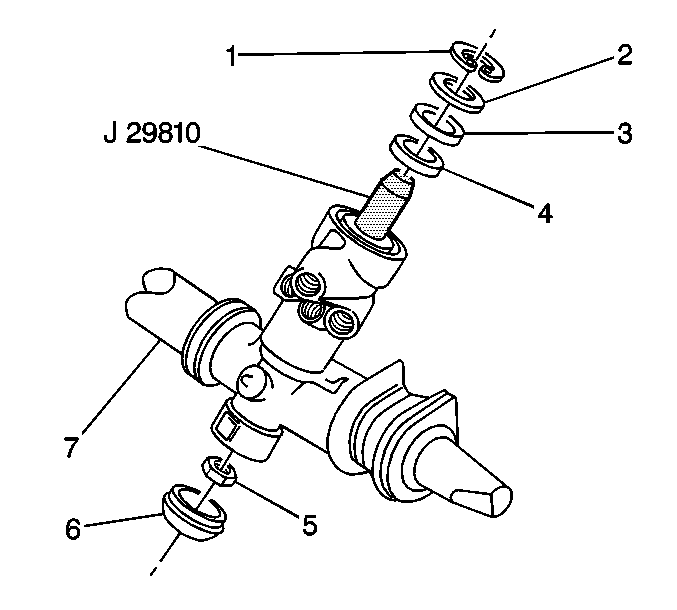
- Remove the retaining ring (1) from the top of the rack and pinion housing (7).
- Remove the dust cover (6) from the lower part of the valve housing (7).
- INSERT A NOTICE: If pitman shaft is not held, damage to the pinion teeth will occur. Hold the pitman shaft stationary in order to remove the hex lock nut (5) from the pinion.
- Using a press, apply pressure to the threaded end of the pinion until flush with the pinion bearing assembly.
- Remove the following components from the valve end of the rack and pinion housing (7):


Important: Do not remove the pinion and valve assembly.
| • | The pitman shaft seal (3) |
| • | The pitman shaft bearing annulus assembly (4) |
Installation Procedure
- Install the pinion and valve assembly until the assembly bottoms in the rack and pinion housing (7).
- INSERT A NOTICE: If pitman shaft is not held, damage to the pinion teeth will occur. Holding the pitman shaft stationary, install the hex lock nut (5) to the threaded end of the pinion.
- Install the dust cover (6) to the rack and pinion housing (7).
- Install the pitman shaft bearing annulus assembly (4) onto the pitman shaft and slide into the rack and pinion housing (7).
- Install J 29810 onto the pitman shaft.
- Install the pitman shaft seal (3) over J 29810 and into the rack and pinion housing (7).
- Install the retaining ring (1) into the groove in the rack and pinion housing (7).
- Coat the following components with a lithium base grease and install into the rack and pinion housing:
- Center the rack in the rack and pinion housing.
- Turn the adjuster plug (1) clockwise until the plug bottoms in the housing, then back off 35-45 degrees.
- Adjust the preload torque on the pinion to specifications. Refer to Fastener Tightening Specifications .
- Install the adjuster plug lock nut (2) to the adjuster plug (1).
- Hold the adjuster plug (1) stationary and tighten the adjuster plug lock nut (2).

Notice: Use the correct fastener in the correct location. Replacement fasteners must be the correct part number for that application. Fasteners requiring replacement or fasteners requiring the use of thread locking compound or sealant are identified in the service procedure. Do not use paints, lubricants, or corrosion inhibitors on fasteners or fastener joint surfaces unless specified. These coatings affect fastener torque and joint clamping force and may damage the fastener. Use the correct tightening sequence and specifications when installing fasteners in order to avoid damage to parts and systems.
Tighten
Tighten the hex lock nut to 35N·m (26 lb ft).

| • | The rack bearing with the O-ring seal attached |
| • | The adjuster spring |
| • | The adjuster plug (1) |
Tighten
Tighten the adjuster plug lock nut to 70 N·m
(50 lb ft).
