Door Replacement Front
Removal Procedure
- Raise the window to the full up position.
- Remove the door trim panel. Refer to Door Trim Panel Replacement .
- Remove enough door water deflector in order to access the door wire harness. Refer to Door Water Deflector Replacement .
- Disconnect the wire harness from all of components in the door.
- Remove the rubber conduit from the door.
- Remove the wire harness from the door through the conduit access hole.
- Remove the door hold-open bolt.
- Support the door.
- Mark the position of the door hinge to the hinge pillar.
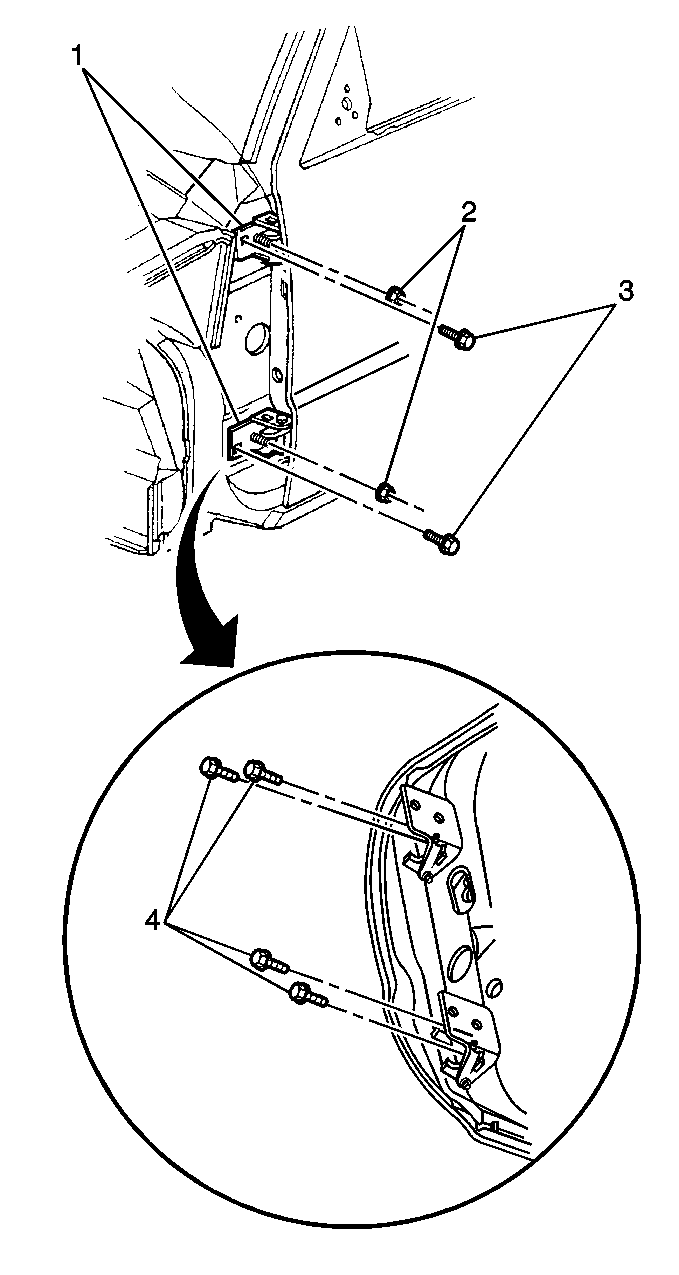
- Remove the lower hinge bolt (3) and nut (2) from the hinge pillar (1).
- Remove the upper hinge bolt (3) and nut (2) from the hinge pillar (1).
- Remove the door from the car body.
- Mark the position of the door hinge to the door.
- Remove the lower hinge bolts (4) from the door.
- Remove the upper hinge bolts (4) from the door.

Installation Procedure
- Snug the upper hinge bolts so that the door can be moved.
- Snug the lower hinge bolts so that the door can be moved.
- Attach the door to the car body.
- Snug the upper hinge bolt and nut so that the door can be moved.
- Snug the lower hinge bolt and nut so that the door can be moved.
- Carefully close the door.
- Adjust the door for proper alignment.
- Open the door slowly.
- Install the upper hinge bolt (3) and nut (2) to the hinge pillar (1).
- Install the lower hinge bolt (3) and nut (2) to the hinge pillar (1).
- Install the upper hinge bolts (4) to the door.
- Install the lower hinge bolts (4) to the door.
- Inspect the door for proper alignment. If the door is not aligned properly, repeat all of the above steps.
- When the door is properly aligned, install the door detent-to-hinge pillar bolt.
- Install the door wire harness through the conduit access hole.
- Install the rubber conduit to the door.
- Connect the door wire harness.
- Install the door water deflector. Refer to Door Water Deflector Replacement .
- Install the door trim panel. Refer to Door Trim Panel Replacement .
Notice: Door hinge parts could cause damage to other door components if not replaced with the same part or equivalent. Do not use replacement parts of lesser quality or substitute design. Specified torque values must be used during assembly in order to ensure proper retention.

Notice: Use the correct fastener in the correct location. Replacement fasteners must be the correct part number for that application. Fasteners requiring replacement or fasteners requiring the use of thread locking compound or sealant are identified in the service procedure. Do not use paints, lubricants, or corrosion inhibitors on fasteners or fastener joint surfaces unless specified. These coatings affect fastener torque and joint clamping force and may damage the fastener. Use the correct tightening sequence and specifications when installing fasteners in order to avoid damage to parts and systems.
Tighten
| • | Tighten the bolt to 24 N·m (18 lb ft). |
| • | Tighten the nut to 24 N·m (18 lb ft). |
Tighten
| • | Tighten the bolt to 24 N·m (18 lb ft). |
| • | Tighten the nut to 24 N·m (18 lb ft). |
Tighten
Tighten the bolt to 22 N·m (16 lb ft).
Tighten
Tighten the bolt to 22 N·m (16 lb ft).
Tighten
Tighten the bolt to 9 N·m (80 lb in).
Door Replacement Rear
Removal Procedure
- Raise the window to the full up position.
- Remove the door trim panel. Refer to Door Trim Panel Replacement .
- Remove enough door water deflector in order to access the door wire harness. Refer to Door Water Deflector Replacement .
- Disconnect the wire harness from all of components in the door.
- Remove the rubber conduit from the door.
- Remove the wire harness from the door through the conduit access hole.
- Remove the door hold-open bolt.
- Support the door.
- Mark the position of the door hinge to the hinge pillar.
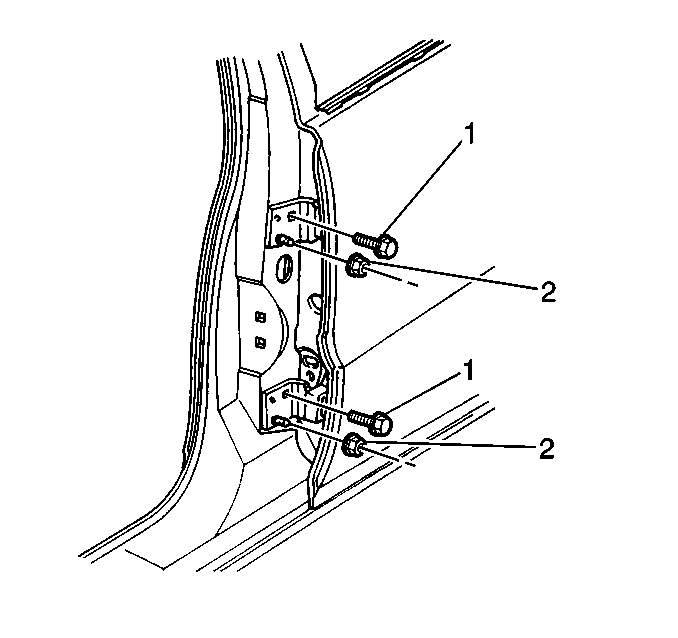
- Remove the lower hinge bolt (1) and nut (2) from the hinge pillar.
- Remove the upper hinge bolt (1) and nut (2) from the hinge pillar.
- Remove the door from the car body.
- Mark the position of the door hinge to the door.
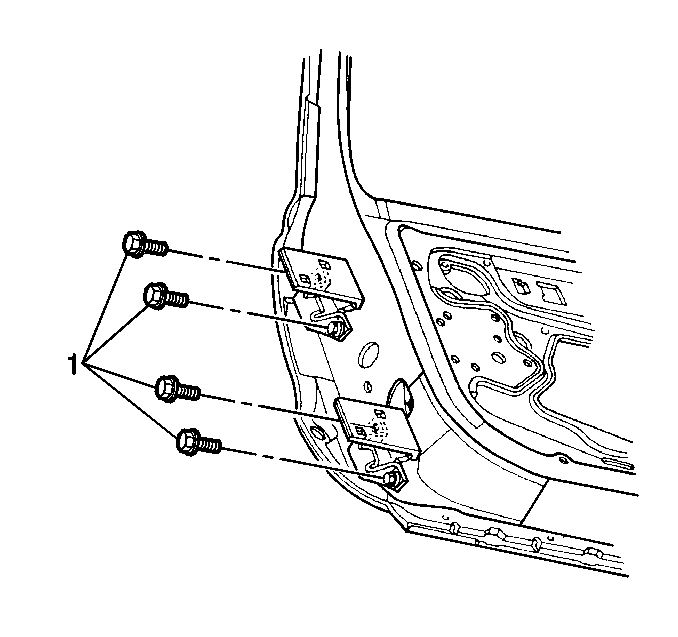
- Remove the lower hinge bolts (1) from the door.
- Remove the upper hinge bolts (1) from the door.


Installation Procedure
- Snug the upper hinge bolts so that the door can be moved.
- Snug the lower hinge bolts so that the door can be moved.
- Attach the door to the car body.
- Snug the upper hinge bolt and nut so that the door can be moved.
- Snug the lower hinge bolt and nut so that the door can be moved.
- Carefully close the door.
- Adjust the door for proper alignment.
- Open the door slowly.
- Install the upper hinge bolt (1) and nut (2) to the hinge pillar.
- Install the lower hinge bolt (1) and nut (2) to the hinge pillar.
- Install the upper hinge bolts (1) to the door.
- Install the lower hinge bolts (1) to the door.
- Inspect the door for proper alignment. If the door is not aligned properly, repeat this procedure from the beginning.
- When the door is properly aligned, install the door detent-to-hinge pillar bolt.
- Install the door wire harness through the conduit access hole.
- Install the rubber conduit to the door.
- Connect the door wire harness.
- Install the door water deflector. Refer to Door Water Deflector Replacement .
- Install the door trim panel. Refer to Door Trim Panel Replacement .
Notice: Door hinge parts could cause damage to other door components if not replaced with the same part or equivalent. Do not use replacement parts of lesser quality or substitute design. Specified torque values must be used during assembly in order to ensure proper retention.

Notice: Use the correct fastener in the correct location. Replacement fasteners must be the correct part number for that application. Fasteners requiring replacement or fasteners requiring the use of thread locking compound or sealant are identified in the service procedure. Do not use paints, lubricants, or corrosion inhibitors on fasteners or fastener joint surfaces unless specified. These coatings affect fastener torque and joint clamping force and may damage the fastener. Use the correct tightening sequence and specifications when installing fasteners in order to avoid damage to parts and systems.
Tighten
| • | Tighten the bolt to 24 N·m (18 lb ft). |
| • | Tighten the nut to 24 N·m (18 lb ft). |
Tighten
| • | Tighten the bolt to 24 N·m (18 lb ft). |
| • | Tighten the nut to 24 N·m (18 lb ft). |

Tighten
Tighten the bolt to 22 N·m (16 lb ft).
Tighten
Tighten the bolt to 22 N·m (16 lb ft).
Tighten
Tighten the bolt to 9 N·m (80 lb in).
