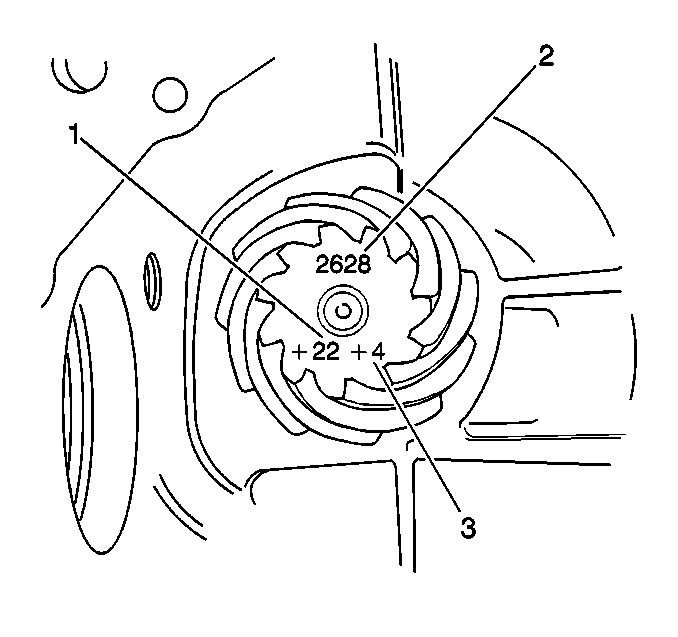
Important: When replacing the differential ring and pinion set, it is important
to note that the replacement drive pinion gear will most likely contain markings
on the gear face. These markings indicate adjustments that need to be made
to the shim thickness as a result of the production tolerances of the gear.
The differential drive pinion gear face contains the following 3 engraved
values:
• The CHECK VALUE (1). The check value shows in the hundredths of
a millimeter + 22 = 0.22 mm (0.008 in)
how deep the drive pinion should be installed relative to the drive pinion
gear zero line. Compare this value (+ 0.22 mm (+ 0.008 in)
of the replacement pinion gear with the value of the original pinion gear,
i.e. + 0.08 mm (+ 0.003 in). Adjust the pinion
shim accordingly, which in this case would result in adding 0.13 mm
(0.005 in) to the drive pinion shim. Now perform a tooth contact pattern
test. Refer to
General Information
. • The PAIRING VALUE (2) for the drive pinion and for the differential
ring gear. This marking is stamped on both the ring gear and on the pinion
gear identifying the pairing as a matched gearset. • The UNDERLINED VALUE (3). The underlined value does not concern
service.
Establishing the differential drive pinion gear depth is initiated by reassembling the differential with the original pinion gear shim that was previously installed and by performing a pattern test. Adjust shim thickness as necessary according to the results of the contact pattern test. Only reuse the shim if it is intact and if it is undamaged. Measure the thickness of the shim if the shim is damaged. Replace the damaged shim with a new shim of the corresponding thickness. Perform the differential drive pinion gear-to-differential drive pinion gear backlash check once the assembly is assembled with the original thickness of the shim. Refer to Backlash Inspection and Adjustment .
