The cause of most external leaks generally can be located and repaired with the transmission in the vehicle.
Methods for Locating Leak
- Verify leaking fluid is transmission fluid.
- Clean the suspected leak area.
- Operate the vehicle for at least 24 km (15 mi) or until normal operating temperatures are reached.
- Park the vehicle over clean paper or cardboard.
- Turn OFF the engine.
- Inspect for fluid spots on paper.
- Trace the source of the leak from the spot on the paper.
- Make necessary repairs.
Powder Method
- Clean the suspected area with a suitable solvent.
- Apply the aerosol type powder (foot powder) to the suspected leak area.
- Operate the vehicle for at least 24 km (15 mi) or until normal operating temperatures are reached.
- Turn OFF the engine.
- Inspect the suspected leak area.
- Trace the leak path through the powder to the source of the leak.
- Make necessary repairs.
Important: Do not spray hot engine parts with aerosol during the following step. The aerosol may ignite.
Dye And Black Light Method
A fluid dye and a black light kit is available from various tool manufacturers.
- Follow manufacturer recommendations for amount of dye to use.
- Operate the vehicle for at least 24 km (15 mi) or until normal operating temperatures are reached after dye has been added.
- Detect the source of the leak with the black light.
- Make necessary repairs.
Possible Points of Fluid Leaks
Torque Converter Seal
- Inspect for pitting or corrosion on torque converter (1) seal surface.
- Inspect for loose seal attaching screws.
- Inspect the seal for cuts or damage.
- Refer to Torque Converter Replacement for seal replacement.

Leak At Bell Housing Seal
- Inspect for corrosion or debris between the bell housing and case.
- Inspect for loose bell housing mounting screws.
- Inspect for damaged bell housing seal.
- Refer to the Transmission Unit Repair Manual for seal replacement.
Leak At Front Case Oil Pan Gasket
- Inspect for incorrectly tightened oil pan bolts.
- Inspect for bent flange on oil pan.
- Inspect for corrosion or debris between oil pan and housing.
- Refer to Changing Fluid and Oil Filter for gasket replacement.
Leak At Oil Pressure Test Hole Plug
- Inspect for loose test hole plug.
- Inspect for damaged threads on plug or case.
Notice: Use the correct fastener in the correct location. Replacement fasteners must be the correct part number for that application. Fasteners requiring replacement or fasteners requiring the use of thread locking compound or sealant are identified in the service procedure. Do not use paints, lubricants, or corrosion inhibitors on fasteners or fastener joint surfaces unless specified. These coatings affect fastener torque and joint clamping force and may damage the fastener. Use the correct tightening sequence and specifications when installing fasteners in order to avoid damage to parts and systems.
Tighten
Tighten the test hole plug to 12 N·m (106 lb in).
Leak At Front Case-To-Main Case Gasket
- Inspect for corrosion or debris between the cases.
- Inspect for loose attaching bolts.
- Inspect for damaged gasket.
- Refer to the Transmission Unit Repair Manual for gasket replacement.
Leak At Case Extension Gasket
- Inspect for corrosion or debris between case and case extension.
- Inspect for loose attaching bolts.
- Inspect for damaged gasket.
- Refer to Case Extension and Gasket Replacement for gasket replacement.
Leak At Transmission Speed Sensor Seal
- Inspect for loose transmission speed sensor bolt.
- Inspect for corrosion or debris on sealing surface.
- Inspect for damaged seal or sensor.
- Refer to Vehicle Speed Sensor for sensor and seal replacement.
Tighten
Tighten the transmission speed sensor bolt to 9 N·m (78 lb in).
Leak At Case Extension Seal
- Inspect for damaged drive flange sealing surface.
- Inspect for seal damaged.
- Inspect for worn output shaft bearing.
- Refer to Drive Flange and Seal Replacement for seal replacement.
Leak At Oil Pan Gasket
- Inspect for incorrectly tightened oil pan bolts.
- Inspect for bent flange on oil pan.
- Inspect for corrosion or debris between pan and housing.
- Refer to Changing Fluid and Oil Filter for gasket replacement.
Leak At Oil Pan Fill Plug Seal
- Inspect for incorrectly tightened plug.
- Inspect for damaged seal or sealing surfaces.
Tighten
Tighten the oil pan fill plug to 45 N·m (33 lb ft).
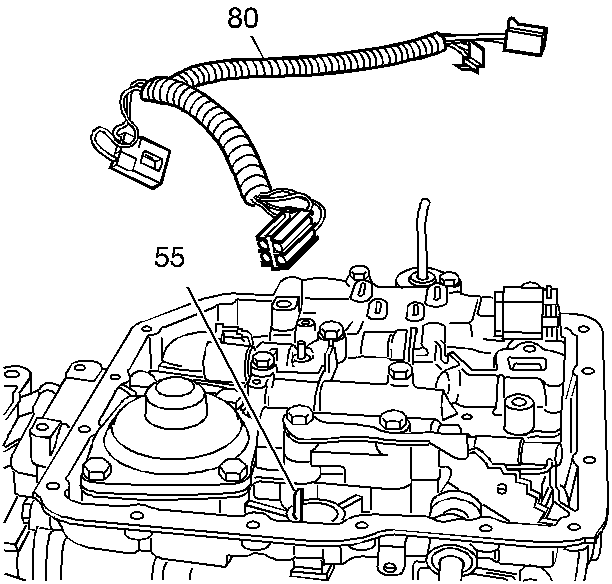
Leak At Control Valve Wiring Harness Seal
- Inspect for dirt or debris in housing bore (55).
- Inspect for damaged seal.
- Refer to Control Valve Body for seal replacement.

