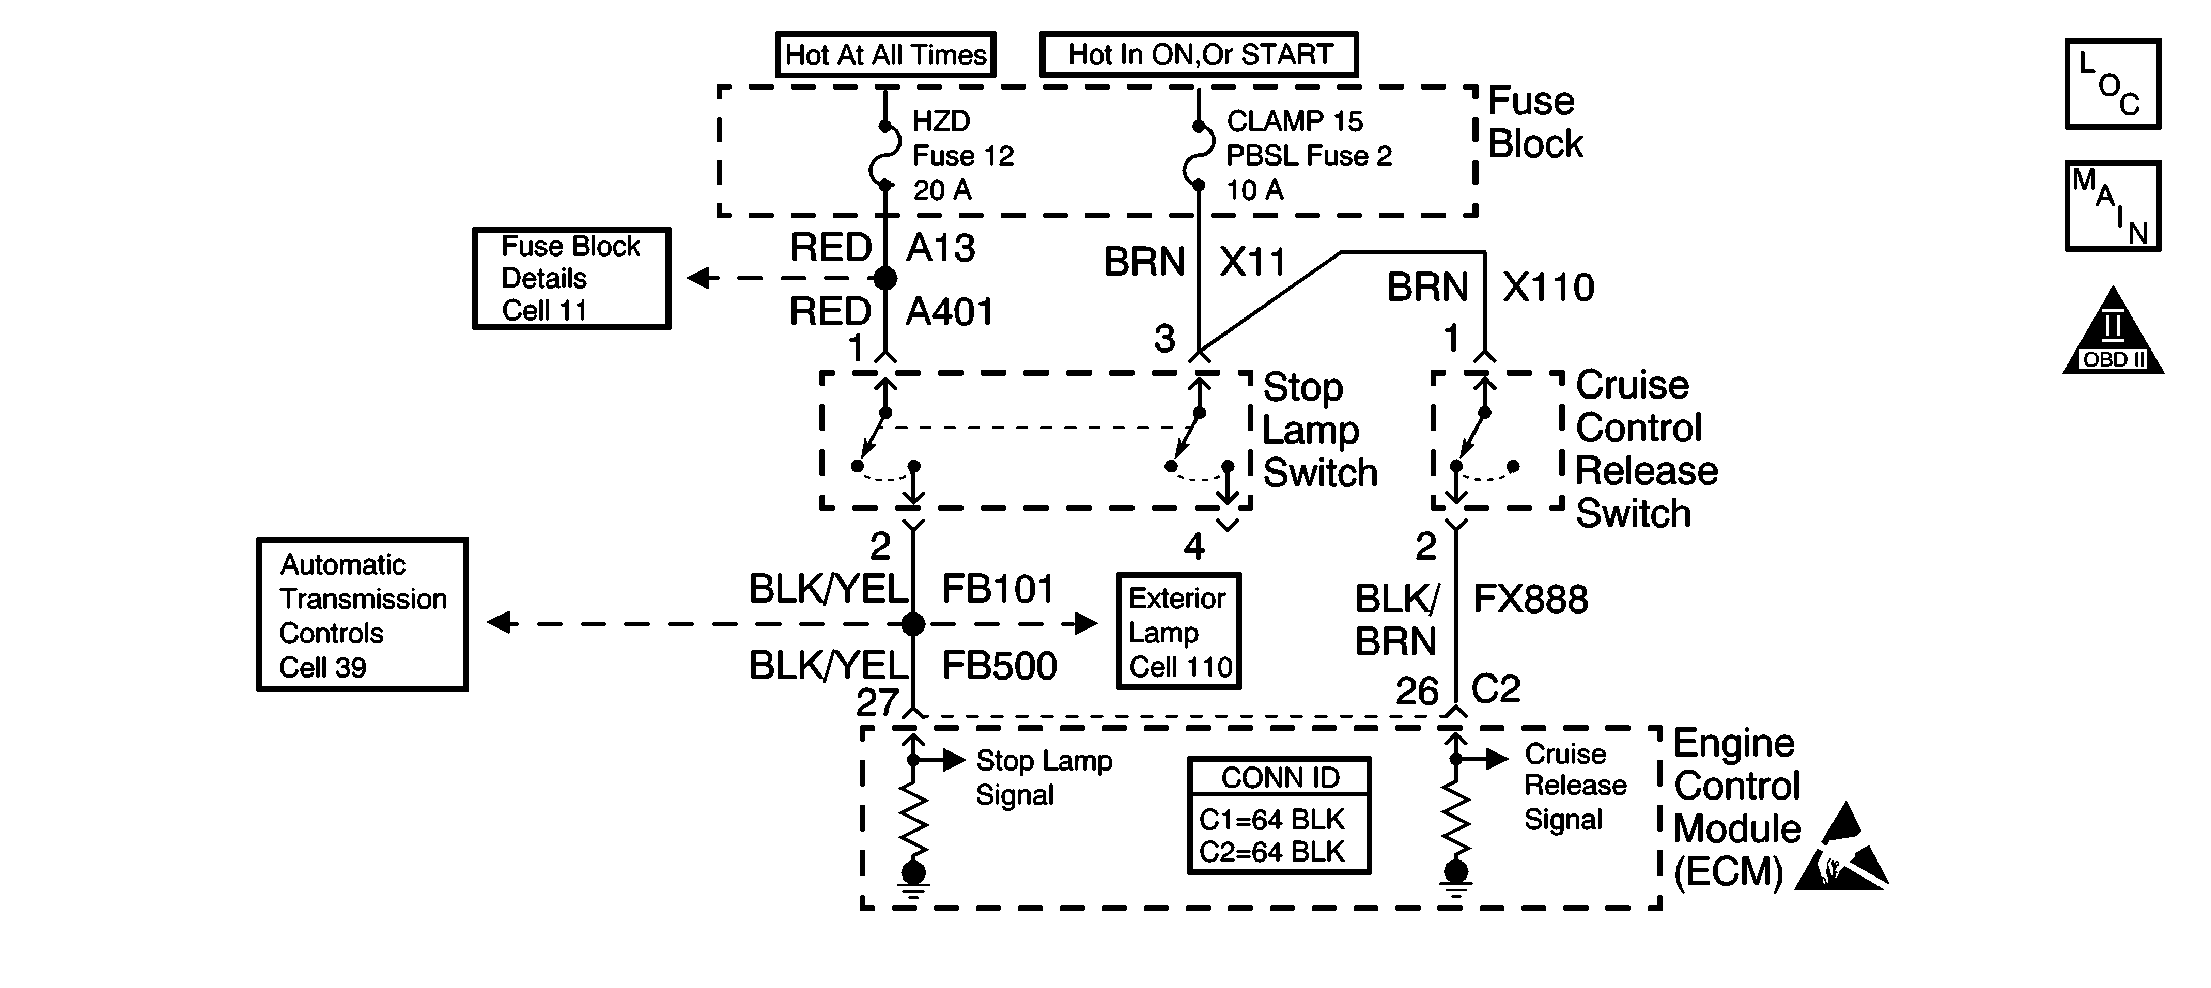
Circuit Description
The cruise control switch release is used to disable the cruise control whenever the brake is applied. The switch gets its power from the ignition circuit at the stoplamp switch. The engine control module ECM monitors the B+ voltage for the cruise control and stoplamp switch circuits.
Conditions for Setting the DTC
The cruise release signal does not match the stop lamp signal at least 20 times.
Conditions for Running
Ignition is ON.
Action Taken When the DTC Sets
The ECM will not illuminate the malfunction indicator lamp (MIL).
Conditions for Clearing the MIL/DTC
| • | The DTC clears after forty consecutive warm-up cycles in which there are no failures reported by this diagnostic or any other non-emission related diagnostic. |
| • | The ECM battery voltage is interrupted. |
| • | The scan tool clears the MIL/DTC. |
Diagnostic Aids
Notice: Using the J 35616-A Connector Test Adapter Kit will prevent damage to the harness connector terminals.
Use the J 35616 Connector Test Adapter Kit for any test that requires probing the ECM harness connector or a component harness connector.
Check for the following conditions:
| • | Poor connections at the ECM or at the component--Inspect the harness connectors for a poor terminal to wire connection. Refer to Engine Control Module Diagnosis , Checking Terminal Contact, for the proper procedure. |
| • | Damaged harness--Inspect the wiring harness for damage. If the harness appears to be OK, observe the scan tool while moving the related connectors and the wiring harnesses. A change in the display may help locate the fault. |
Refer to Symptoms for the Intermittents.
Step | Action | Values | Yes | No | ||||
|---|---|---|---|---|---|---|---|---|
1 | Did you perform the Powertrain On-Board Diagnostic (OBD) System Check? | -- | Go to Step 2 | |||||
2 |
Do both displays indicate the state of the brake pedal correctly? | -- | Go to Diagnostic Aids | Go to Step 3 | ||||
3 | Is the Cruise Release Brake Switch display incorrect? | -- | Go to Step 4 | Go to Step 8 | ||||
4 | Does the Cruise Release Brake Switch display always indicate Applied? | -- | Go to Step 5 | Go to Step 7 | ||||
5 |
Does the test lamp illuminate? | -- | Go to Step 6 | Go to Step 13 | ||||
6 |
Does the display indicate the state of the brake pedal as Released? | -- | Go to Step 15 | Go to Step 12 | ||||
7 |
Does the display indicate the state of the brake pedal as Applied? | -- | Go to Step 15 | Go to Step 14 | ||||
8 | Observe the exterior brake lights while depressing and releasing the brake pedal. Do the exterior brake lights operate normally? | -- | Go to Step 12 | Go to Step 9 | ||||
9 |
Are the exterior brake lights illuminated? | -- | Go to Step 14 | Go to Step 10 | ||||
10 | With a J 35616-200 unpowered test lamp connected to ground, probe the stop lamp switch power feed circuit pin 1. Does the test lamp illuminate? | -- | Go to Step 11 | Go to Step 13 | ||||
11 |
Does the display indicate the state of the brake pedal as Applied? | -- | Go to Step 16 | Go to Step 12 | ||||
12 |
Was a problem found and repaired? | -- | Go to Step 18 | Go to Step 17 | ||||
13 |
Is the action complete? | -- | Go to Step 18 | -- | ||||
14 | Repair the signal circuit shorted to B+. Refer to Wiring Repairs in Wiring Systems. Is the action complete? | -- | Go to Step 18 | -- | ||||
15 | Replace the cruise control release switch. Refer to Cruise Control Switch Replacement . Is the action complete? | -- | Go to Step 18 | -- | ||||
16 | Replace the stop lamp switch. Refer to stop lamp switch replacement in Body and Accessories. Is the action complete? | -- | Go to Step 18 | -- | ||||
17 |
Important:
Replace the ECM. Refer to Engine Control Module Replacement/Programming . Is the action complete? | -- | Go to Step 18 | -- | ||||
18 |
| -- | Go to Step 2 | Go to Step 19 | ||||
19 | Does the scan tool display any additional undiagnosed DTCs? | -- | Go to the applicable DTC table | System OK |
