Front Bumper Replacement DeVille
Removal Procedure
- Remove the screws that retain the wheelhouse extensions to the front bumper fascia.
- Remove the fasteners that retain the lower closeout/splash shield to the bumper fascia.
- Remove the horn harness, if equipped.
- Remove the fog lamps from the mounting brackets, if equipped.
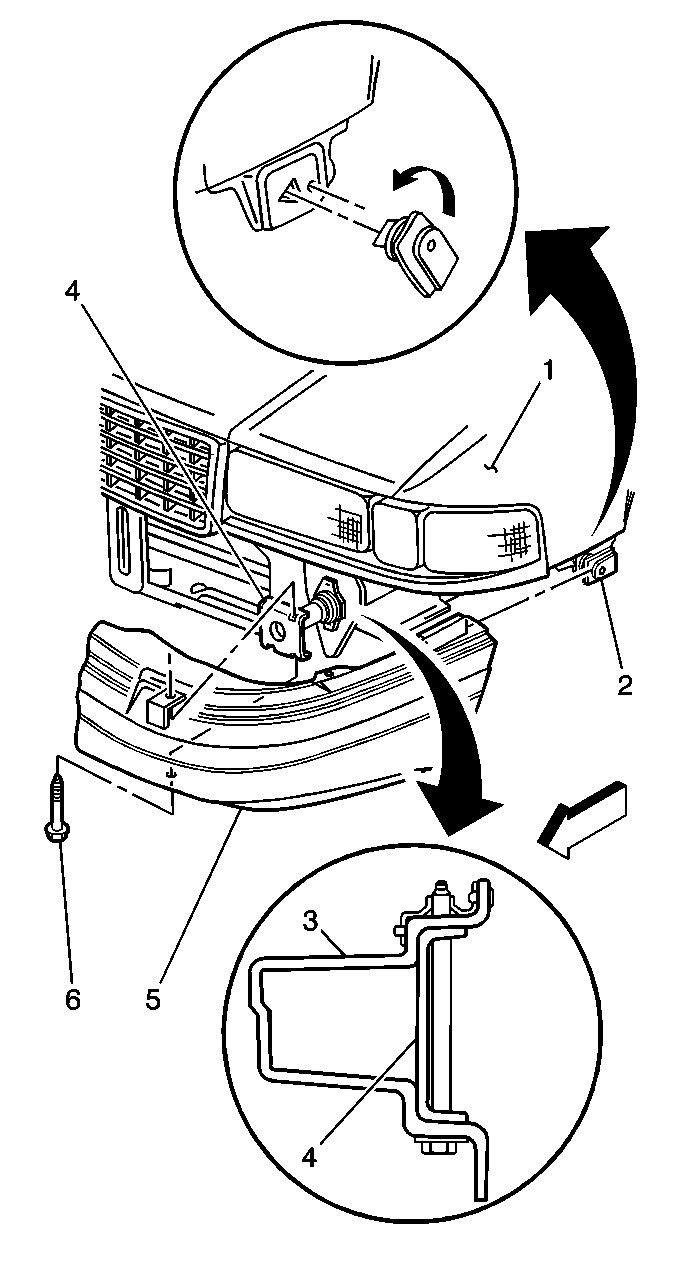
- Remove the bolts (6) that retain the bumper to the energy absorbers (4).
- Remove the front bumper by pulling the front bumper straight out from the vehicle.
- Remove the front license plate bracket, if equipped. Refer to Front License Plate Bracket Replacement .
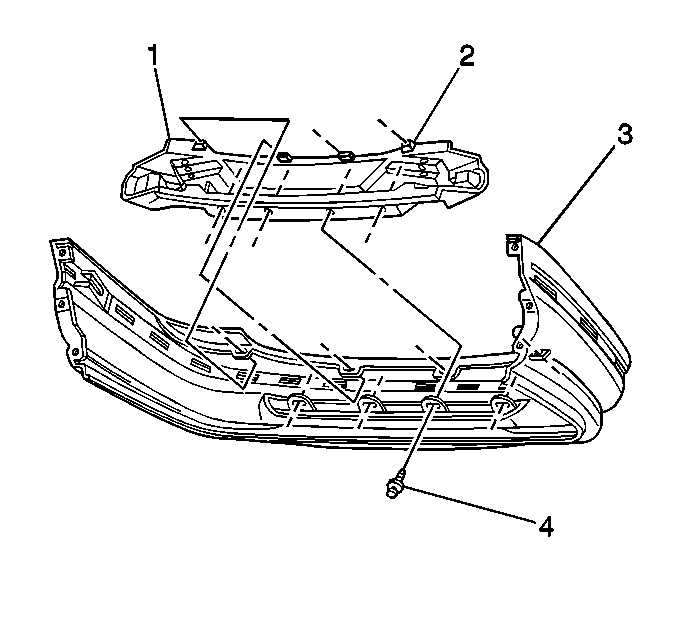
- Remove the fasteners (4) that retain the fascia (3) to the impact bar (1).
- Pry the fascia (3) from the impact bar upper snap tabs (2).
- Remove the impact bar (1).
- Remove the front bumper moldings. Refer to Molding Replacement - Front Bumper .


Installation Procedure
- Install the impact bar (1) to the fascia (3).
- Install the tabs (2) in order to retain the top of the fascia (3) to the impact bar (1).
- Install the push-in fasteners (4) in order to retain the fascia (3) to the impact bar (1).
- Install the front bumper moldings. Refer to Molding Replacement - Front Bumper .
- Install the front license bracket, if equipped. Refer to Front License Plate Bracket Replacement .
- With the aid of a helper, position the front bumper.
- Install the bolts (6) at the energy absorbers (4).
- Install the horn harness, if equipped.
- Install the fog lamps to the mounting brackets, if equipped.
- Install the fasteners in order to retain the closeout/splash shield to the bumper fascia.
- Install the wheelhouse extension screws.


Ensure that you engage both fascia guides (2).
Notice: Use the correct fastener in the correct location. Replacement fasteners must be the correct part number for that application. Fasteners requiring replacement or fasteners requiring the use of thread locking compound or sealant are identified in the service procedure. Do not use paints, lubricants, or corrosion inhibitors on fasteners or fastener joint surfaces unless specified. These coatings affect fastener torque and joint clamping force and may damage the fastener. Use the correct tightening sequence and specifications when installing fasteners in order to avoid damage to parts and systems.
Tighten
Tighten the bolts to 24 N·m (18 lb ft).
Front Bumper Replacement Eldorado
Removal Procedure
- Remove the screws that retain the wheelhouse extensions to the front bumper fascia (3).
- Remove the fasteners that retain the lower closeout/splash shield to the front bumper fascia (3).
- Remove the left and the right side marker lamp sockets.
- Remove the horn harness, if equipped.
- Remove the bolts that secure the bumper to the energy absorbers.
- Remove the front bumper by pulling the bumper straight out from the vehicle.
- Remove the front license bracket. Refer to Front License Plate Bracket Replacement .
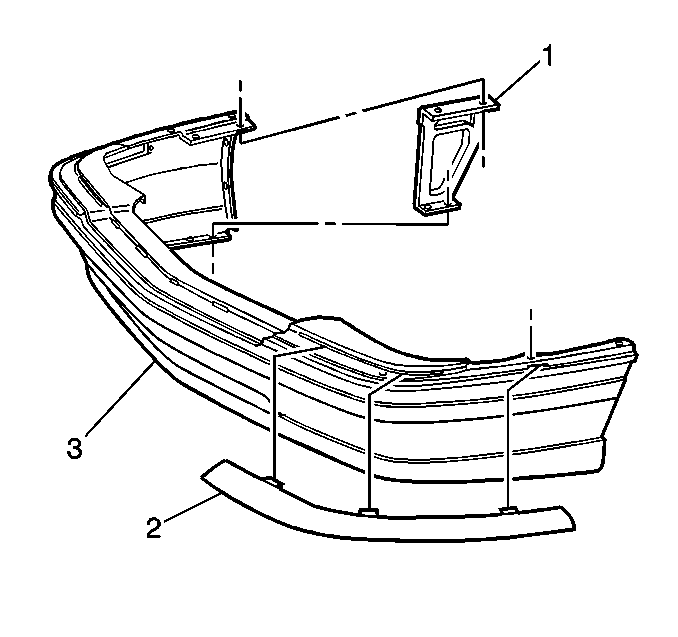
- Remove the fasteners (3) that retain the fascia (2) to the impact bar (1).
- Pry the fascia (2) from the impact bar upper snap tabs.
- Remove the impact bar (1).
- Release the snap tabs and remove the molding.
- Remove the clips that retain the side marker lamp to the fascia.
- Remove the side marker lamp from the fascia.


Installation Procedure
- Install the side marker lamp to the fascia.
- Install the clips in order to secure the lamp to the fascia.
- Position the upper side moldings to the fascia.
- Install the impact bar (1) to the fascia (2).
- Install the tabs in order to retain the top of the fascia (2) to the impact bar (1).
- Install the front license bracket, if equipped. Refer to Front License Plate Bracket Replacement .
- With the aid of a helper, position the front bumper.
- Install the bolts at the energy absorbers.
- Install the horn harness, if equipped.
- Install the fog lamps to the mounting brackets, if equipped.
- Install the left and the right side marker lamp sockets.
- Install the fasteners in order to retain the closeout/splash shield to the bumper fascia (3).
- Install the wheelhouse extensions screws.

Press the moldings in order to engage the snap tabs.

Ensure that you engage both of the fascia guides.
Notice: Use the correct fastener in the correct location. Replacement fasteners must be the correct part number for that application. Fasteners requiring replacement or fasteners requiring the use of thread locking compound or sealant are identified in the service procedure. Do not use paints, lubricants, or corrosion inhibitors on fasteners or fastener joint surfaces unless specified. These coatings affect fastener torque and joint clamping force and may damage the fastener. Use the correct tightening sequence and specifications when installing fasteners in order to avoid damage to parts and systems.
Tighten
Tighten the bolts to 24 N·m (18 lb ft).
