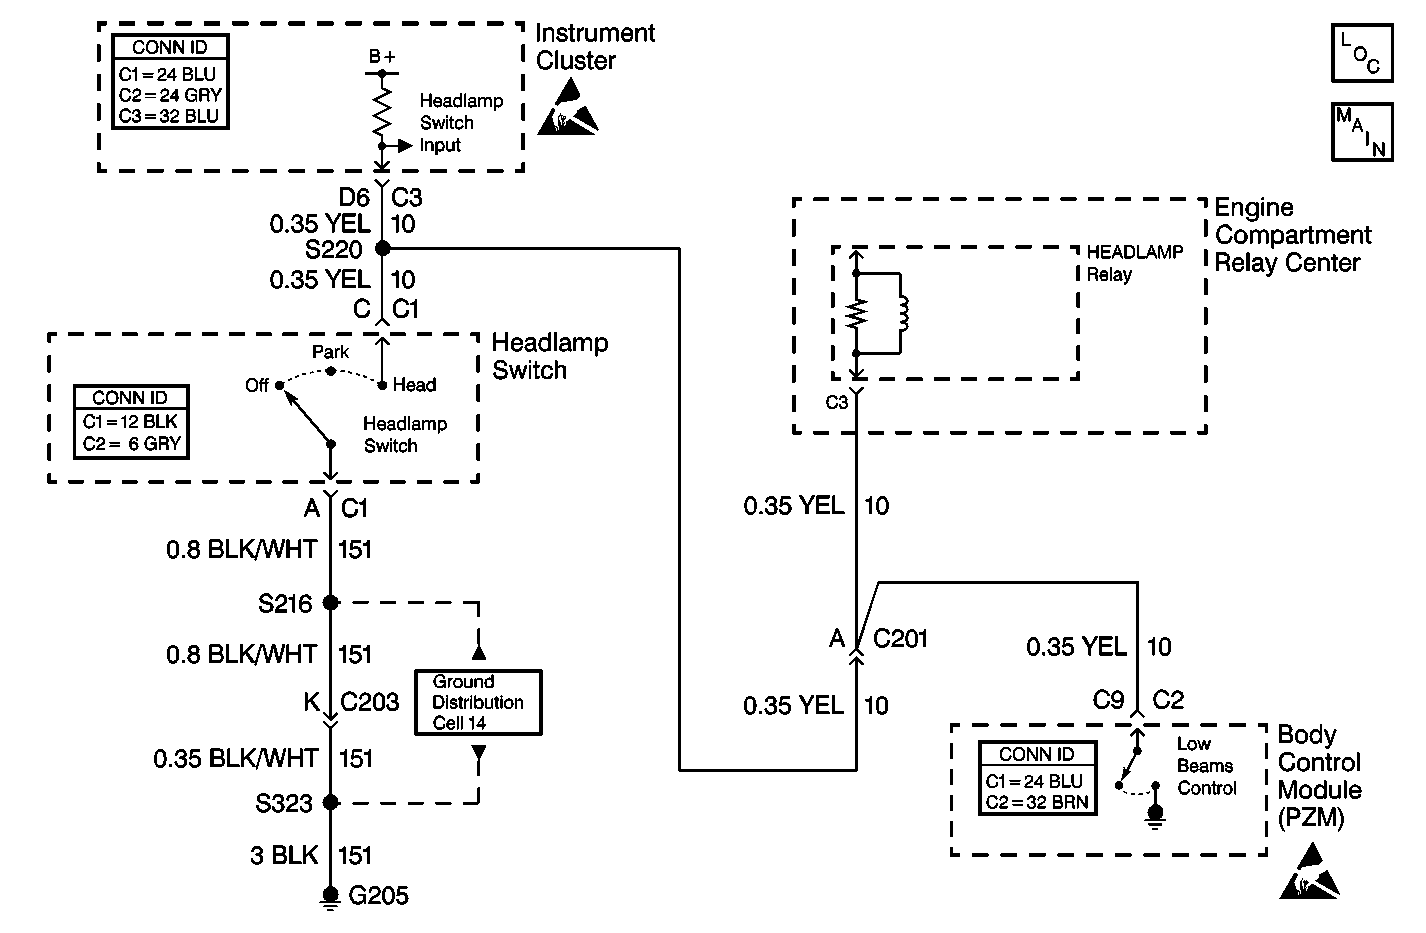
Circuit Description
The body control module (PZM) may command the low beams through a discrete output to the low beam relay. Grounding this output also grounds the headlamps input to the instrument cluster.
Conditions for Setting the DTC
A short to ground is tested for under the following conditions:
| • | The exterior lamp power is active. |
| • | The low beam output is inactive. |
| • | The headlamp switch is not active. |
| • | DTC B1970 is not active. |
A short to the battery is tested for under the following conditions:
| • | The exterior lamp power is active. |
| • | The low beam output is active. |
| • | DTC B1970 is not active. |
Action Taken When the DTC Sets
The PZM continues to command the state requested until the state is achieved or changed.
Conditions for Clearing the DTC
The commanded state matches the feedback state.
Step | Action | Value(s) | Yes | No |
|---|---|---|---|---|
1 | Was the Body Control Module Diagnostic System Check performed? | -- | Go to Step 2 | |
2 |
Are the headlamps OFF? | -- | Go to Step 3 | Go to Step 4 |
3 | Turn the headlamp switch ON. Are the headlamps on? | -- | Go to Step 5 | Go to Step 6 |
4 |
Are the headlamps OFF? | -- | Go to Step 7 | Go to Step 10 |
5 | Cycle the ignition. Is DTC B2472 now set as a history code? | -- | Go to Step 11 | Go to Step 10 |
6 | Test for an open in CKT 10 (YEL). Was an open found? | -- | Go to Step 16 | Go to Step 15 |
7 |
Is the resistance within the specified range? | 0-5 ohms | Go to Step 8 | Go to Step 9 |
8 | Test for a short to ground in CKT 10 (YEL). Was a short found? | -- | Go to Step 16 | Go to Step 13 |
9 | Replace the headlamp switch. Refer to Headlamp Switch Replacement in Lighting Systems. Is the repair complete? | -- | -- | |
10 | Test for an open in CKT 10 (YEL). Was an open found? | -- | Go to Step 16 | Go to Step 14 |
11 | Repair the intermittent short to voltage in CKT 10 (YEL). Is the repair complete? | -- | -- | |
12 | Replace the headlamp relay. Is the repair complete? | -- | -- | |
13 | Replace the IPC. Refer to Instrument Cluster Replacement in Instrument Panel, Gauges and Console. Is the repair complete? | -- | -- | |
14 | Replace the PZM. Refer to Body Control Module Replacement . Is the repair complete? | -- | -- | |
15 | Test for an open in CKT 352 (WHT). Was an open found? | -- | Go to Step 17 | Go to Step 12 |
16 | Repair the open or the short in CKT 10 (YEL). Is the repair complete? | -- | -- | |
17 | Repair the open in CKT 352 (WHT). Is the repair complete? | -- | -- |
