Engine Mount Replacement Right
Removal Procedure
- Raise and support the vehicle. Refer to Lifting and Jacking the Vehicle in General Information.
- Remove the right front wheel. Refer to Tire and Wheel Removal and Installation in Tires and Wheels.
- Support the engine assembly with a suitable jack.
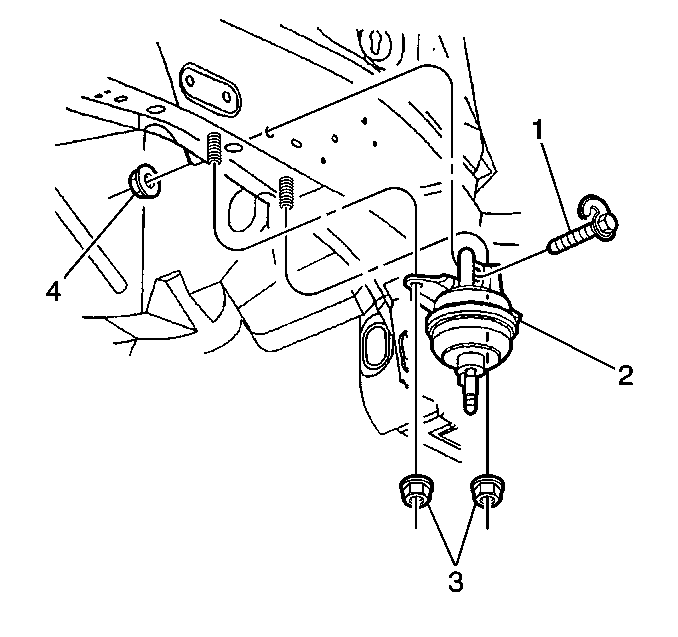
- Remove the nut securing the engine mount to the engine mount bracket.
- Lower the jack allowing the engine to lower slightly.
- Remove the nut (4) and bolt (1) securing the mount to the rail.
- Remove the two nuts (3) securing the mount to the rail.
- Remove the mount (2).

Installation Procedure
- Position the mount (2) to the rail.
- Install the mount attaching bolt (1) and nut (4) to the rail.
- Install the two nuts (3) securing the mount to the rail.
- Raise the engine into position.
- Install the nut to the mount and mount bracket.
- Remove the engine support jack.
- Install the right front wheel. Refer to Tire and Wheel Removal and Installation in Tires and Wheels.
- Lower the vehicle.
Notice: Use the correct fastener in the correct location. Replacement fasteners must be the correct part number for that application. Fasteners requiring replacement or fasteners requiring the use of thread locking compound or sealant are identified in the service procedure. Do not use paints, lubricants, or corrosion inhibitors on fasteners or fastener joint surfaces unless specified. These coatings affect fastener torque and joint clamping force and may damage the fastener. Use the correct tightening sequence and specifications when installing fasteners in order to avoid damage to parts and systems.
Tighten
Tighten the nuts (3,4) to 70 N·m (52 lb ft).
Tighten
Tighten the mount nut to 80 N·m (59 lb ft).
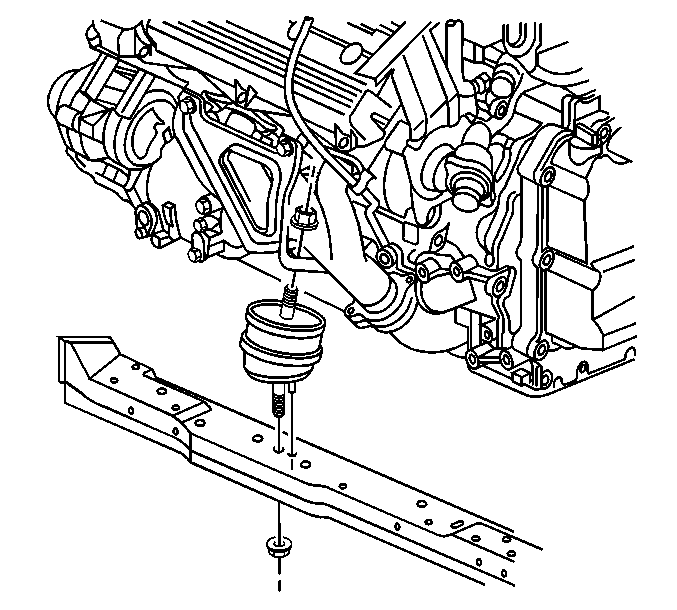
Engine Mount Replacement Front
Removal Procedure
- Raise and support the vehicle. Refer to Lifting and Jacking the Vehicle in General Information.
- Remove the front air deflector. Refer to Front Air Deflector Replacement in Body Front End.
- Support the powertrain with a suitable adjustable support.
- Support the front of the frame with a suitable adjustable support.
- Remove the front engine mount to frame nut.
- Remove the two front frame bolts.
- Lower the frame with the adjustable support.
- Remove the two lower engine mount bracket nuts.
- Remove the one support bracket nut.
- Remove the support bracket.
- Remove the two upper engine mount bolts
- Remove the front engine mount and bracket from the vehicle. Rotate the mount and bracket in a counterclockwise direction to remove from the vehicle.
- Remove the nut retaining the mount to the bracket.

Installation Procedure
- Install the engine mount and shield to the engine mount bracket.
- Correctly position the alignment tab on the mount with the shield and bracket.
- Install and tighten the mount to bracket nut.
- Position the bracket, mount and shield onto the vehicle.
- Install the two upper bracket bolts.
- Install the support brace.
- Install the support brace bolt.
- Install the two lower bracket nuts. Tighten the bolts in the following sequence.
- Tighten the two lower engine mount bracket nuts to 41 N·m (30 lb ft).
- Tighten the transaxle support brace bolt to 50 N·m (37 lb ft).
- Tighten the two upper engine mount bracket bolts to 50 N·m (37 lb ft).
- Using the adjustable support position the frame into place, Making sure the front mount is correctly positioned in the frame.
- Install the two frame mount bolts.
- Install the front engine mount to frame nut.
- Remove the two adjustable supports.
- Install the front air deflector. Refer to Front Air Deflector Replacement in Body Front End.
- Lower the vehicle.
Important: Make sure when installing the new shield and engine mount to the bracket that the alignment tabs are correctly positioned.
Notice: Refer to Fastener Notice in the Preface section.
Tighten
Tighten the front engine mount to bracket nut to 114 N·m (84 lb ft).
Tighten
Tighten
Tighten the retainers to 191 N·m (141 lb ft).
Tighten
Tighten the fasteners to 70 N·m (52 lb ft).
