WIND NOISE, HIGH DOOR CLOSING EFFORT (WINDOW ADJUST PROC.)

SUBJECT: WIND NOISE, HIGH DOOR CLOSING EFFORT, OR WINDOW OUTSIDE BLOWOUT CLIP (WINDOW ADJUSTMENT PROCEDURE)
VEHICLES AFFECTED: 1992 CADILLAC ELDORADO "E" MODEL
Some owners of 1992 Eldorados may comment on the door window remaining outside of the blowout clip when the door is in the closed position and the window is fully up, and/or wind noise/poor sealing conditions, or high door closing effort caused by misadjusted door window. These conditions can be corrected using the following door window adjustment procedure. This procedure supersedes adjustment steps listed in the 1992 Eldorado Preliminary Service Manual.
Service Procedure:
1. Verify door hinge and mini-wedge/striker adjustments are correct With the window lowered the door should close with normal effort, be properly aligned to the body/fender, and not ride up or down on the mini-wedge/striker as the door is opened. In the closed position the rear of the door should be flush to 1mm outboard of the quarter panel. If door or mini-wedge/striker adjustments are required, these must be performed prior to any window adjustments Refer to the 1992 Eldorado Service Information Manual for door and/or fender adjustment procedures (Section 10-6).
2. Remove the door trim panel and water deflector. Note original position of water deflector, it must be reinstalled in same position to prevent water leaks.
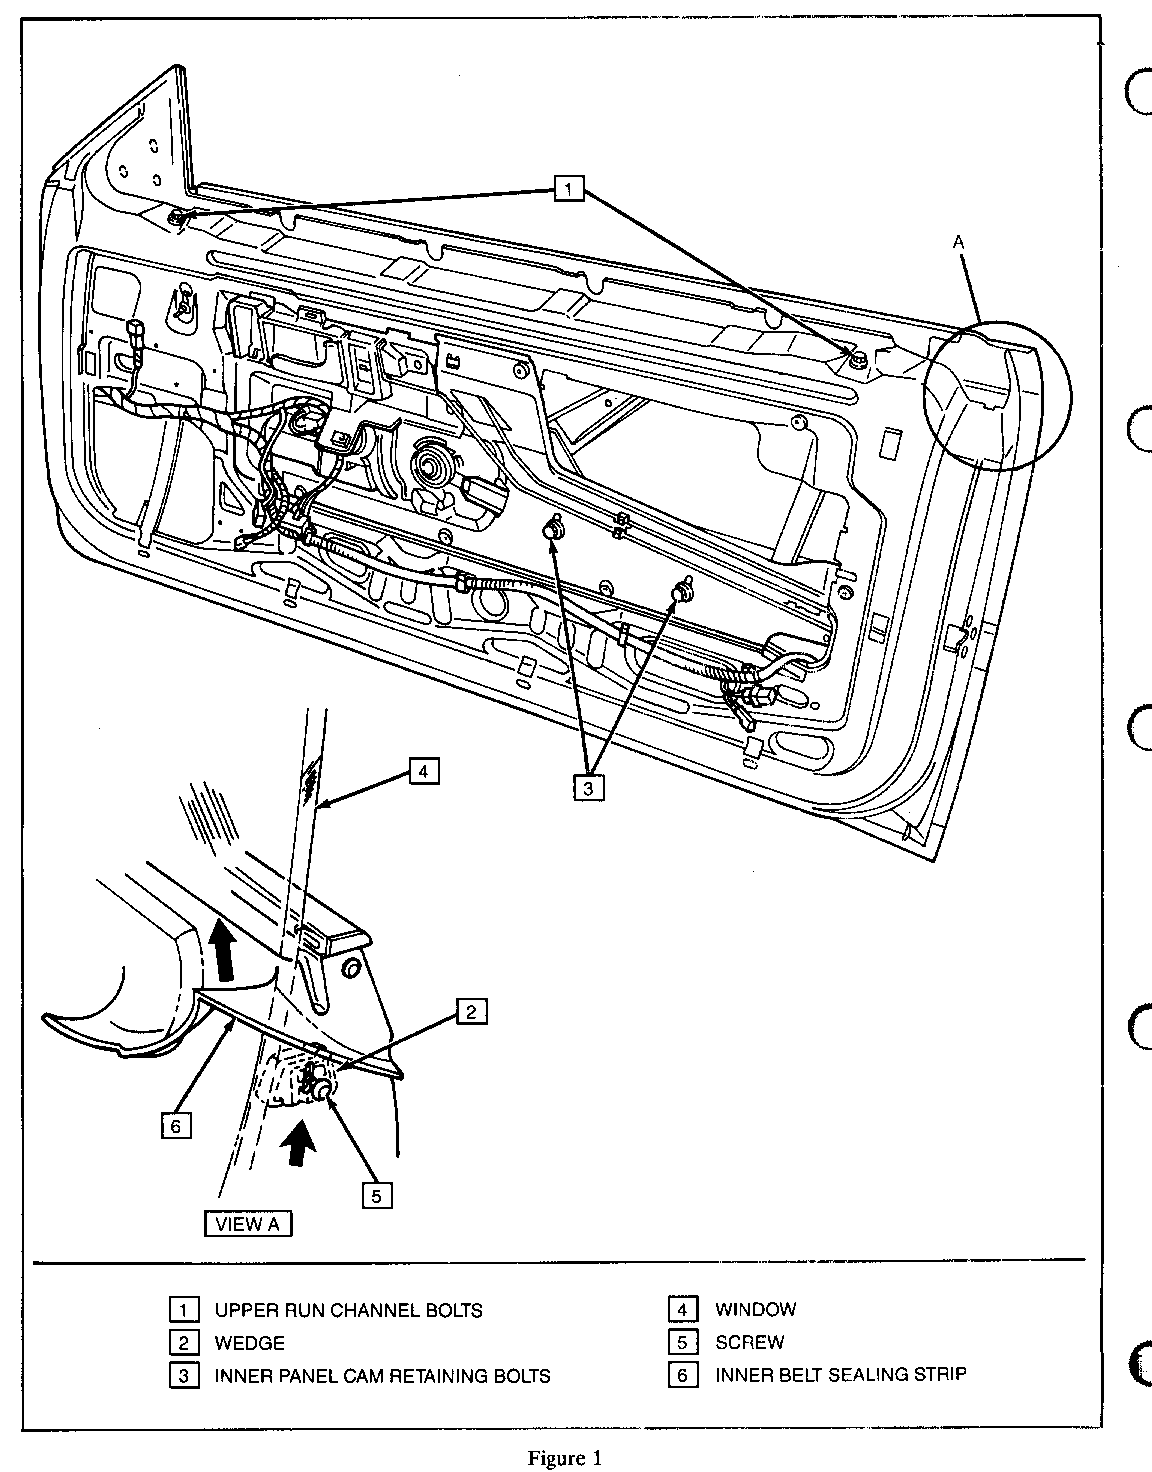
3. Loosen the upper run channel bolts. Refer to Figure 1. Loosen and move rear wedge to lowest position. Refer to Figure 1, View A. With the door open, lower the window to the full down position then raise the window up stopping approximately 25mm from full up position. Tighten both upper run channel bolts to 9-13 N.m (7-9 ft. lbs.) torque.
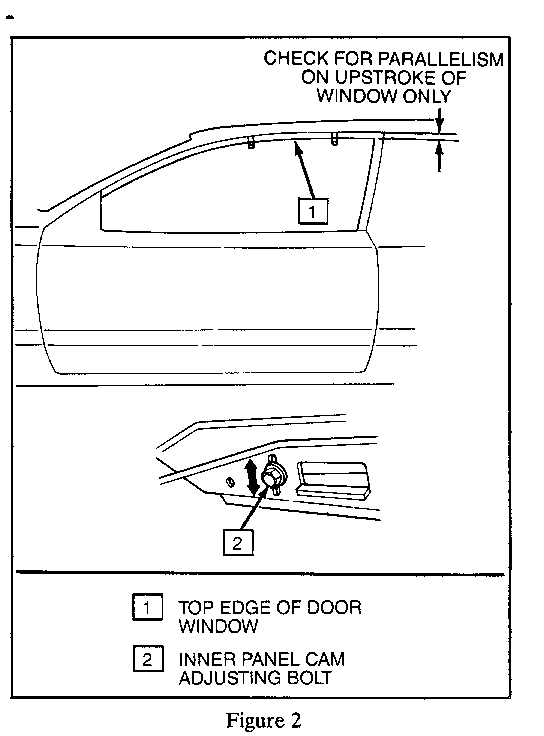
4. Check window parallelism adjustment. Raise the window to approximately 12mm below full up position.
NOTE: Parallelism is to be checked on upstroke of window motion.
The gap from the horizontal edge of the window to the weatherstrip should be even at front and rear of window. Refer to Figure 2. Adjust parallelism as needed by loosening and repositioning the inner panel cam bolts. Refer to Figure 1. Tighten the inner panel cam bolts to 9-13 N.m (7-9 ft. lbs.) torque after adjustment.
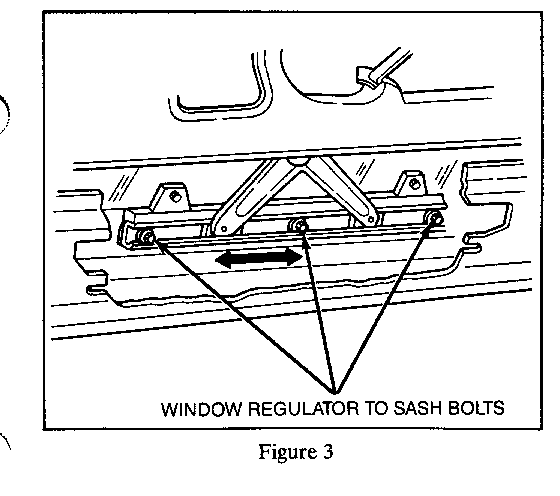
5. Loosen sash channel bolts. Refer to Figure 3. Position window rearward to just relieve pressure on windshield pillar post section of weatherstrip; then snug sash channel bolts.
6. Adjust the inward/outward window tilt adjustment as follows:
A. Remove the lower outside door trim moulding in order to access the bevel gear adjusters. Refer to Service Information Manual Section 10-6.
B. Set the front and rear bevel gears in the mid-position, (approximately 12 full revolutions from the full inward or outward travel stops will be the midpoint). The bevel gears use a 40 torx bit.
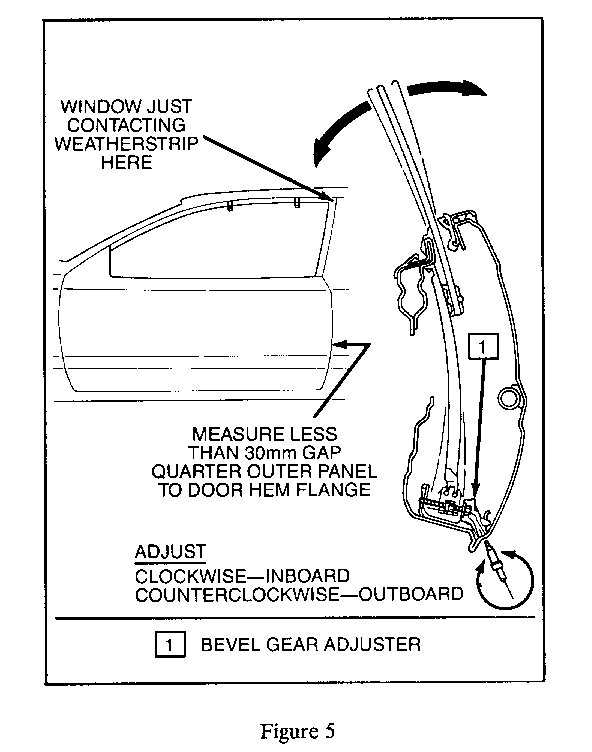
C. With the door in the open position and the window in the full up position, move the door toward the closed position until the horizontal upper rear corner of the window edge contacts the weatherstrip. The distance from the outer surface of the quarter panel to the door outer panel hem flange should not exceed 30mm. Refer to Figure 5.
D. If adjustment is required adjust the bevel gears. The front and rear gear should be turned equal amounts in order to attain sufficient and/or even weatherstrip compression.
NOTE: High door closing effort can result if the window tilt is adjusted to far inward. Door closing effort noted with the window lowered should increase only slightly with the window fully raised.
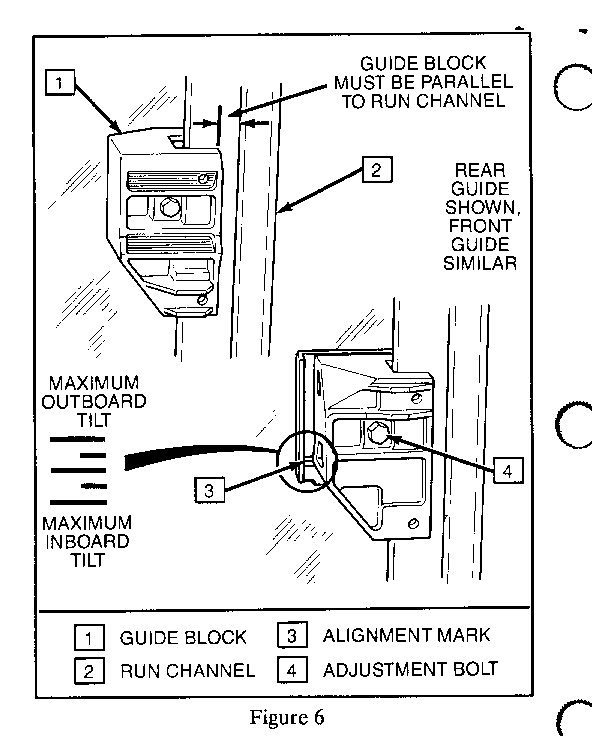
If bevel screw adjuster travel is not sufficient to allow adjustment, reposition the front/rear run channel guide blocks inward or outward as required. Refer to Figure 6.
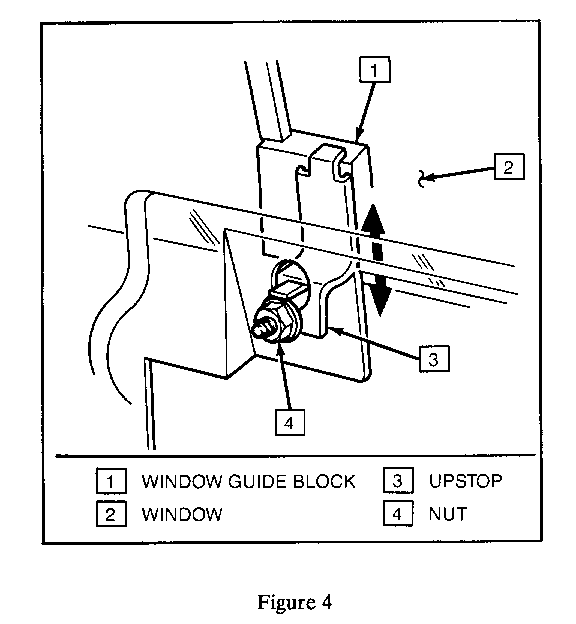
7. Raise the window to full up position and check for proper up stop settings. At full up the window will pass just under the weatherstrip outer lip and blowout clip as the door is being closed. Additionally the window should maintain the parallelism established in step 4. Adjust front and/or rear up stops as required. Refer to Figure 4. Tighten nuts to 9-13 N.m (7-9 ft. lbs.) torque.
8. Loosen sash channel bolts and position glass forward to achieve water/wind seal at windshield pillar post section of weatherstrip. Tighten sash bolts to 9-13 N.m (7-9 ft. lbs.) torque.
NOTE: Moving window forward too far will increase door closing effort and reduce window clearance to blowout clip.
9. With the window in the full up position, check for a smooth transition from the mucket at the mirror to the window. The transition should be checked with slight outward pressure on window or in the door closed position. Loosen the attachment screws to reposition the mucket as required.
10. With the window still in the full up position, raise the rear wedge until it lightly contacts the rear edge of the window and tighten the wedge attachment screw to 3 N.m (2 ft. lbs.) torque. Use a thin flat-bladed screwdriver in the adjustment slot to prevent the wedge from rotating when tightened.
NOTE: The window should be cycled and door closed several times to verify the proper operation of door and window.
11. Reinstall the door water deflector and trim panel. Perform water test and wind noise ride evaluation.
For vehicles repaired under warranty use: .7 hour for right-hand window adjustments and .7 hour for left-hand door window adjustments.
General Motors bulletins are intended for use by professional technicians, not a "do-it-yourselfer". They are written to inform those technicians of conditions that may occur on some vehicles, or to provide information that could assist in the proper service of a vehicle. Properly trained technicians have the equipment, tools, safety instructions and know-how to do a job properly and safely. If a condition is described, do not assume that the bulletin applies to your vehicle, or that your vehicle will have that condition. See a General Motors dealer servicing your brand of General Motors vehicle for information on whether your vehicle may benefit from the information.
