BUMPER FASCIA (COVER) FIT LOOSENESS TO BEAM-REPAIR PROC.

SUBJECT: BUMPER FASCIA (COVER) FIT, LOOSENESS TO BEAM (REPAIR PROCEDURES)
VEHICLES AFFECTED: 1992 CADILLAC "E,K" MODELS CADILLAC ELDORADO, SEVILLE
Some 1992 Eldorados, Touring Coupes, Sevilles, and STS' may experience a condition where the bumper fascia can move on the bumper reinforcement when force is applied to the fascia. This condition is caused by larger than normal gaps between the fascia and the reinforcement which allow the fascia to be loose.
Fascia looseness on Eldorado and STS front and/or rear bumpers and Seville front bumpers can be reduced or eliminated using one or more of the following procedures:
STS Rear Fascia - Add Pad Seville/STS Rear Fascia, Right Side at Wheel Opening - Add Screw Eldorado/Touring Coupe Rear Fascia - Add Pad Front Bumper Systems - General Repair For Fascia Looseness
The Seville rear fascia interface to the reinforcement is firm and is not expected to generate complaints.
STS Rear Fascia:
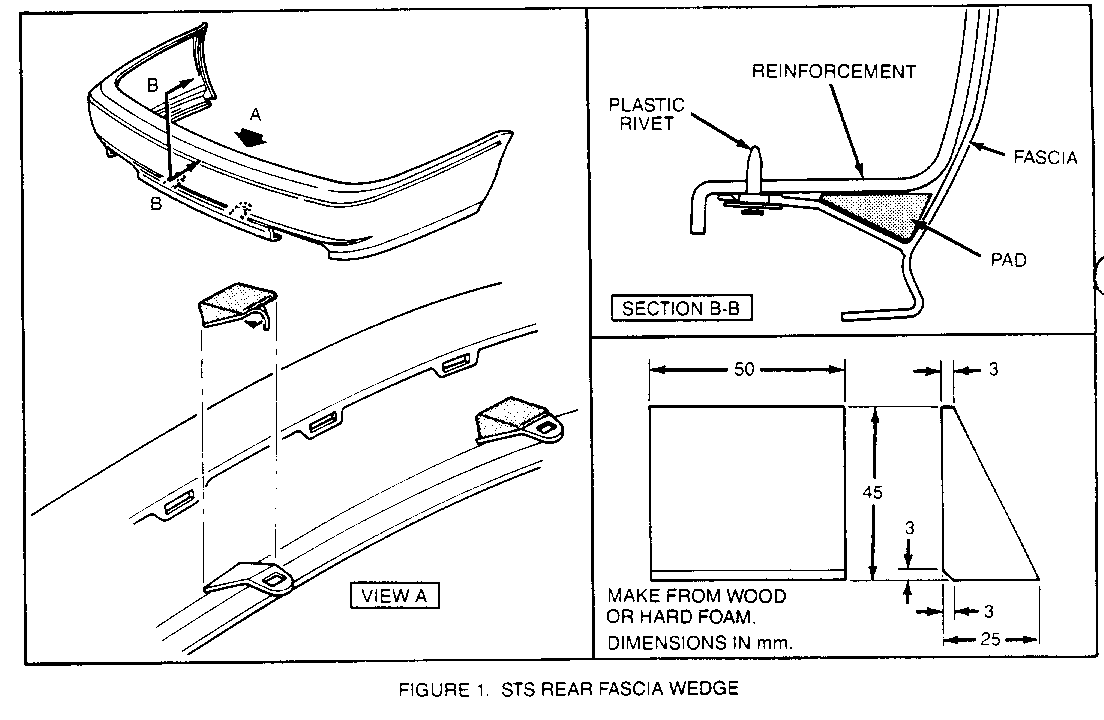
A hard foam wedge-shaped pad has been released to take up space between the fascia and reinforcement. A pad is bonded to each of the two center lower fastening tabs between the tab and the reinforcement, rearward of the push-in fasteners. The wedge pads, P/N 3535722, are currently available through CANSPO (two required). Pads can also be manufactured out of wood, plastic, or hard foam using the dimensions shown in Figure 1.
1. Hoist vehicle.
2. Remove lower retainers from the two center fascia tabs securing the fascia to reinforcement. Refer to Figure 1.
3. Clean the tops of the fascia tabs with a wax and grease remover. Rinse and dry thoroughly.
4. Attach one wedge pad, P/N 3535722, to each tab (two required). Remove covering from adhesive and press in place as shown in Figure 1.
5. Fasten tab to reinforcement using plastic retainers.
For vehicles repaired under warranty use: 0.3 hour.
Seville and STS Rear Fascia, Right Side At Wheel Opening:
The following procedure is for excessive in-out looseness of the fascia side wing upper corner at the wheel opening, and applies to the right side only (the left side is not loose). An additional self-drilling screw may be used to fasten the fascia extension to the body providing stability for the fascia wing.
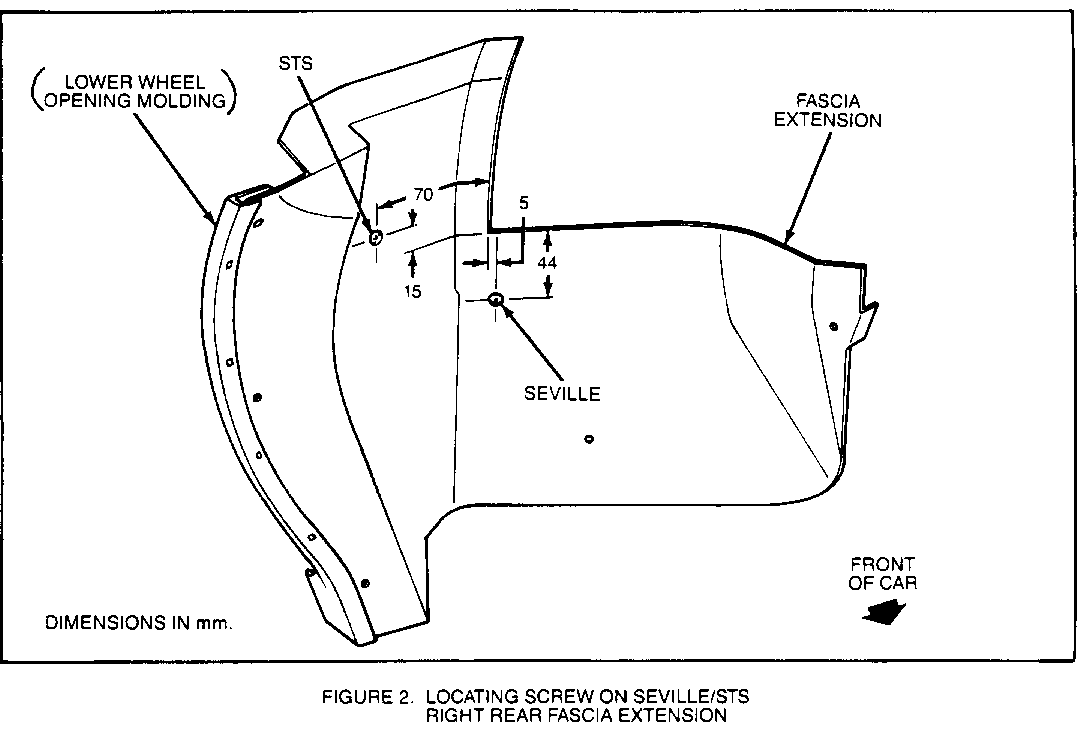
NOTICE: Location of this screw is critical, as an improperly positioned screw may penetrate into the rear compartment or not produce the desired result (eliminating looseness). Refer to Figure 2 to properly locate the screw.
1. Remove right rear tire.
2. Using the dimensions shown in Figure 2, measure and mark the location for the additional screw on the fascia extension.
3. Fasten the fascia extension to the body with self-drilling screw, P/N 11513942, or equivalent.
4. Assemble tire to vehicle.
For vehicles repaired under warranty use: 0.3 hour.
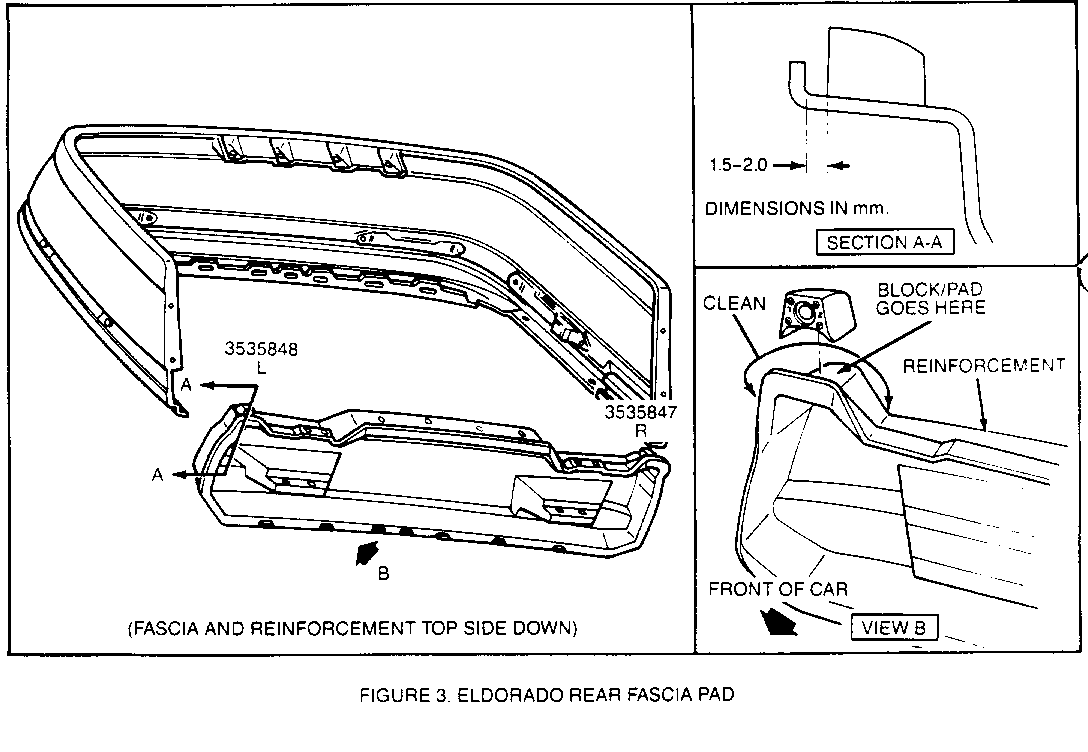
Eldorado/Eldorado Touring Coupe Rear Fascia: -------------------------------------------- To prevent vertical fascia movement, hard foam pads can be adhesively attached to the lower corners of the rear reinforcement, providing stability to the fascia. The pad part numbers are 3535847 (RH-passenger side) and 3535848 (LH-driver's side). Two pads, one left- and one right-hand, are required for this procedure.
1. Hoist vehicle.
2. Remove bumper assembly. If necessary, refer to Service Manual Section 10-4. Lay bumper assembly top side down on a bench or table.
3. Remove fascia from bumper reinforcement.
4. Clean corners of reinforcement using a grease and wax remover. Rinse and dry thoroughly. Refer to Figure 3, View B, for area to be cleaned.
For Steps 5 and 6, apply adhesive and bond according to manufacturer's directions.
5. Apply adhesive such as 3m hot melt, or equivalent, to one of the foam pads.
6. Bond the foam pad to the correct reinforcement lower corner, positioning the pad as shown in Figure 3, View B and Section A-A. If necessary, allow time for the adhesive to set up.
NOTICE: The foam pads are marked R (right) and L (left): pads are not interchangeable. Be sure to apply them to the correct side of the reinforcement.
7. Repeat Steps 5 and 6 for the other pad.
8. Reassemble the fascia to the reinforcement being careful not to disturb the pads.
9. Assemble the bumper to the vehicle.
For vehicles repaired under warranty use: 0.7 hour.
Front Bumper Systems - General Repair For Fascia Looseness:
To eliminate fascia looseness on front bumper systems, fill the space between the fascia and bumper reinforcement using an expandable foam product. The objective is to surround the lower corners of the bumper reinforcement with foam and use the foam to form a bond between the fascia and reinforcement.
IMPORTANT: Do not use the following method of repair for the rear bumpers unless the expandable foam product can withstand temperatures up to 110 degrees C (230 degrees F). High temperatures due to the exhaust system, especially on the STS and Touring Coupe models, may melt the foam. Use the wedges and/or blocks specified above for rear bumpers.
1. Hoist vehicle.
2. Remove the plastic retainers holding the lower acromat (splash shield) to the fascia.
3. Remove fog lamps, if equipped (STS, ETC).
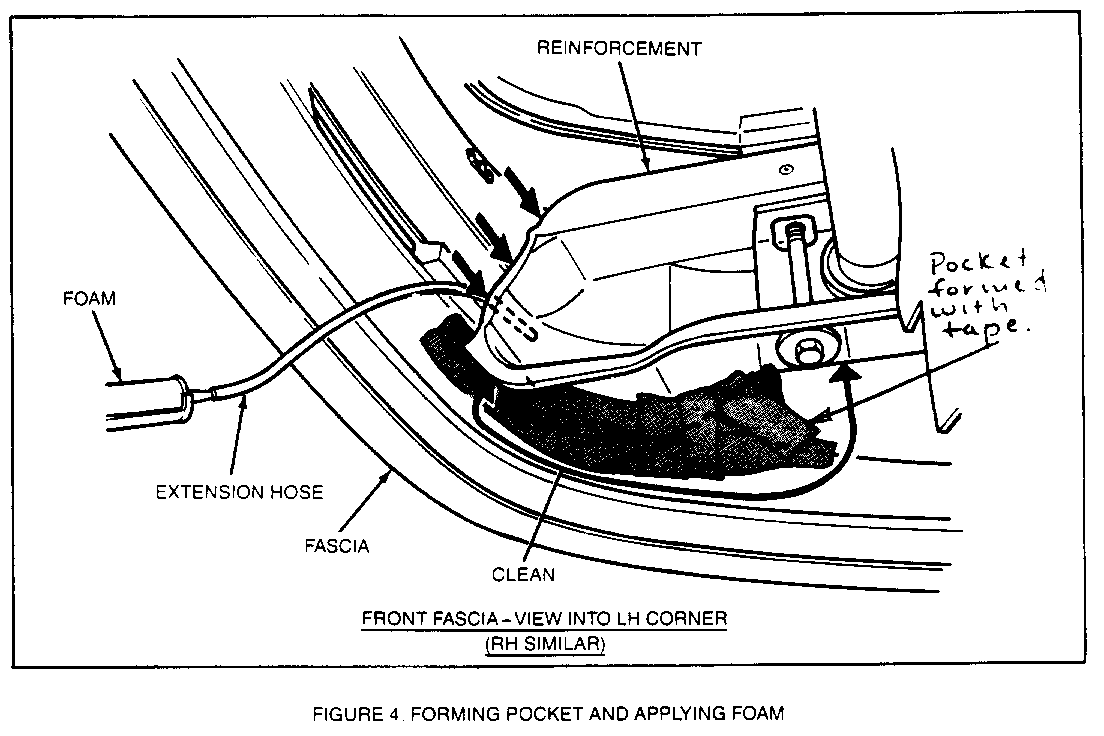
4. Clean the outboard areas of the fascia and reinforcement using a wax and grease remover. Rinse thoroughly and wipe dry. Refer to Figure 4 for area to be cleaned.
5. With a wide masking tape, bridge between the bumper reinforcement and the fascia at the lower corners. Form a pocket to trap the foam in the desired area between the fascia and the reinforcement. Refer to Figure 4. Cardboard or paper taped into position will work also.
NOTE: If performing this operation on an STS or Touring Coupe, form the pocket above the fog lamp opening and toward the outboard corner, then up around the side of the reinforcement.
6. Assemble an extension hose/nozzle to a canister of expandable foam. Position the hose above the pocket at the end of the reinforcement, extending the hose around toward the face of the reinforcement. First foam the lower pocket area, then work the hose/nozzle up the end of the bumper reinforcement to fill the gap between the fascia and the reinforcement. Refer to Figure 4.
HINT: To help determine amount of foam required for Step 6, and prevent unnecessary cleanup, first apply a small amount of foam to a piece of paper or cardboard and observe the rate of expansion.
7. Allow the foam to cure according to manufacturer's directions.
8. Remove tape and trim any excess that may be visible or may interfere with fog lamp mounting.
9. Reassemble fog lamps, if equipped, and lower acromat.
For vehicles repaired under warranty use: 0.8 hour.
WARRANTY INFORMATION:
VEHICLE SERIES
Operation Description E K
STS Rear Fascia-Add Pad - 0.3 (Fascia)
Seville and STS Rear Fascia- - 0.3 Add Screw for Stability
Eldorado/Touring Coupe Rear 0.7 - Fascia-Add Pad (Reinforcement)
Front Fascia Repair- 0.8 0.8 Expandable Foam
3M adhesives are available from your local 3M distributor.
We believe this source and their equipment to be reliable. There may be additional manufacturers of such equipment, however, General Motors does not endorse, indicate any preference for, or assume any responsibility for the products or equipment from these firms or for any such items which may be available from other sources.


General Motors bulletins are intended for use by professional technicians, not a "do-it-yourselfer". They are written to inform those technicians of conditions that may occur on some vehicles, or to provide information that could assist in the proper service of a vehicle. Properly trained technicians have the equipment, tools, safety instructions and know-how to do a job properly and safely. If a condition is described, do not assume that the bulletin applies to your vehicle, or that your vehicle will have that condition. See a General Motors dealer servicing your brand of General Motors vehicle for information on whether your vehicle may benefit from the information.
