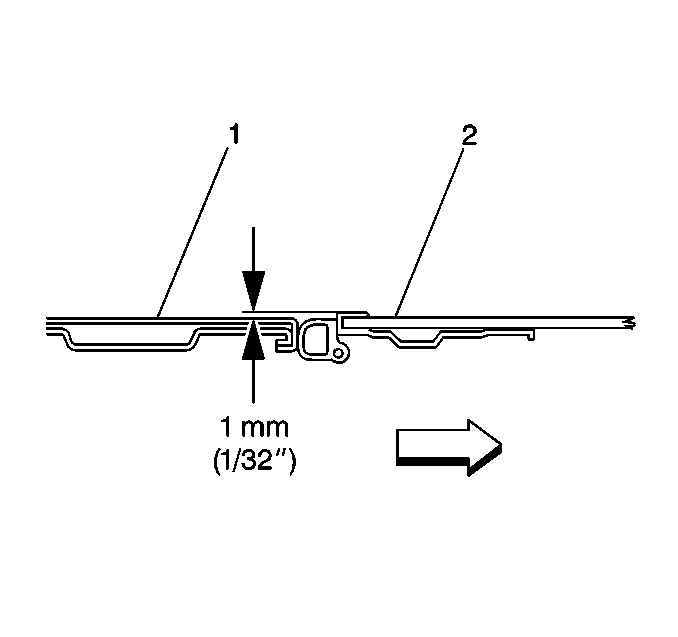
In order to provide the proper sealing and minimize the windnoise, adjust the height of the sliding glass panel in the following manner:

| • | Equal in height from side-to-side |
| • | Front of the sliding glass panel (1), flush to 1.0 mm (0.040 in) below the roof panel (2) |
| • | Rear of the sliding glass panel, flush to 1.0 mm (0.040 in) above the roof panel |
With the sliding glass panel in the closed position, inspect the height of the glass panel at the following locations:
| • | The front of the glass panel |
| • | The rear of the glass panel |
If the panel height is not within the above specifications, perform the following adjustment procedure:
- With the glass panel fully closed, slide the sunshade fully rearward.
- Remove the 3 fasteners from the front edge of the sunroof panel window cam. Slide the sunroof panel window cam rearward.
- In order to adjust any corner, complete the following steps:
- After loosening the 2 fasteners, move the glass panel up or down by hand.
- Inspect the sliding glass panel height.
- Repeat the adjustment procedures on the other corners as needed in order to meet the height specifications.
- Slide the sunroof panel window cam forward.
- Install the 3 retaining fasteners.
Important: Adjust the sliding glass panel height one corner at a time. Only adjust the corners that are not at the proper height. After adjusting each corner, inspect the height of the entire sliding glass panel in order to determine if additional adjustment is required.
Important: DO NOT loosen all 3 of the fasteners on the side being adjusted.
| 3.1. | Loosen the glass panel mounting fastener nearest to the corner being adjusted. |
| 3.2. | Loosen the center mounting fastener on the side being adjusted. |
Notice: Use the correct fastener in the correct location. Replacement fasteners must be the correct part number for that application. Fasteners requiring replacement or fasteners requiring the use of thread locking compound or sealant are identified in the service procedure. Do not use paints, lubricants, or corrosion inhibitors on fasteners or fastener joint surfaces unless specified. These coatings affect fastener torque and joint clamping force and may damage the fastener. Use the correct tightening sequence and specifications when installing fasteners in order to avoid damage to parts and systems.
Tighten
Tighten the 2 fasteners to 2 N·m (18 lb in).
Readjust the height as needed.
Tighten
Tighten the three fasteners to 2 N·m (18 lb in).
