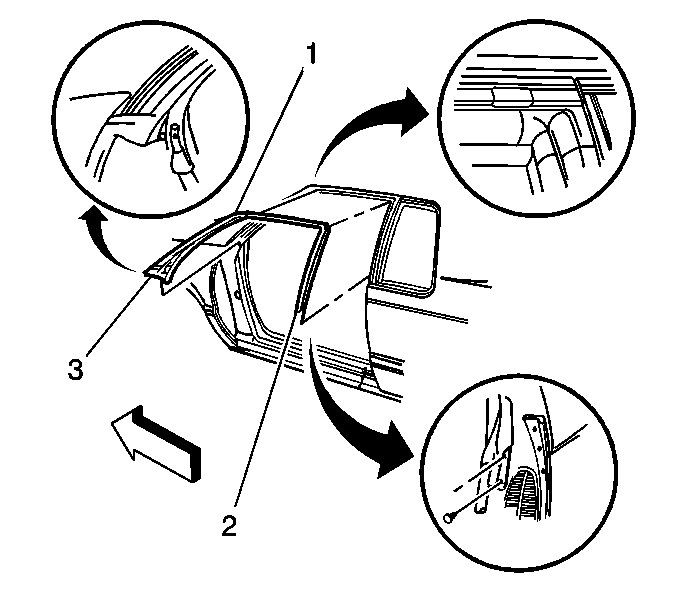
For 1990-2009 cars only
Removal Procedure
- Open the front doors.
- Remove the retainers (2,3) retaining the roof rail weather-strip (1) to the door opening.
- Carefully pull the weatherstrip from the weatherstrip retainer.

Installation Procedure
- Install the weatherstrip to the retainer channel in the door opening.
- Place the corner of the weatherstrip into the retainer channel at the B-pillar beltline and slide the weatherstrip up the retainer channel until the weatherstrip is pushed to the roof.
- The weatherstrip close-out lip should butt against the fabric covered portion of the body opening primary seal.
- Continue installing the weatherstrip from the B-pillar to approximately 6 inches forward of the blowout clip using a roller tool along the roof rail.
- Remove the blue release paper off the lower primary seal carrier at the hinge pillar (3) to expose the butyl tape (reference insert).
- Slide the weatherstrip over the plug on the lower primary seal and secure with a push in fastener at the hinge pillar.
- Bisect the length of hanging weatherstrip at the roof and A-pillar using a flat bladed tool.
- Install the weatherstrip from the blow-out clip to the corner using a roller.
- Install the weatherstrip from the hinge pillar to the top of the A-pillar corner using a roller.
- Tuck in the close-out lip against the primary seal so that the lip is against the fabric, and not on top of the fabric.
- Secure the weatherstrip with the push in retainers at locations (2,3).
- Ensure the weatherstrip is seated correctly at the blow-out clip.
- Close the doors.

Important: Spray water onto the B-pillar at the beltline and at the hinge pillar area in order to aid in the installation of the weatherstrip.
Important: The paint dot on the plug must line up with the pierced hole in the hinge pillar before the installation of the weatherstrip.
