Outside Moisture Sensor Replacement Rain Sensor
Removal Procedure

- Mark the outside moisture
sensor module location on the outside of the windshield using one horizontal
piece of tape (1) and one vertical piece of tape (1).
- Disconnect the electrical connector (1) from the outside
moisture sensor module (2).
Notice: Do not apply direct heat to the area around the outside moisture sensor
module. Continuous exposure to heat can damage the sensor module or the windshield.
Important: Do not hold the heat gun closer than 18 cm (6 in) from
the windshield. Move the heat gun around the outside moisture sensor module
area. If the windshield is 61° C (110° F)
or above, you may not require the heat gun.
- Using a heat gun with a maximum of 740 watts, apply heat to the
sensor area of the windshield.
Apply heat until the outside moisture sensor module may be twisted
back and forth.

- Twist the outside moisture
sensor module back and forth in order to dislodge the sensor module (2).
- Remove the outside moisture sensor module (2) from the
windshield.
- Cover the instrument panel below the outside moisture sensor module
using a protective cloth.
- Remove all optical tape from the windshield using a sharp plastic
scraper.
- Use the cloth and cleaning solution included in the service kit
to wipe the windshield. Wipe the windshield until the remaining tape residue
is completely removed.
Installation Procedure
Important: Ensure that the temperature of the windshield is between 30.5°C
(55°F) and 55.5°C (100°F) for proper adhesion of the outside moisture
sensor module.
- Attach the outside moisture sensor module to the windshield using the
following steps:
| | Important: Properly position the outside moisture sensor module prior to attaching
the outside moisture module to the windshield. The outside moisture module
cannot be moved once the outside moisture module is in contact
with the windshield.
|
| 1.1. | Remove the red backing from the optical tape and immediately install
the outside moisture sensor module to the windshield. |
| 1.2. | Push the outside moisture module firmly against the windshield
and hold the outside moisture sensor module in place for 10-15 seconds. |
| 1.3. | Inspect for air bubbles between the tape and the windshield. |
| 1.4. | Repeat the previous step under the following conditions: |
| • | The outside moisture sensor did not adhere to the windshield. |
| • | There are bubbles between the tape and the windshield. |
- Attach the electrical connector (1) to the outside moisture
sensor module (2).
Do not move or shift the outside moisture sensor module on the windshield.
- Remove the tape from the windshield.
- Verify the operation of the outside moisture sensing wiper system.
Removal Procedure For Reusing Outside Sensor Module

- Disconnect the electrical
connector (1) from the outside moisture sensor module (2).
- Remove the outside moisture sensor module from the windshield.

Notice: Do not apply direct heat to the area around the outside moisture sensor
module. Continuous exposure to heat can damage the sensor module or the windshield.
Important: Do not hold the heat gun closer than 18 cm (6 in) from
the windshield. Move the heat gun around the outside moisture sensor module
area. If the windshield is 61°C (110°F) or above,
you may not require the heat gun.
- Use a heat gun with a maximum of 740 watts in order to apply
heat to the sensor area of the windshield. Apply heat until the outside moisture
sensor module can be twisted back and forth.

- Twist the outside moisture
sensor module (2) back and forth in order to dislodge the outside
moisture module.
- Remove the outside moisture sensor module (2) from the
windshield.
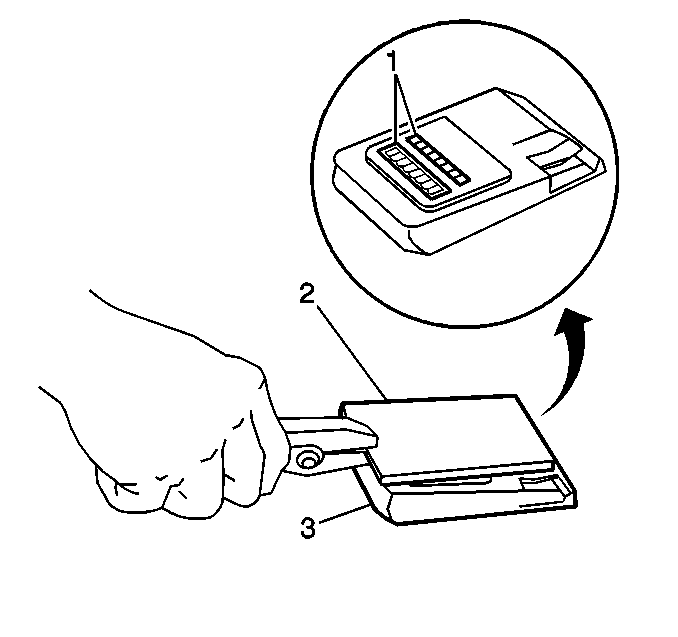
- Remove the optical tape
residue (1) from the outside moisture sensor module (3).
- Place an aluminum plate (2) on the tape residue in order
to ensure that the plate covers the entire outside moisture sensor module (3).
Notice: Do not apply direct heat to the area around the outside moisture sensor
module. Continuous exposure to heat can damage the sensor module or the windshield.
- Using a heat gun with a maximum of 740 watts, apply heat directly
to the plate for approximately 60 seconds in order to soften the tape residue.
Use pliers in order to remove the HOT aluminum plate from the outside
moisture module.
- Use your fingers or thumb in order to roll the tape residue down
the length of the outside moisture module optical area.
Repeat this step as many times as necessary in order to remove the majority
of tape residue from the optical area.
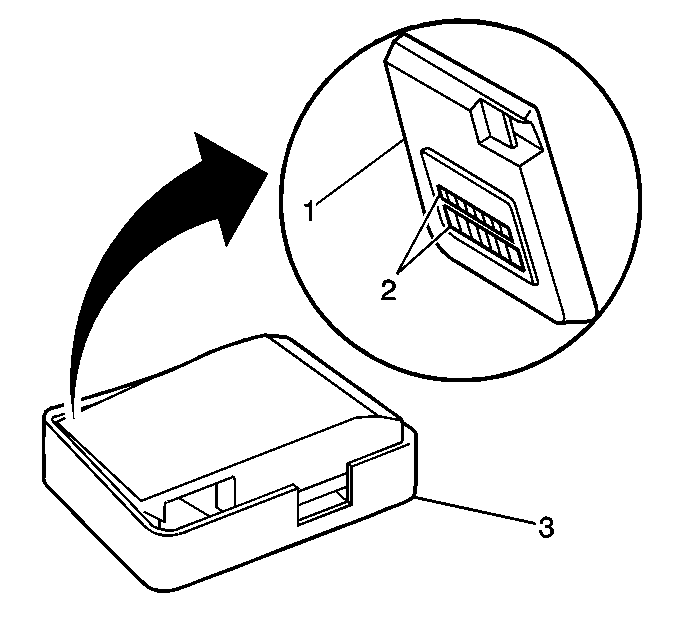
- Fill the tray (3)
to the bottom of the cut-out notch with cleaning solution.
The tray and cleaning solution are included in the service kit.
Notice: Do not allow cleaning solution to enter the outside moisture sensor
module. Cleaning solution will damage the sensor module. If this occurs, the
sensor module must be replaced.
- Place the outside moisture module (1) in the tray (3)
and allow the tape residue to soak for 15 minutes.
Perform step 1 of the installation procedure while the sensor
is soaking.
- Use the lint-free cloth and the cleaning solution, included in
the service kit, in order to wipe the remaining tape residue off of the optical
area.
Repeat step 11 if necessary. The soaking time will decrease
as the amount of tape residue decreases.
- Clean the tray (3) of all the tape residue and solution.
You will use the tray later in this procedure.
Installation Procedure For Reusing Outside Sensor Module
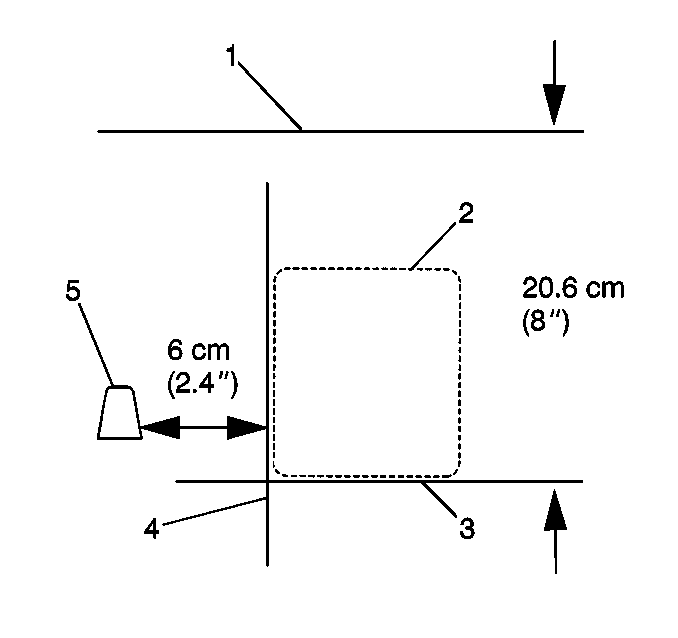
- Use a water soluble marker
or tape in order to mark the location of the outside moisture sensor module
on the outside of the windshield. Complete the following steps:
| 1.1. | Starting at the top of the windshield, draw a line (4) perpendicular
to the top of the windshield 6 cm (2.38 in) to the right
of the passenger-side edge of the rear view mirror mount. |
| 1.2. | Measure 20.6 cm (8.0 in) down from the top of the
windshield. Draw a line (3) parallel to the top of the windshield. Ensure
that this line crosses the vertical line. |
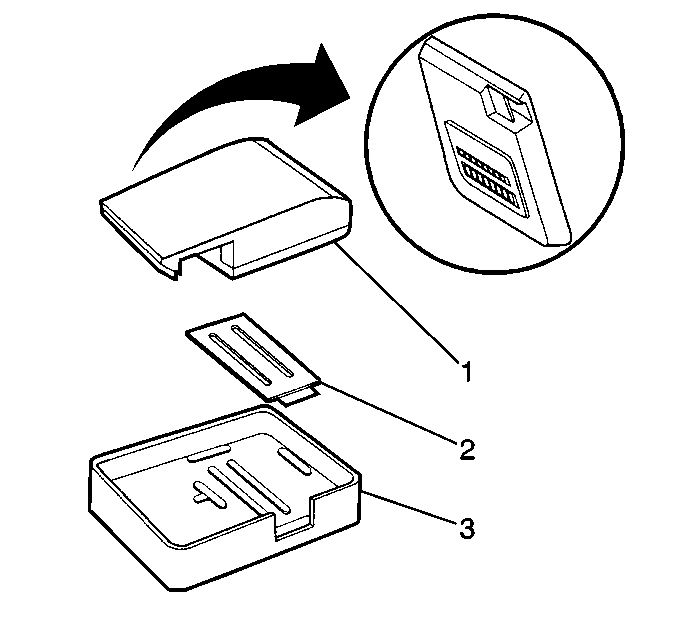
- Install the optical tape (2)
to the outside moisture sensor module (1). Complete the following steps:
| | Important: Do not touch the optical tape adhesive. If you touch or contaminate
the optical tape adhesive, replace the optical tape.
|
| 2.1. | Remove the white backing from the optical tape by pulling the blue release
tab. |
| 2.2. | Carefully place the optical tape in the tray (3) with the
exposed adhesive up. Ensure that the red tab rests in the cut-out notch of
the tray. |
| 2.3. | Apply primer B to the sensor using the applicator supplied in
the kit. |
Follow the directions on the primer B applicator. Remove the excess
primer using the clean cloth included in the kit.
| 2.4. | Place the outside moisture sensor module onto the optical tape
in the tray. Press down firmly for 10-15 seconds. |
| 2.5. | Remove the outside moisture sensor module from the tray. Remove
any air bubbles that are under the tape by pressing on the tape with your
fingers. |
Do not move the optical tape on the outside moisture sensor module.
Important: The temperature of the windshield must be 30.5°C (55°F) to 55.5°C
(100°F) for proper adhesion. If the windshield is installed in the vehicle,
cover the instrument panel with a protective cloth.
- Install the outside moisture module to the windshield. Complete the
following steps:
| 3.1. | Clean the area of the windshield where the outside moisture sensor
module will be installed. |
Use the cloth and cleaning solution included in the service kit in order
to clean the windshield.
| | Important: Properly position the outside moisture module prior to attaching the
outside moisture sensor module to the windshield. The outside moisture module
may not be moved once the outside moisture module is in contact
with the windshield.
|
| 3.2. | Remove the red backing from the optical tape. Immediately install the
outside moisture sensor module onto the windshield. |
| 3.3. | Push the outside moisture sensor module firmly against the windshield.
Hold the outside moisture sensor module in place for 10-15 seconds. |
| 3.4. | Inspect for air bubbles between the tape and the windshield. Repeat
the previous step under the following conditions: |
| • | The outside moisture sensor did not adhere to the windshield. |
| • | There are air bubbles between the tape and the windshield. |
- Connect the connector to the outside moisture sensor module. Do
not move the outside moisture sensor module once the outside moisture sensor
module is on the windshield.
- Remove the tape or marked lines from the windshield.
- Inspect the operation of the outside moisture sensing wiper system.
Refer to
Wiper/Washer System Check
Outside Moisture Sensor Replacement Rain Sensor - New Windshield
Removal Procedure
Important: A GM service kit is available for removal and reinstallation of the
rain sensor.
- Disconnect the connector from the rain sensor module.
Important: Do not apply direct heat to the area around the outside moisture sensor
module. Continuous exposure to heat can damage the sensor module or the windshield.
- Complete the following steps in order to remove the rain sensor module
from the windshield.
| 2.1. | Apply heat to the sensor area of the windshield. Use a maximum
740 watt heat gun. |
| 2.2. | In order to remove the rain sensor from the windshield, twist
the sensor back and forth. |

- Remove the optical tape
residue from the rain sensor module (3).
| 3.1. | Place an aluminum plate (2) on the tape residue. Ensure
that the plate covers the entire rain sensor module. |
| 3.2. | Use a maximum 740 watt heat gun. Apply the heat directly
to the plate for approximately 60 seconds in order to soften the tape
residue. |
Use pliers in order to remove the HOT plate from the rain sensor module.
| 3.3. | Using the fingers or thumb, roll the tape residue down the length
of the rain sensor module optical area. Repeat this step as needed in order
to remove the majority of tape residue from the optical area. |
| | Important: Do not apply direct heat to the area around the outside moisture sensor
module. Continuous exposure to heat can damage the sensor module or the windshield.
|
| 3.4. | Fill the tray to the bottom of the cut-out notch with cleaning solution.
The cleaning solution is included in the service kit. |

- Place the rain sensor
module (1) in a tray (3). Allow the tape residue to soak for
15 minutes. Perform Step 1 of the installation
procedure while the sensor is soaking.
Important: Do not allow cleaning solution to enter the outside moisture sensor
module. Cleaning solution will damage the sensor module. If this occurs, the
sensor module must be replaced.
- Using a lint free cloth and cleaning solution, wipe the remaining tape
residue off the optical area. Repeat the previous step as needed.
Less soaking time will be required as the amount of tape residue becomes
less.
- Clean the tray of all tape residue and solution.
Installation Procedure
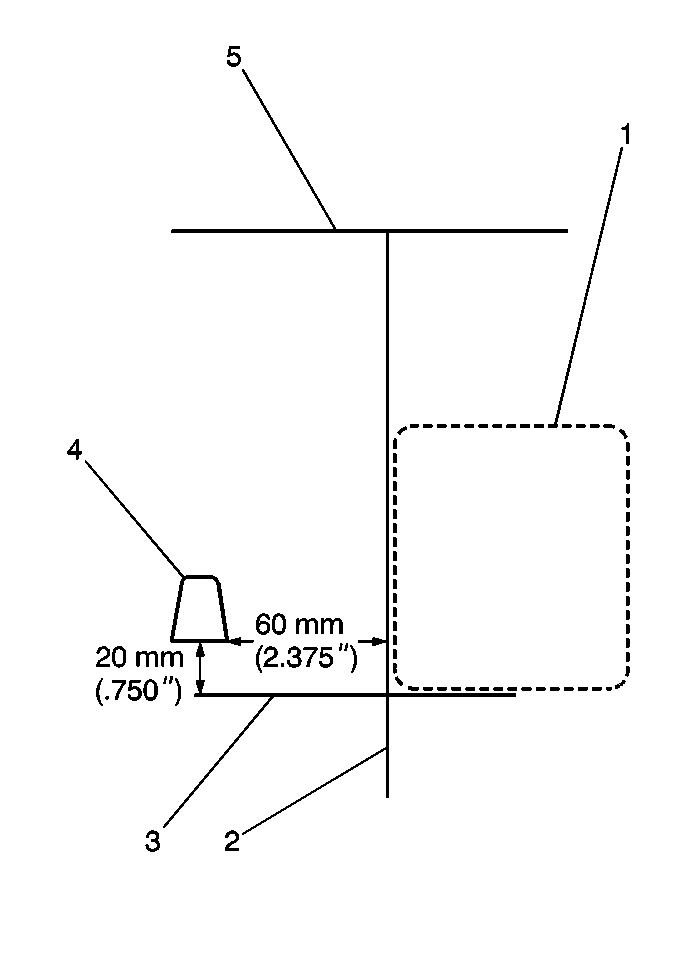
- Mark the location of the
sensor (1) on the outside of the windshield.
Use a water soluble marker or tape in order to mark the sensor locations
in the following manner:
| 1.1. | Draw a line (2) perpendicular to the top of the windshield (5)
6 cm (2.375 in) to the right of the passenger side edge of
the rear view mirror mount (4). |
| 1.2. | Draw a line (3) parallel to the top of the windshield (5)
2 cm (.750 in) from the bottom of the rear view mirror mount (4).
This line should cross the vertical line. |

- Install the optical tape (2)
to the rain sensor module (1).
| | Important: Do not touch the optical tape adhesive. Replace the optical tape (2)
if the tape is touched or contaminated.
|
| 2.1. | Pull the blue release tab in order to remove the white backing from
the optical tape (2). |
| 2.2. | Carefully place the optical tape in a tray with the exposed adhesive
in the up position. |
The red tab should rest in the cut-out notch of the tray.
| 2.3. | Apply primer B to the sensor using the applicator supplied
in the kit. Follow the directions on the primer B applicator. |
Remove excess adhesive using the clean cloth that is included in the
service kit.
| 2.4. | Place the rain sensor module onto the optical tape in the tray.
Firmly press down for 10-15 seconds. |
| | Important: DO NOT move the optical tape on the rain sensor module.
|
| 2.5. | Remove the rain sensor module from the tray. Remove the air bubbles
under the tape with finger pressure. |
- Clean the area of the windshield where the sensor is to be installed.
Use a cloth and the cleaning solution included in the service kit.
Important:
| • | The temperature of the windshield must be 13°C (55°F)-38°C
(100°F) for proper adhesion. |
| • | Use care in order to position the rain sensor module properly
prior to attaching the sensor to the windshield. The sensor may not be moved
once the sensor is in contact with the windshield. |
- Remove the red backing from the optical tape. Immediately install the
rain sensor module on the windshield.
- Push the rain sensor module firmly against the windshield.
Hold the sensor for 10-15 seconds.
- Inspect the sensor for air bubbles between the tape and the windshield.
When incomplete adhesion or bubbles are present, repeat the previous step.
- Install the windshield into the vehicle.
Important: DO NOT move the rain sensor module on the windshield.
- Connect the connector to the rain sensor module.
- Remove the tape or marked lines from the windshield.
- Inspect the operation of the outside moisture sensing wiper system.
Refer to
Wiper/Washer System Check
in Wipers/Washer Systems.


