Ignition and Start Switch Replacement LHD
Removal Procedure
Caution: When you are performing service on or near the SIR components or the SIR wiring, you must disable the SIR system. Refer to Disabling the SIR System. Failure to follow the correct procedure could cause air bag deployment, personal injury, or unnecessary SIR system repairs.
- Apply the parking brake.
- Disconnect the negative battery cable. This will maintain the key code.
- Disable the SIR system. Refer to Disabling the SIR System in SIR.
- Remove the radio or the navigation display module. Refer to Radio Replacement in Entertainment or Navigation Display Module Replacement .
- Remove the A/C heater control head. Refer to Control Assembly Replacement in HVAC Heating and Ventilation.
- Remove the steering column. Refer to Steering Column Replacement in Steering Wheel and Column-Tilt.
- Disconnect the electrical connectors from the ignition switch.
- Disconnect the park lock cable from the ignition switch. Refer to Park Lock Cable Replacement in Automatic Transaxle-4T80-E.
- Remove 1 fastener from the access hole in the IP at the steering column opening.
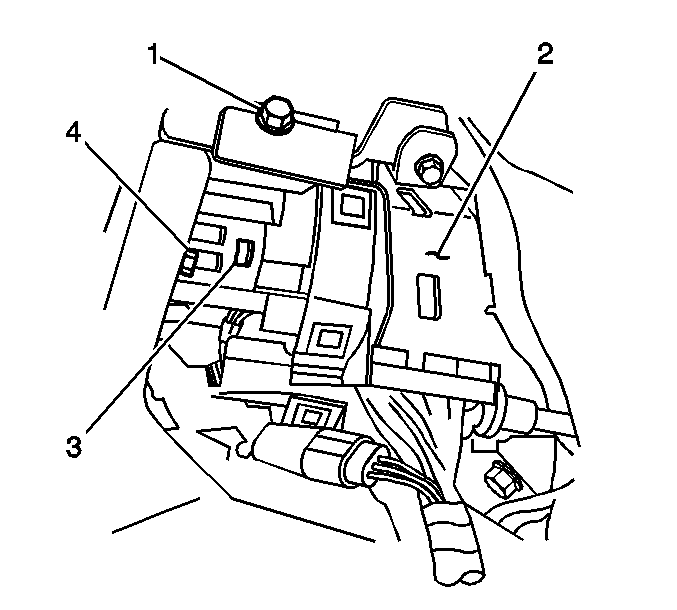
- Remove 2 fasteners (2) from the radio opening hole. One hole is at the top of the opening, and the other hole is near the opening edge. The heads of the fasteners face forward. These are blind fasteners which cannot be seen when they are installed.
- Rotate the switch in the IP.
- Remove the ignition switch through the radio opening.
- Remove the fasteners (1,2,3) that secure the ignition switch bracket to the switch.
- Remove the ignition switch bracket from the ignition switch.
Caution: Unless directed otherwise, the ignition and start switch must be in the OFF or LOCK position, and all electrical loads must be OFF before servicing any electrical component. Disconnect the negative battery cable to prevent an electrical spark should a tool or equipment come in contact with an exposed electrical terminal. Failure to follow these precautions may result in personal injury and/or damage to the vehicle or its components.


Installation Procedure
- Install the ignition switch housing bracket to the switch.
- Install the fasteners (1,2,3).
- Install the ignition switch into the radio opening.
- Install the fasteners (2) from the ignition switch to the IP retainer.
- Install 1 fastener to the access hole in the IP at the steering column opening.
- Install the ignition switch cylinder to the ignition switch housing. Refer to
- Install the park lock cable. Refer to Park Lock Cable Replacement in Automatic Transaxle--4T80-E.
- Connect the electrical connectors.
- Install the steering column. Refer to Steering Column Replacement in Steering Wheel and Column--Tilt.
- Install the AC/heater control head. Refer to Control Assembly Replacement in HVAC Heating and Ventilation.
- Install the radio or the navigation display module. Refer to Radio Replacement in Entertainment or Navigation Display Module Replacement .
- Enable the SIR system. Refer to Enabling the SIR System in SIR.
- Connect the negative battery cable.
- Release the parking brake.


Ignition and Start Switch Replacement RHD
Removal Procedure
Caution: When you are performing service on or near the SIR components or the SIR wiring, you must disable the SIR system. Refer to Disabling the SIR System. Failure to follow the correct procedure could cause air bag deployment, personal injury, or unnecessary SIR system repairs.
- Apply the park brake.
- Disconnect the negative battery cable, in order to maintain the key code. Refer to Battery Negative Cable Disconnection and Connection in Engine Electrical.
- Disable the SIR system. Refer to Disabling the SIR System in SIR.
- Remove the right instrument panel end cap. Refer to Instrument Panel Outer Trim Cover Replacement .
- Remove the knee bolster. Refer to Knee Bolster Replacement .
- Disconnect the electrical connectors from the ignition switch.
- Remove the lamp socket from the ignition switch.
- Turn the ignition to the run position.
- Depress the release button (1) for the park lock cable and pull the cable, in order to disconnect the park lock cable from the ignition switch.
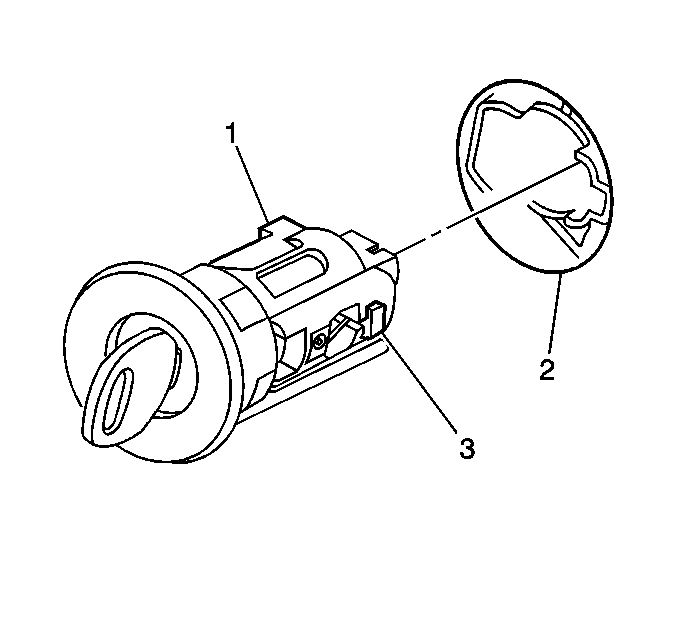
- Look through the IP endcap opening and locate the ignition lock cylinder retaining tab (3).
- Using a flat-bladed tool, depress and hold the ignition lock cylinder retaining tab (3)
- Remove the ignition lock cylinder from the IP.
- Remove the ignition switch fastener (1).
- Looking through the opening next to the steering column, remove the fastener (2) from the ignition switch (2)
- Remove the ignition switch assembly from the IP.

The release button (1) is located on the bottom of the ignition switch at the 6 o'clock position.

The ignition lock cylinder retaining tab (3) is located on the right lower side of the ignition switch assembly (2).

Installation Procedure
- Install the ignition switch (2) to the IP retainer.
- Through the opening next to the steering column, install the ignition switch fastener (1).
- Through the IP endcap opening , install the ignition switch fastener (1).
- Install the park lock cable (1) to the ignition switch.
- Connect the electrical connectors.
- Install the lamp socket to the ignition switch.
- With the key installed in the ignition lock cylinder (1) insert the ignition lock cylinder (1) into the IP opening (2).
- Using light force, pull on the lock cylinder in order to ensure the lock cylinder is engaged.
- Turn the ignition to LOCK, then remove the key.
- Install the right IP endcap. Refer to Instrument Panel Outer Trim Cover Replacement .
- Install the knee bolster. Refer to Knee Bolster Replacement .
- Enable the SIR system. Refer to Enabling the SIR System in SIR.
- Connect the negative battery cable. Refer to Battery Negative Cable Disconnection and Connection in Engine Electrical.
- Inspect the ignition switch for proper operation in all positions.
- Release the park brake.

Notice: Use the correct fastener in the correct location. Replacement fasteners must be the correct part number for that application. Fasteners requiring replacement or fasteners requiring the use of thread locking compound or sealant are identified in the service procedure. Do not use paints, lubricants, or corrosion inhibitors on fasteners or fastener joint surfaces unless specified. These coatings affect fastener torque and joint clamping force and may damage the fastener. Use the correct tightening sequence and specifications when installing fasteners in order to avoid damage to parts and systems.
Tighten
Tighten the fastener to 2 N·m (18 lb in).

Tighten
Tighten the fastener to 2 N·m (18 lb in).


The lock cylinder retaining tab (3) will produce an audible click, when fully engaged.
