Front Wheelhouse Replacement Sectioning
Removal Procedure
Important: Both the driver-side and passenger-side front wheelhouses are available
as complete sub-assemblies with the strut tower attached to the wheelhouse.
The strut mounting holes are pre-punched in the service part, which also
includes all necessary component stud mounts. When replacing a wheelhouse,
carefully position the service assembly using three-dimensional measuring
equipment to properly locate the wheelhouse.
Important: Do not replace the entire wheelhouse when damage is limited to the front
portion of the wheelhouse assemblies. In such a situation, the technician
can section the wheelhouse.

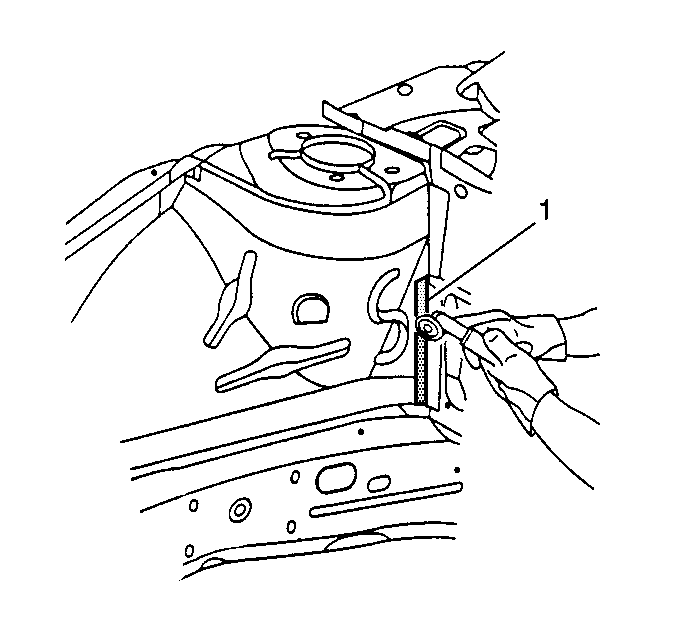
Important: Inspect for damage where the wheelhouse is attached to the cowl panel
(1). If the panels have been separated, it will be necessary to repair the
cowl panel and replace the wheelhouse. If the panels have not been separated
and there is no damage in this location, the wheelhouse can be sectioned.

- Remove panels and components
as necessary for access.
- Restore as much of the damage as possible to factory specifications.
- Place 25 mm (1 in) wide masking tape (1) following
the forward contour of the strut tower.
- Cut the wheelhouse along the outside edge of the masking tape.
- Locate, mark, and drill out the factory welds attaching the wheelhouse
to the radiator support and the upper and lower front rails.
- Remove the damaged section of the wheelhouse.
Installation Procedure

- When preparing the service
part, cut the forward apron well beyond the 25 mm (1 in) overlap
needed for sectioning (1).
- Temporarily position the new wheelhouse section on the vehicle,
and mark a line on the new wheelhouse section by tracing along the cut line
of the original wheelhouse (1).
- Remove the new wheelhouse section.
- Measure and cut 25 mm (1 in) inboard along the traced
line to create an overlap. After installation, the original wheelhouse will
overlap the modified service part.
- Drill an 8 mm (5/16 -in) hole every 35 mm
along the overlap on the new wheelhouse section.
- Position the new wheelhouse section and check the fit.
- Plug weld on the outboard side of the panel as necessary.
- Clean and prepare all bare metal surfaces.
Important: Prior to refinishing, refer to GM P/N 4901 MD-99
Refinish Manual for recommended products.
- Apply as necessary.
| • | sealers and anti-corrosion materials |
| • | two-part catalyzed primer |
- Install all related panels and components removed for access.
Front Wheelhouse Replacement Full Front Replacement
Removal Procedure
- Remove panels and components as necessary for access.
- Restore as much of the damage as possible to factory specifications.
- Remove all sealers and anti-corrosion materials as necessary.

- Place 25 mm (1 in) wide masking tape on the forward contour of the wheelhouse at the flange where it attaches to the cowl panel.
- Cut the wheelhouse along the forward edge of the masking tape (1) to leave a 25 mm (1 in) tab extending forward from the cowl panel. This will provide an overlap for welding the service part to the original wheelhouse without welding directly to the cowl panel.
- Locate, mark, and drill out the factory welds attaching the wheelhouse assembly at the following:
- Remove the damaged wheelhouse assembly.
Installation Procedure
- Clean and prepare surfaces to be welded.

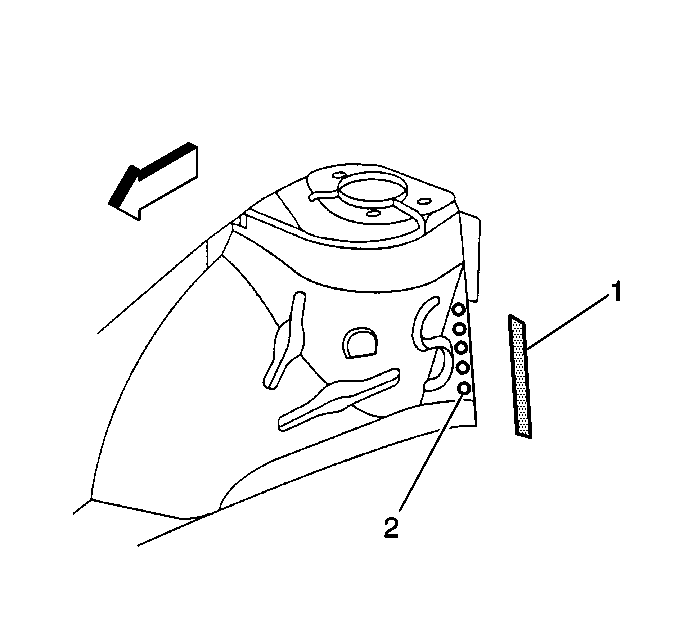
- Cut the flange off the service part that is normally welded to the cowl panel (1).
- Drill 8 mm (5/16 in) holes for plug welding in the locations noted from the original assembly.
- Drill holes for plug welding every 40 mm (1½ in) along the cut edge to be attached to the tab remaining from the original assembly (2).
Important: Watch for flammable materials when welding to the interior panels of the vehicle.
- Prepare all mating surfaces for welding as necessary.
- Apply 3M Weld-Thru Coating P/N 05916 or equivalent to all mating surfaces.
- Position the wheelhouse assembly using three-dimensional measuring equipment.
- Plug weld wheelhouse as necessary.
- Clean and prepare all bare metal surfaces.
- Apply the following as necessary:
| • | Anti-corrosion materials |
| • | Two-part catalyzed primer |
| | Important: Prior to refinishing, refer to publication GM 4901M-D-01 GM Approved Refinish Materials for recommended products. Do not combine paint systems. Refer to paint manufacturer's recommendations.
|
- Install the panels and components previous removed for access.


