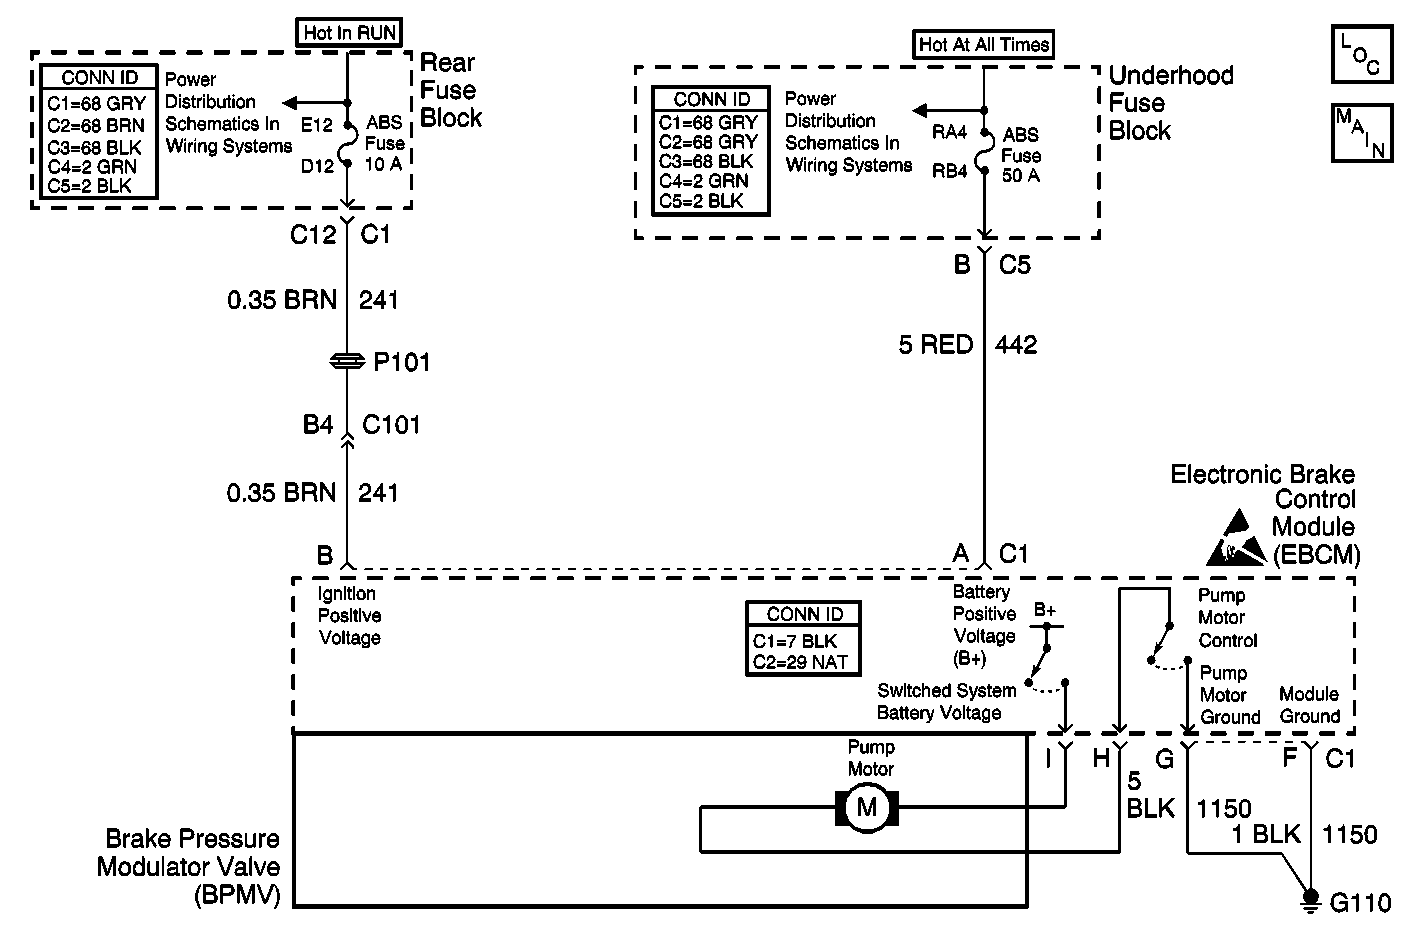
Circuit Description
The system relay is energized when the ignition is ON. The system relay supplies voltage to the solenoid valves and the pump motor. This voltage is referred to as the system voltage.
The electronic brake control module (EBCM) controls each solenoid valve by grounding the solenoid.
The EBCM controls the pump motor by grounding the control circuit. The pump serves 2 purposes:
| • | Transfers brake fluid from the brake calipers to the master cylinder reservoir during pressure decrease events. |
| • | Transfers brake fluid from the master cylinder reservoir to the brake calipers during pressure increase events. |
Conditions for Running the DTC
| • | The pump motor has been commanded OFF for 1 second. |
| • | The system voltage is greater than 9 volts. |
Conditions for Setting the DTC
One of the following conditions exists for 0.2 seconds:
| • | The voltage across the pump motor is greater than 10.2 volts. |
| • | The pump motor low side voltage is less than 2.7 volts. |
Action Taken When the DTC Sets
If equipped, the following actions occur:
| • | The EBCM disables the ABS/TCS/VSES/DRP for the duration of the ignition cycle. |
| • | The ABS indicator turns ON. |
| • | The TRACTION CONTROL indicator turns ON. |
| • | The DIC displays the SERVICE STABILITY SYS message. |
| • | DTC C1248 also sets. |
| • | The red BRAKE warning indicator turns ON. |
Conditions for Clearing the DTC
| • | The condition for the DTC is no longer present and the DTC is cleared with a scan tool. |
| • | The EBCM automatically clears the history DTC when a current DTC is not detected in 100 consecutive drive cycles. |
Diagnostic Aids
| • | This DTC determines if there is a short in the pump motor control circuit. |
| • | The pump motor is integral to the BPMV. The pump motor is not serviceable. |
Test Description
The number below refers to the step number on the diagnostic table.
Step | Action | Value(s) | Yes | No | ||||||
|---|---|---|---|---|---|---|---|---|---|---|
1 | Did you perform the ABS Diagnostic System Check? | -- | Go to Step 2 | |||||||
2 |
Did you find and correct the condition? | -- | Go to Step 8 | Go to Step 3 | ||||||
Does the resistance measure less than the specified value? | 5 ohms | Go to Step 4 | Go to Step 5 | |||||||
4 | Inspect for poor connections at the pump motor harness pigtail connector of the BPMV. Refer to Testing for Intermittent Conditions and Poor Connections and Connector Repairs in Wiring Systems. Did you find and correct the condition? | -- | Go to Step 8 | Go to Step 6 | ||||||
5 | Inspect for poor connections at the harness connector of the EBCM. Refer to Testing for Intermittent Conditions and Poor Connections and Connector Repairs in Wiring Systems. Did you find and correct the condition? | -- | Go to Step 8 | Go to Step 7 | ||||||
6 | Replace the BPMV. Refer to Brake Pressure Modulator Valve Replacement . Did you complete the repair? | -- | Go to Step 8 | -- | ||||||
7 |
Important: Perform the setup procedure for the EBCM. An unprogrammed EBCM will
result in the following conditions:
Replace the EBCM. Refer to Electronic Brake Control Module Replacement . Did you complete the repair? | -- | Go to Step 8 | -- | ||||||
8 |
Does the DTC reset? | -- | Go to Step 2 | System OK |
