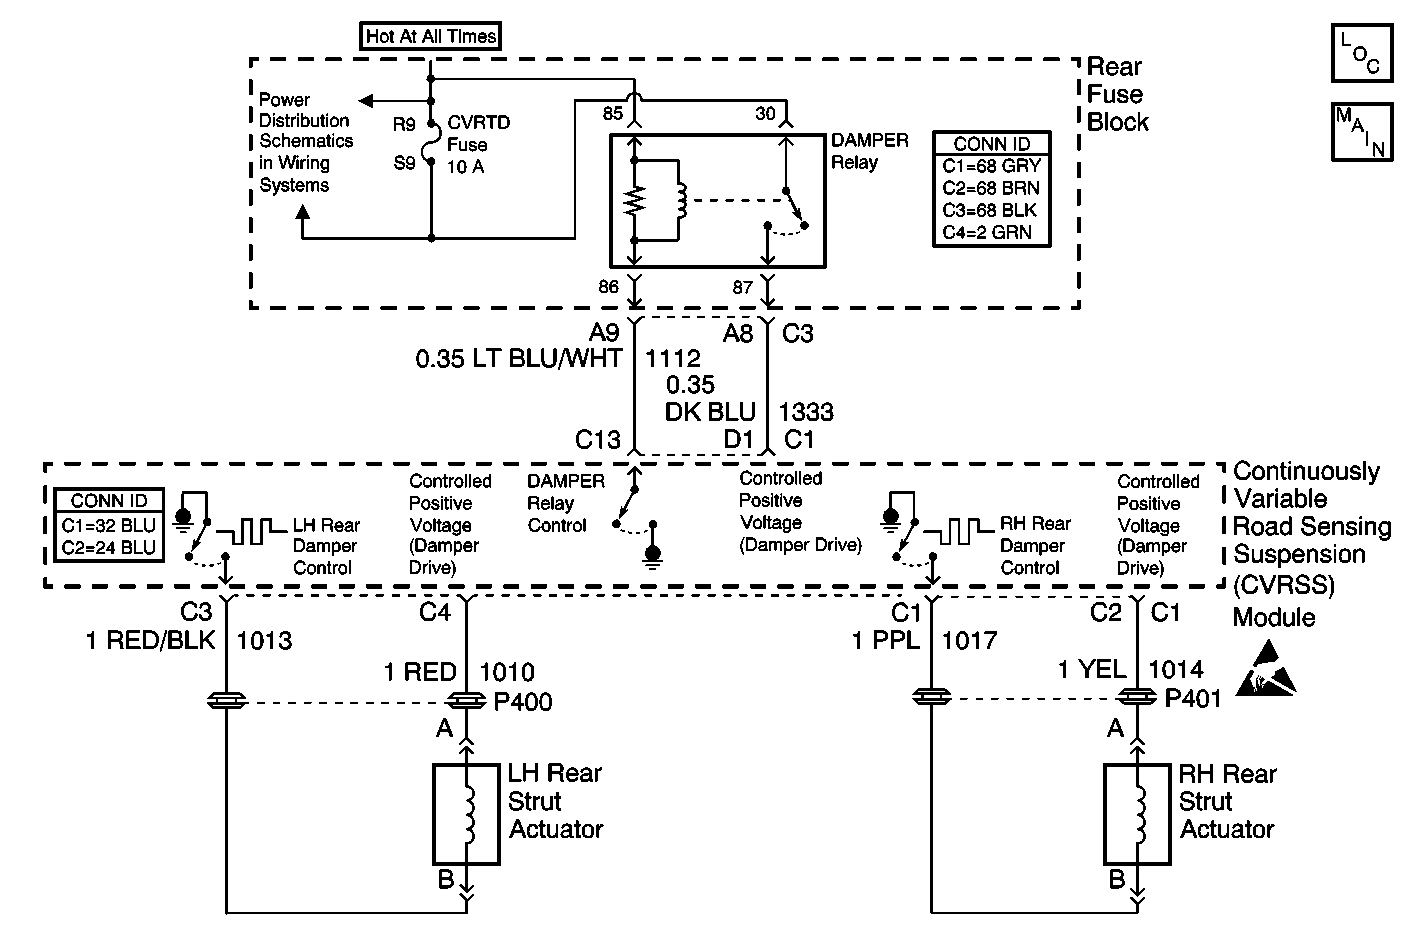
Circuit Description
The LR damper actuator is controlled by the Electronic Suspension Control (ELC) module with a Pulse-Width Modulation (PWM) signal. Battery voltage is modulated (switched on and off) at a high frequency (2.0 kHz), thus, controlling the amount of current delivered to the actuator. By controlling the amount of current to the actuator, the Electronic Suspension Control (ELC) module can then control the damping force in the damper. A higher level of damping force is achieved by providing correspondingly higher current levels, relating to higher percentages of PWM duty cycle.
The default damper state (no battery voltage) is one that provides a minimum damping force.
Conditions for Running the DTC
| • | The Ignition is on. |
| • | The fault is detected during three consecutive ignition cycles, or during the same ignition cycle after clearing the DTC with a scan tool. |
Conditions for Setting the DTC
The DTC is set when the Electronic Suspension Control (ELC) module measures a feedback voltage lower than a preset value during two consecutive OFF-state damper diagnostic test procedures.
Action Taken When the DTC Sets
| • | The LR damper actuator will be disabled by commanding 0 percent PWM duty cycle. |
| • | The LR corner of the vehicle will be soft. |
| • | The SERVICE RIDE CONTROL message will be displayed. |
Conditions for Clearing the MIL/DTC
| • | The scan tool can be used to clear the DTC. |
| • | The On-Board diagnostic CLEAR RSS CODES feature can be used to clear the DTC. |
| • | The DTC is saved as history when the Electronic Suspension Control (ELC) module no longer sees an open in the actuator circuit. The DTC will clear if the fault does after 50 consecutive ignition cycles. |
Diagnostic Aids
Refer to Testing for Intermittent Conditions and Poor Connections in Wiring Systems.
Test Description
The number(s) below refer to the step number(s) on the diagnostic table.
-
Tests for voltage at the coil side of the LR solenoid.
-
Verifies that the Electronic Suspension Control (ELC) module is providing ground to the LR solenoid.
-
Tests if ground is constantly being applied to the LR solenoid.
Step | Action | Value(s) | Yes | No |
|---|---|---|---|---|
1 | Did you perform the Road Sensing Suspension Diagnostic System Check? | -- | Go to Step 2 | Go to Diagnostic System Check |
2 |
Does the LR solenoid turn ON and OFF with each command? | -- | Go to Diagnostic Aids | Go to Step 3 |
Does the test lamp illuminate? | -- | Go to Step 4 | Go to Step 10 | |
Does the test lamp turn ON and OFF with each command? | -- | Go to Step 8 | Go to Step 5 | |
Does the test lamp remain illuminated with each command? | -- | Go to Step 7 | Go to Step 6 | |
6 | Test the control circuit of the LR solenoid for an open. Refer to Circuit Testing and Wiring Repairs in Wiring Systems. Did you find and correct the condition? | -- | Go to Step 13 | Go to Step 9 |
7 | Test the control circuit of the LR solenoid for a short to ground. Refer to Circuit Testing and Wiring Repairs in Wiring Systems. Did you find and correct the condition? | -- | Go to Step 13 | Go to Step 9 |
8 | Inspect for poor connections at the LR solenoid. Refer to Testing for Intermittent Conditions and Poor Connections and Connector Repairs in Wiring Systems. Did you find and correct the condition? | -- | Go to Step 13 | Go to Step 11 |
9 | Inspect for poor connections at the harness connector of the Electronic Suspension Control (ELC) module. Refer to Testing for Intermittent Conditions and Poor Connections and Connector Repairs in Wiring Systems. Did you find and correct the condition? | -- | Go to Step 13 | Go to Step 12 |
10 | Repair the coil side feed circuit of the LR solenoid. Refer to Wiring Repairs in Wiring Systems. Did you complete the repair? | -- | Go to Step 13 | -- |
11 | Replace the LR shock absorber. Refer to Shock Absorber Replacement . Did you complete the replacement? | -- | Go to Step 13 | -- |
12 |
Important: Perform the set up procedure for the Electronic Suspension Control (ELC) module. Replace the Electronic Suspension Control (ELC) module. Refer to Electronic Suspension Control Module Replacement . Did you complete the replacement? | -- | Go to Step 13 | -- |
13 |
Does the DTC reset? | -- | Go to Step 2 | System OK |
