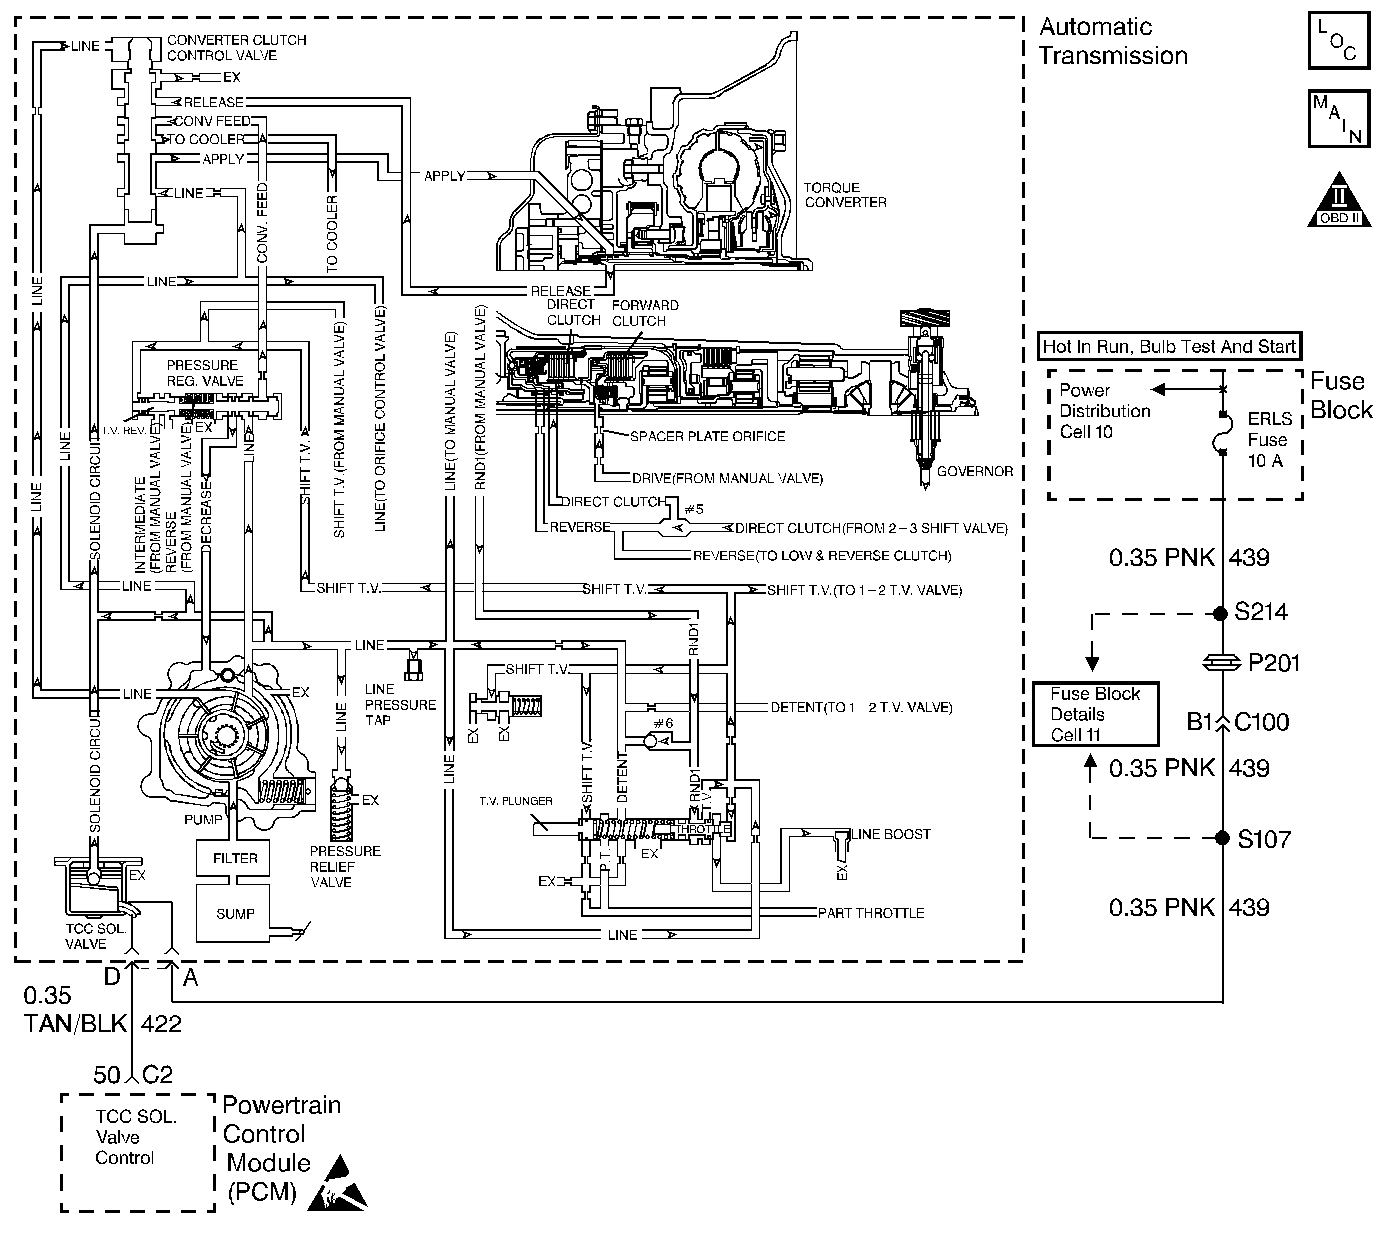
Circuit Description
The Powertrain Control Module (PCM) monitors the Torque Converter Clutch (TCC) slip speed. The PCM calculates the difference between the engine speed and the transmission output speed. In D3 drive range with the TCC engaged, the engine speed should closely match the transmission output speed.
When the PCM detects excessive slip of the TCC, the forward clutch, and the direct clutch when the TCC is engaged in 3rd gear, then DTC P1870 sets. DTC P1870 is a type B DTC.
Conditions for Setting the DTC
| • | No Throttle Position (TP) sensor DTCs P0122 or P0123. |
| • | No Vehicle Speed Sensor Assembly (VSS Assy.) DTCs P0502 or P0503. |
| • | The engine speed is 1,500-4,000 RPM. |
| • | MAP is 30-105 kPa. |
| • | The throttle angle is 10-50%. |
| • | The transmission is in D3 range. |
| • | The Torque Converter Clutch (TCC) is On for 5 seconds. |
| • | The TCC slip speed is greater than 148-1,000 RPM. |
| • | The vehicle speed is 56-132 km/h (35-82 mph). |
| • | The speed ratio is 0.95-1.34. |
| • | All of the above conditions are met for 7 seconds for 2 TCC engagements. |
Action Taken When the DTC Sets
| • | The PCM illuminates the Malfunction Indicator Lamp (MIL). |
| • | The PCM inhibits TCC engagement. |
| • | DTC P1870 will be stored in PCM history. |
Conditions for Clearing the MIL/DTC
| • | The PCM turns OFF the MIL after three consecutive trips without a failure reported. |
| • | A scan tool can clear the DTC from the PCM history. The PCM clears the DTC from the PCM history if the vehicle completes 40 warm-up cycles without a failure reported. |
| • | The PCM cancels the DTC default actions when the fault no longer exists and the ignition is OFF long enough in order to power down the PCM. |
Diagnostic Aids
| • | Inspect the wiring at the PCM, the Automatic Transmission 4-way connector and all other circuit connecting points for the following conditions: |
| - | A bent terminal |
| - | A backed out terminal |
| - | A damaged terminal |
| - | Poor terminal tension |
| - | A chafed wire |
| - | A broken wire inside the insulation |
| - | Moisture intrusion |
| - | Corrosion |
| • | Verify that the final drive ratio is correct for the vehicle. |
| • | Check for overloading or trailer towing in excess of vehicle capacity. |
Test Description
The numbers below refer to the step numbers on the diagnostic table.
-
This step tests for excessive torque converter slip while the TCC is engaged.
-
Low fluid level may be causing the slipping.
-
Low line pressure may be causing the slipping.
Step | Action | Value(s) | Yes | No | ||||||||||||||||||||
|---|---|---|---|---|---|---|---|---|---|---|---|---|---|---|---|---|---|---|---|---|---|---|---|---|
1 | Was the Powertrain On-Board Diagnostic (OBD) System Check performed? | -- | ||||||||||||||||||||||
Important: Before clearing the DTCs, use the scan tool in order to record the DTC Freeze Frame and Failure Records for reference. Using the Clear Info function will erase the Freeze Frame and Failure Records from the PCM. Important: Record the TCC slip speed when the transmission is in third gear, with the TCC enabled or engaged. While the TCC is engaged, is the TCC slip speed greater than the specified value? | 150 RPM | Refer to Diagnostic Aids | ||||||||||||||||||||||
3 |
Is the test light On when the TCC solenoid is commanded on? | -- | ||||||||||||||||||||||
4 | Inspect circuit 422, from the Automatic Transmission 4-way connector to the PCM, for an open. Refer to General Electrical Diagnosis . Did you find and correct the condition? | -- | ||||||||||||||||||||||
5 | Replace the PCM. Refer to PCM Replacement/Programming . Is the replacement complete? | -- | Go to PCM Replacement/Programming | |||||||||||||||||||||
Perform the Transmission Fluid Check . Is the procedure complete? | -- | Go to Transmission Fluid Check | ||||||||||||||||||||||
7 |
Refer to Transmission Control Replacement . Did you find and correct the condition? | -- | ||||||||||||||||||||||
8 | Inspect the Throttle Valve (TV) cable for the following conditions:
Refer to Automatic Transmission Throttle Valve Cable Replacement or Automatic Transmission Throttle Valve Cable Adjustment . Did you find and correct the condition? | -- | ||||||||||||||||||||||
Inspect for low transmission line pressure. Refer to Line Pressure Check . Is the line pressure within specifications? | -- | |||||||||||||||||||||||
10 | Inspect for the following potential sources of the low line pressure:
Refer to Unit Repair. Did you find and correct the condition? | -- | -- | |||||||||||||||||||||
11 | Inspect the TCC hydraulic circuit for the following conditions:
Refer to Unit Repair. Did you find and correct the condition? | -- | ||||||||||||||||||||||
12 | Inspect the torque converter for the following conditions:
Refer to Unit Repair. Did you find and correct the condition? | -- | ||||||||||||||||||||||
13 | Inspect the direct clutch for the following conditions:
Refer to Unit Repair. Did you find and correct the condition? | -- | ||||||||||||||||||||||
14 | Inspect the forward clutch for the following conditions:
Refer to Unit Repair. Did you find and correct the condition? | -- | -- | |||||||||||||||||||||
15 | In order to verify your repair, perform the following procedure:
Has the test run and passed? | -- | System OK |
