Door Window Channel Replacement Standard
Removal Procedure (Front)
- Remove the front door trim panel. Refer to Door Trim Panel Replacement .
- Remove the front door water deflector in order to access the window channel retainer. Refer to Door Water Deflector Replacement .
- Remove the front door window assembly. Refer to Door Window Replacement .
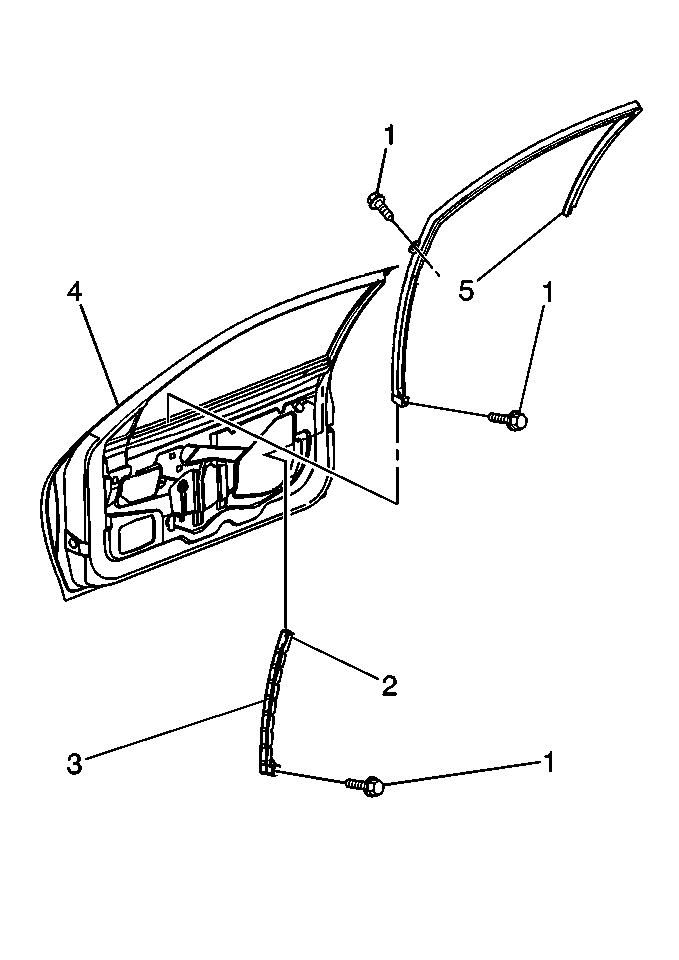
- Remove the bolts (1) from the upper window channel retainer.
- Remove the upper window channel retainer (5).
- Remove the bolt (1) from the lower window channel retainer.
- Pull upward on the lower window channel retainer (3) in order to disengage the hook.
- Remove the lower window channel retainer (3).

Installation Procedure (Front)
- Push downward on the lower window channel retainer (3) in order to engage the hook.
- Install the bolt (1) to the lower window channel retainer.
- Install the upper window channel retainer (5) by fully seating the outboard seal lip along the front door applique.
- Seat the inboard seal carrier on the weld flange.
- Install the bolts (1) to the upper window channel retainer.
- Install the front door window assembly. Refer to Door Window Replacement .
- Install the water deflector. Refer to Door Water Deflector Replacement .
- Install the front door trim panel. Refer to Door Trim Panel Replacement .

Notice: Use the correct fastener in the correct location. Replacement fasteners must be the correct part number for that application. Fasteners requiring replacement or fasteners requiring the use of thread locking compound or sealant are identified in the service procedure. Do not use paints, lubricants, or corrosion inhibitors on fasteners or fastener joint surfaces unless specified. These coatings affect fastener torque and joint clamping force and may damage the fastener. Use the correct tightening sequence and specifications when installing fasteners in order to avoid damage to parts and systems.
Tighten
Tighten the bolt (1) to 10 N·m (89 lb in).
Tighten
Tighten the bolts to 2 N·m (13 lb in).
Removal Procedure (Rear)
- Remove the rear door trim panel. Refer to Door Trim Panel Replacement .
- Remove the rear door water deflector in order to access the window channel retainer. Refer to Door Water Deflector Replacement .
- Remove the rear door window assembly. Refer to Door Window Replacement .
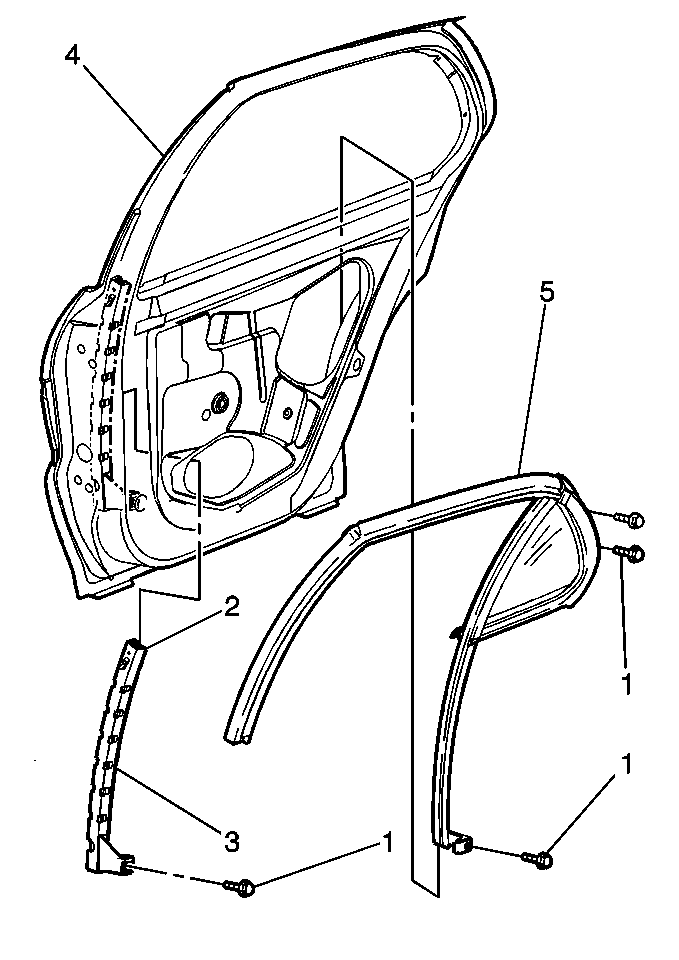
- Remove the bolts (1) from the upper window channel retainer.
- Remove the upper window channel retainer (5).
- Remove the bolt (1) from the lower window channel retainer.
- Pull upward on the lower window channel retainer (3) in order to disengage the hook.
- Remove the lower window channel retainer (3).

Installation Procedure (Rear)
- Push downward on the lower window channel retainer (3) in order to engage the hook.
- Install the bolt (1) to the lower window channel retainer.
- Install the upper window channel retainer (5) by fully seating the outboard seal lip along the rear door applique.
- Seat the inboard seal carrier on the weld flange.
- Install the bolts (1) to the upper window channel retainer.
- Install the rear door window assembly. Refer to Door Window Replacement .
- Install the water deflector. Refer to Door Water Deflector Replacement .
- Install the rear door trim panel. Refer to Door Trim Panel Replacement .

Notice: Use the correct fastener in the correct location. Replacement fasteners must be the correct part number for that application. Fasteners requiring replacement or fasteners requiring the use of thread locking compound or sealant are identified in the service procedure. Do not use paints, lubricants, or corrosion inhibitors on fasteners or fastener joint surfaces unless specified. These coatings affect fastener torque and joint clamping force and may damage the fastener. Use the correct tightening sequence and specifications when installing fasteners in order to avoid damage to parts and systems.
Tighten
Tighten the bolt (1) to 10 N·m (89 lb in).
Tighten
Tighten the bolts to 2 N·m (13 lb in).
Door Window Channel Replacement Convertible
Removal Procedure (Front)
- Remove the trim panel. Refer to Upper Extension Trim Panel Replacement .
- Remove the door trim panel. Refer to Door Trim Panel Replacement .
- Remove the door rear view mirror. Refer to Outside Rearview Mirror Replacement .
- Peel the deflector away from the door inner panel as necessary. Refer to Door Water Deflector Replacement .
- Remove the door belt outer molding.
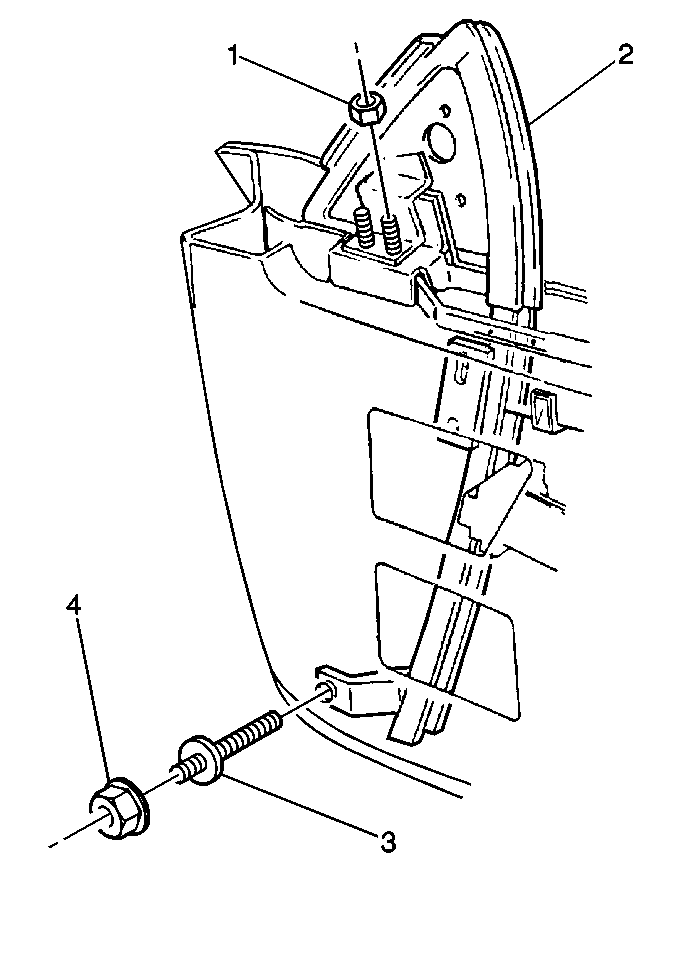
- Remove the nuts (1) from the door bracket studs.
- Remove the nutwasher (4).
- Remove the glass front channel and seal assembly (2).

Caution: Disconnect the power window switch when working inside the driver's door. When operated, the Express Down Feature allows the door window to drop very quickly, without stopping, which could cause personal injury.
| 8.1. | Lift the glass front channel and seal assembly (2). |
| 8.2. | Remove the adjustment stud (3) through the door inner panel access hole. |
| 8.3. | Pull the front channel upward through the top of the door. |
Installation Procedure (Front)
- Install the glass front channel and seal assembly (2).
- Install the nutwasher (4).
- Install the nuts (1) to the door bracket studs.
- Install the door belt outer molding.
- Adjust the window glass as necessary.
- Install the water deflector.
- Install the door rear view mirror. Refer to Outside Rearview Mirror Replacement .
- Install the trim panel. Refer to Upper Extension Trim Panel Replacement .
- Remove the door trim panel. Refer to Door Trim Panel Replacement .

| 1.1. | Insert the glass front channel and seal assembly (2) through the top of the door. Press downward enough in order to install the adjustment stud (3) through the door inner panel access hole. |
| 1.2. | Engage the front channel to the door window glass. |
Position the channel upper mounting bracket over the door studs.
| 1.3. | Place the adjustment stud (3) through the door inner panel hole. |
Do not tighten the nutwasher at this time.
Notice: Use the correct fastener in the correct location. Replacement fasteners must be the correct part number for that application. Fasteners requiring replacement or fasteners requiring the use of thread locking compound or sealant are identified in the service procedure. Do not use paints, lubricants, or corrosion inhibitors on fasteners or fastener joint surfaces unless specified. These coatings affect fastener torque and joint clamping force and may damage the fastener. Use the correct tightening sequence and specifications when installing fasteners in order to avoid damage to parts and systems.
Tighten
Tighten the nuts (1) to 6 N·m (53 lb in).
Tighten
Tighten the nutwasher (4) to 10 N·m (89 lb in).
Removal Procedure (Rear)
- Remove the door trim panel. Refer to Door Trim Panel Replacement .
- Remove the trim panel. Refer to Upper Extension Trim Panel Replacement .
- Peel the deflector away from the door inner panel as necessary. Refer to Door Water Deflector Replacement .
- Position the door glass approximately 51 mm (2 in) from the full-up position.
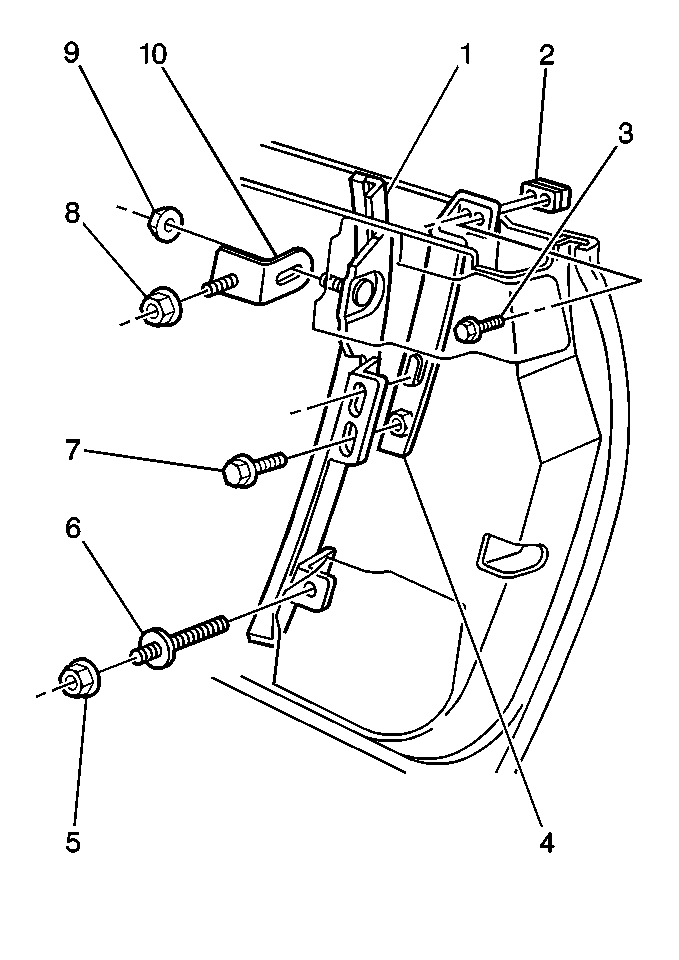
- Remove the nutwasher (5) and the nut (8).
- Remove the window rear channel (1).

Caution: Disconnect the power window switch when working inside the driver's door. When operated, the Express Down Feature allows the door window to drop very quickly, without stopping, which could cause personal injury.
| 6.1. | Tip the top of the window rear channel (1) outward and rearward. |
| 6.2. | Slide the bottom of the window rear channel (1) rearward in order to disengage the channel from the window. |
| 6.3. | Pull the window rear channel (1) from the door through the access hole. |
Disassembly Procedure (Rear)
- Remove the adjustment stud (6).
- Remove the screws (3) and the channel upstop (2).
- Remove the screw (7) and the rear upstop bracket (4).
- Remove the nut (9) and the rear upper extension bracket (10).

Assembly Procedure (Rear)
- Install the rear upper extension bracket (10) and the nut (9).
- Install the rear upstop bracket (4) and the screw (7).
- Install the channel upstop (2) and the screws (3).
- Install the adjustment stud (6).

Do not tighten the nut at this time.
Do not tighten the screw at this time.
Installation Procedure (Rear)
- Install the window rear channel (1) through the access hole.
- Install the nuts (8,9).
- Adjust the window glass as necessary.
- Install the water deflector. Refer to Door Water Deflector Replacement .
- Install the trim panel. Refer to Upper Extension Trim Panel Replacement .
- Install the door trim panel. Refer to Door Trim Panel Replacement .

| 1.1. | Tip the window rear channel (1) upward into position. |
| 1.2. | Align the window rear channel (1) to the rear window guide. |
| 1.3. | Position the rear extension bracket (10) and the adjustment stud (6) through the door inner panel holes. |
Notice: Use the correct fastener in the correct location. Replacement fasteners must be the correct part number for that application. Fasteners requiring replacement or fasteners requiring the use of thread locking compound or sealant are identified in the service procedure. Do not use paints, lubricants, or corrosion inhibitors on fasteners or fastener joint surfaces unless specified. These coatings affect fastener torque and joint clamping force and may damage the fastener. Use the correct tightening sequence and specifications when installing fasteners in order to avoid damage to parts and systems.
Tighten
Tighten the nuts (8,9) to 6 N·m (53 lb in).
Tighten
Tighten the nutwasher (5) to 10 N·m (89 lb in).
