Removal Procedure
Tools Required
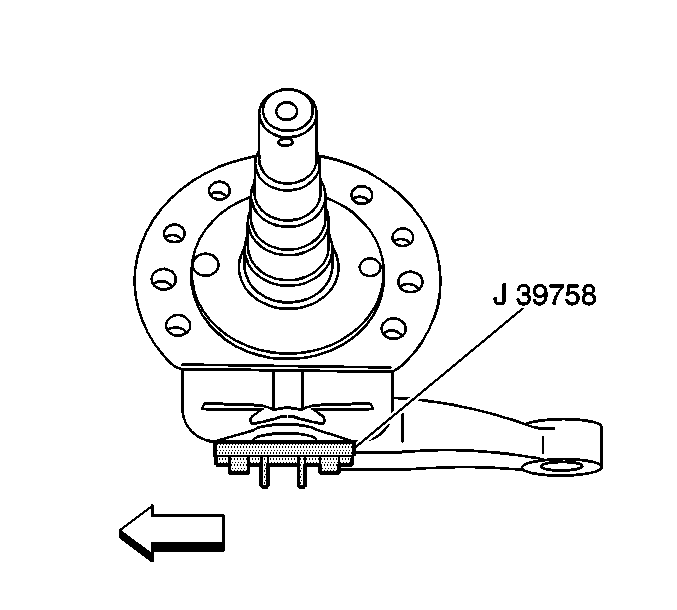
J 39758 Kingpin Holding Tool
- Set the parking brake.
- Block the vehicle rear wheels.
- Raise the vehicle frame until the front tires clear the floor. Refer to Lifting and Jacking the Vehicle in General Information.
- Support the frame using suitable safety stands.
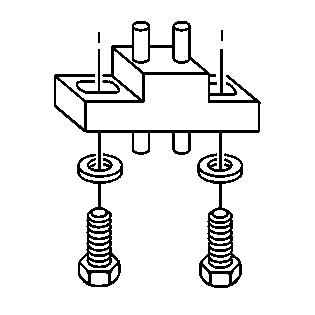
- Remove the front tire and wheel assembly. Refer to Tire and Wheel Removal and Installation in Tires and Wheels.
- Remove the brake components as needed. Refer to Brake Caliper Replacement in Front Disc Brakes Caliper.
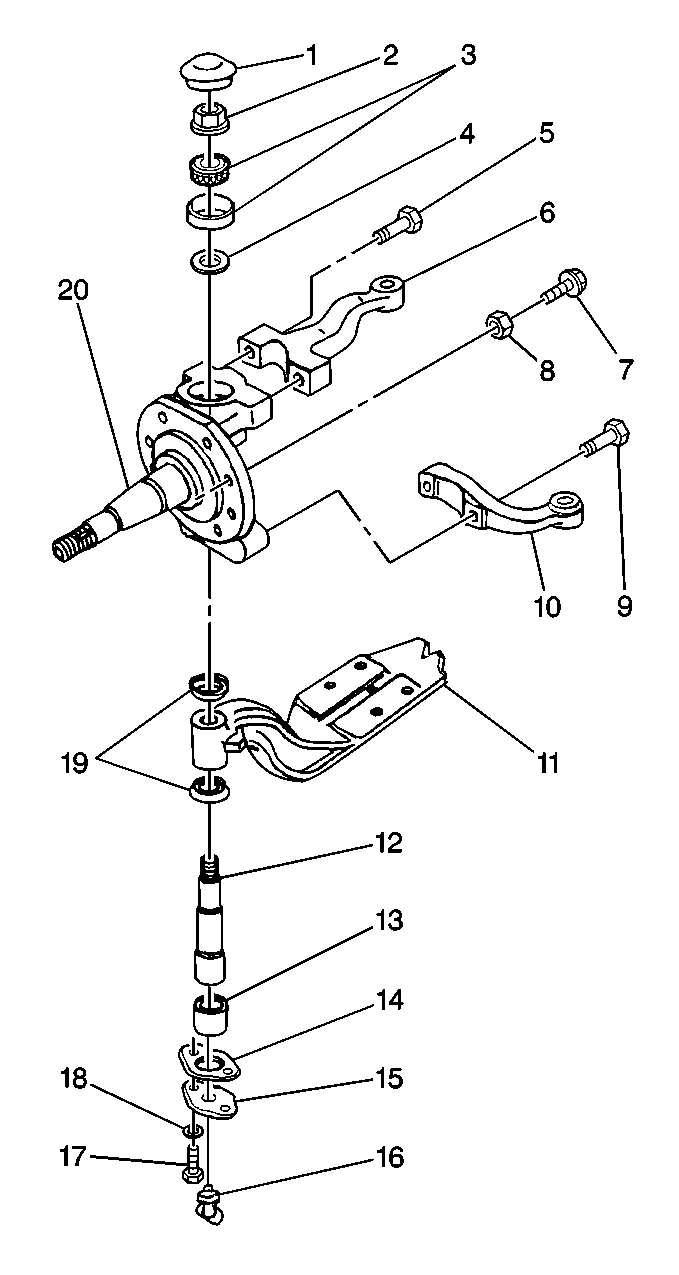
- Remove the upper kingpin dust cap (1).
- Using the J 39758 remove the kingpin nut.
- Insert the tool pins into the holes at the bottom of the kingpin.
- Align the tool's bolt holes and secure the tool with two bolts into the steering knuckle. This will keep the kingpin from spinning.
- Remove the kingpin nut (2).
- Remove the kingpin bearing-and-cup assembly (3).
- Clean the following components using cleaning solvent:
Notice: Do not use the front crossmember to support the vehicle or the crossmember may buckle.
| • | The kingpin nut |
| • | The bearing. Soak the bearing until all of the old lubricant is gone. |
| • | The cavity |
Installation Procedure
Tools Required
| • | J 35999 Tension Scale |
| • | J 39758 Kingpin HoldingTool |
- Pack the cavity and the kingpin thrust bearing (3) using high-temperature wheel bearing grease.
- Install the kingpin bearing (3).
- Using the J 39758 install the kingpin nut.
- Insert the tool pins into the holes at the bottom of the kingpin.
- Align the tool's bolt holes and secure the tool with two bolts into the steering knuckle. This will keep the kingpin from spinning.
- Install the kingpin nut (2).
- Use the J 35999 in order to measure the kingpin bearing preload. Refer to King Pin Bearing Preload .
- Install the dust cap (15) and install the snap ring.
- Install the lower kingpin cap bolt (17).
- Install the brake components as needed. Refer to Brake Caliper Replacement in Front Disc Brakes Caliper.
- Install the front tire and wheel assembly. Refer to Tire and Wheel Removal and Installation in Tires and Wheels.
- Lower the vehicle.
- Remove the blocks.
Notice: Use the correct fastener in the correct location. Replacement fasteners must be the correct part number for that application. Fasteners requiring replacement or fasteners requiring the use of thread locking compound or sealant are identified in the service procedure. Do not use paints, lubricants, or corrosion inhibitors on fasteners or fastener joint surfaces unless specified. These coatings affect fastener torque and joint clamping force and may damage the fastener. Use the correct tightening sequence and specifications when installing fasteners in order to avoid damage to parts and systems.
Tighten
Tighten the kingpin nut to 550 N·m (406 lb ft).

Tighten
Tighten the lower kingpin cap bolt to 24 N·m (18 lb ft).
