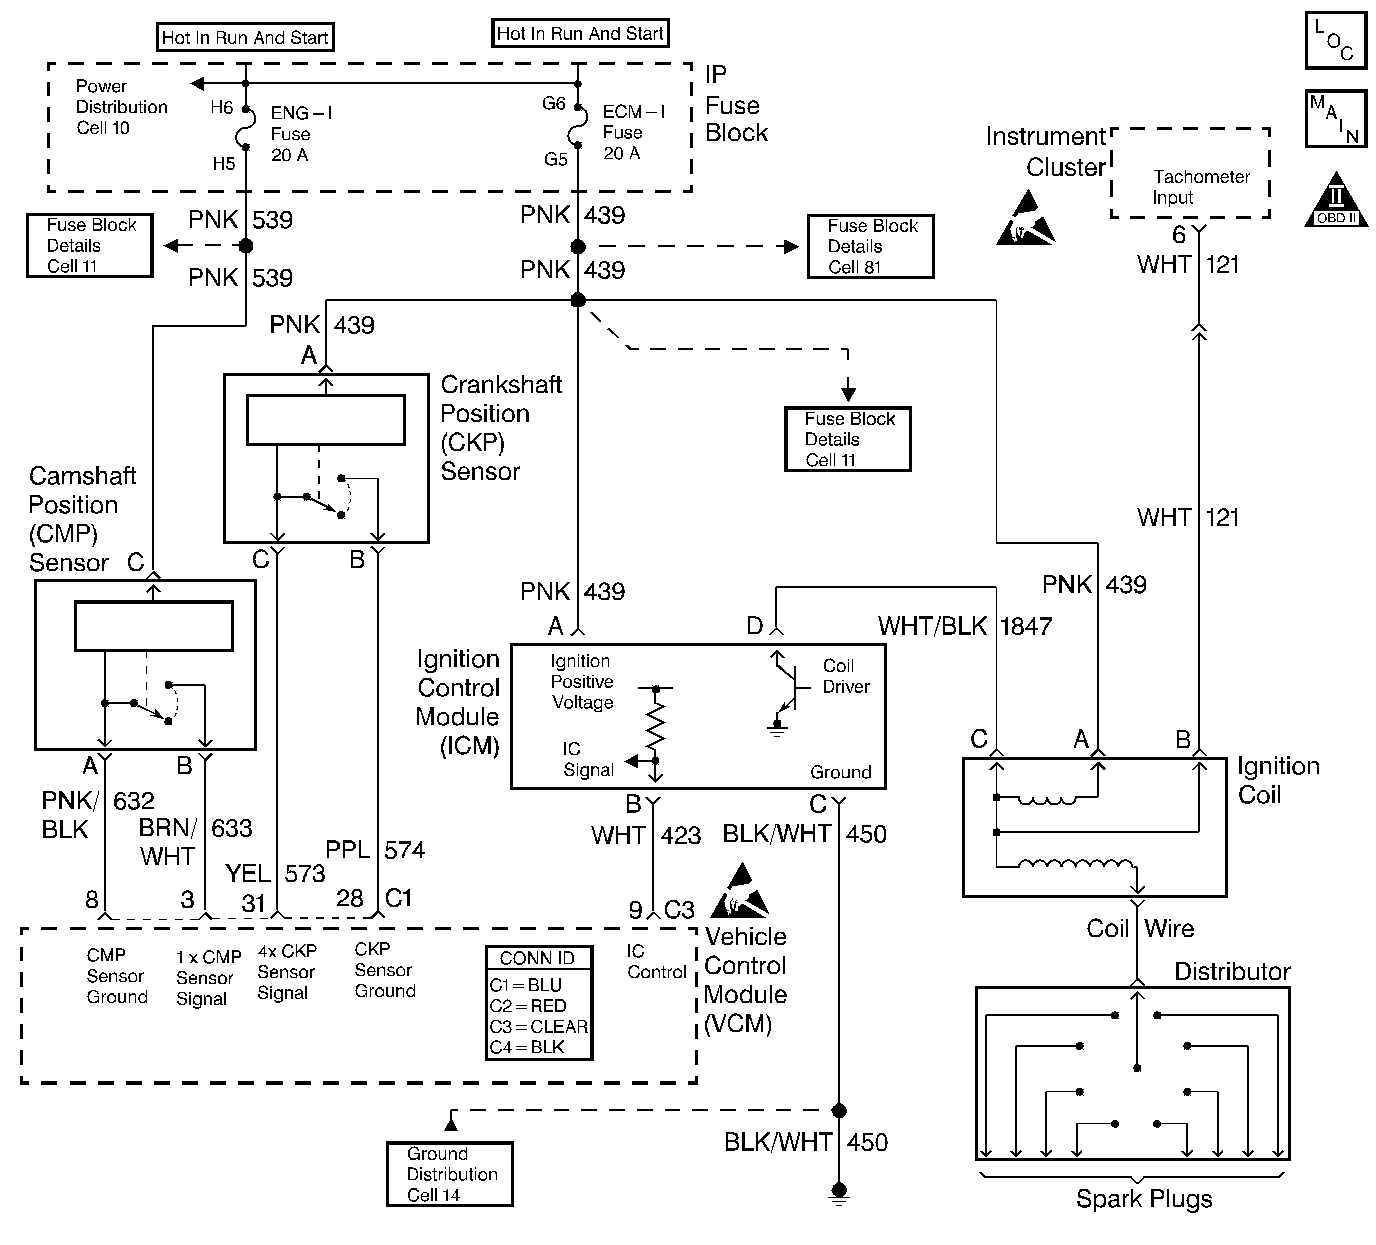
Circuit Description
The enhanced ignition system uses the crankshaft position (CKP) sensor in order to provide a timing input to the control module. Ignition control (IC) spark timing for each cylinder is based on this input. The control module provides the ignition timing signal to the ignition control module (ICM) to control the ignition coil. Each timing pulse detected by the ICM allows it to energize the ignition coil. A large secondary ignition voltage is induced in the secondary coil by the primary coil. This high voltage is switched to the correct spark plug by the distributor.
This DTC will set if the VCM detects an unusually low voltage on the ignition timing signal circuit.
Conditions for Running the DTC
| • | The ignition control is enabled |
| • | The engine speed is less than 250 RPM |
Conditions for Setting the DTC
The ignition control voltage is less than 0.04 volts
Action Taken When the DTC Sets
| • | The control module illuminates the malfunction indicator lamp (MIL) the first time the diagnostic runs and fails. |
| • | The control module will set the DTC and records the operating conditions at the time the diagnostic fails. The control module stores the failure information in the scan tools Freeze Frame/Failure Records. |
Conditions for Clearing the MIL or DTC
| • | The control module turns OFF the MIL after 3 consecutive drive trips when the test has run and passed. |
| • | A history DTC will clear if no fault conditions have been detected for 40 warm-up cycles. A warm-up cycle occurs when the coolant temperature has risen 22°C (40°F) from the startup coolant temperature and the engine coolant reaches a temperature that is more than 70°C (158°F) during the same ignition cycle. |
| • | Use a scan tool in order to clear the DTCs. |
Diagnostic Aids
Check for the following conditions:
Intermittent test--If the connections and the harness check OK, connect a DMM between VCM connector C3 pin 9 and C4 pin 18 and monitor the voltage while moving the related connectors and wiring harness. If the failure is induced, the voltage reading will change. This may help to isolate the malfunction.
An intermittent may be caused by any of the following conditions:
| • | A poor connection |
| • | Rubbed through wire insulation |
| • | A broken wire inside the insulation |
Thoroughly check any circuitry that is suspected of causing the intermittent complaint. Refer to Intermittents and Poor Connections Diagnosis in Wiring Systems.
If a repair is necessary, refer to Wiring Repairs or Connector Repairs in Wiring Systems.
Test Description
The numbers below refer to the step numbers in the diagnostic table.
-
If the engine starts at this point, the DTC 1361 is an intermittent.
-
This step determines if the IC signal from the VCM is available at the ignition coil module.
Step | Action | Value(s) | Yes | No |
|---|---|---|---|---|
1 |
Important: Before clearing the DTCs, use the scan tool Capture Info to save the Freeze Frame and Failure Records for reference. The control module's data is deleted once the Clear Info function is used. Did you perform the Powertrain On-Board Diagnostic (OBD) System Check? | -- | ||
Does DTC P1361 set? | -- | Go to Diagnostic Aids | ||
Is the voltage reading within the specified value? | 1-4 V | |||
4 |
Is the test lamp ON? | -- | ||
5 | Repair the short to ground in the IC control circuit. Refer to Wiring Repairs in Wiring Repairs. Is the action complete? | -- | -- | |
6 |
Is the test lamp ON? | -- | ||
7 | Repair the open ignition control module ground circuit. Refer to Wiring Repairs in Wiring Repairs. Is the action complete? | -- | -- | |
8 | Check for a poor ignition control module connection. Did you find a problem? | -- | ||
9 | Replace the ignition control module. Refer to Ignition Coil and Ignition Coil Module Replacement in Engine Electrical. Is the action complete? | -- | -- | |
10 | Repair the ignition control module connection. Refer to Connector Repairs or Wiring Repairs in Wiring Repairs. Is the action complete? | -- | -- | |
11 |
Is the action complete? | -- | -- | |
12 |
Does the scan tool indicate the diagnostic Passed? | -- | ||
13 | Does the scan tool display any additional undiagnosed DTCs? | -- | Go to the applicable DTC table | System OK |
