Tools Required
J 24319-B Universal Steering Linkage Puller
Use the connecting rod in order to connect the pitman arm to the relay arm. Use the adjustable connecting rod for centering the steering gear with the front axle. Replace the connecting rod if the rod is bent or if the ball stud is loose.
- Raise and support the vehicle. Refer to Lifting and Jacking the Vehicle in General Information.
- Remove the cotter pins and the castellated nuts from the connecting rod.
- Use the J 24319-B in order to remove the connecting rod from the pitman arm.
- Use the J 24319-B in order to remove the connecting rod from the steering knuckle.
- Loosen the adjuster clamp bolts.
- Discard the nuts and the bolts if you require more than 9 N·m (80 lb in) of torque in order to remove the nut from the bolt. Excessive torque may be required due to rusted components.
- Apply penetrating oil between the clamps and the tube.
- Rotate the clamps until the clamps move freely.
- Unscrew the connecting rod ends from the adjuster tube.
- Inspect the components for the following conditions:
- Clean the following components:

Notice: Do not attempt to disconnect a steering linkage joint by driving a wedge between the joint and the attached part. Seal damage may result which will cause premature failure of the joint.

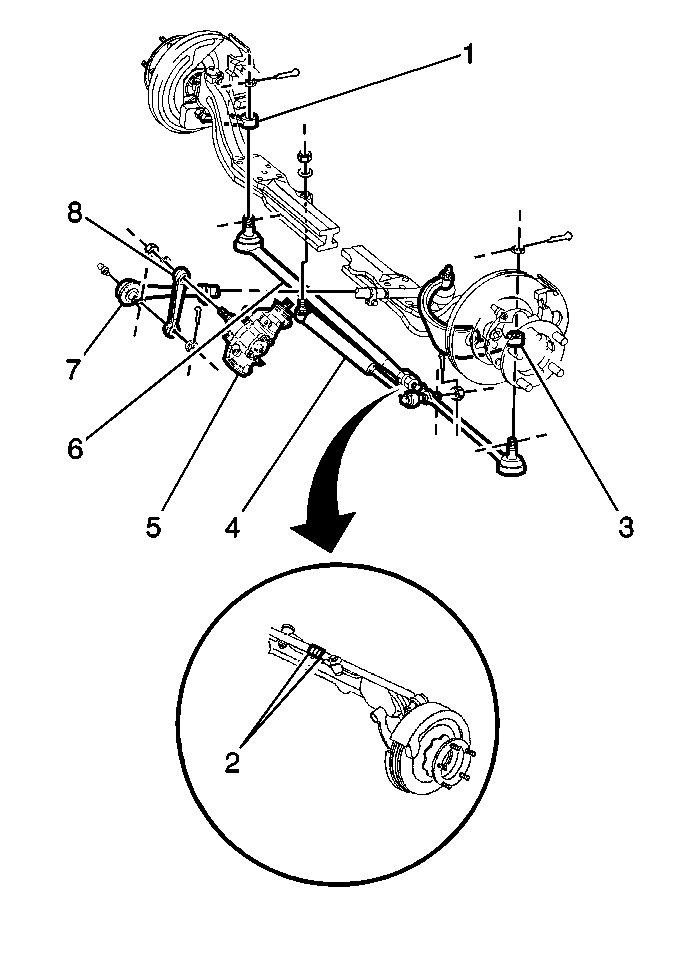
Important: Before you remove the connecting rod (7) adjuster tube, note the position of the connecting rod adjuster tube and the direction from which the bolts are installed.
| • | The ball stud threads for damage |
| • | The ball stud seals for wear |
| • | The adjuster tube for bending |
| • | The adjuster tube for damaged threads |
| • | The threads on the ball stud |
| • | The threads on the ball stud nut |
Installation Procedure
- If you removed the connecting rod ends, lubricate the connecting rod threads with chassis lubricant. Refer to Fluid and Lubricant Recommendations in Maintenance and Lubrication.
- Install the connecting rod (7) ends to the adjuster tube.
- Install the inner connecting rod ball stud to the pitman arm (8).
- Install the castellated nut.
- Install the outer connecting rod ball stud to the inner arm of the steering knuckle (3).
- Install the castellated nut and the cotter pin to the outer connecting rod ball stud.
- Ensure that the connecting rod ends to the pitman arm and the steering knuckle are in correct relationship to each other after adjustment within 2 degrees.
- Adjust the steering gear high point centering. Refer to Steering Gear Adjustments in Power Steering System.
- Install the adjuster clamp bolts.
- Ensure that the clamps are positioned between the locating dimples (1) and clear of the dimples at either end of the adjuster tube before tightening the nuts.
- Position the clamps within the angular travel as shown with rearward rotation (2) of 45 degrees. The slot (1) of the adjuster tube must not be within area (3) of the clamp jaws.
- Ensure that the gap adjacent to the adjuster tube (1) is NOT less than 0.127 mm (0.005 in).
- The clamp ends may touch when the nuts are tightened to specifications.
- Ensure that both the inner and the outer connecting rod ends rotate for the full travel of the connecting rod end.
- Maintain the position of each connecting rod end as you tighten the clamps. This will ensure free movement of each joint.
- Tighten the adjuster tube bolts.
- Lower the vehicle.

The number of threads on both the inner and the outer connecting rod ends must be equal within 3 threads.
Ensure that the seal is on the stud.
Notice: Use the correct fastener in the correct location. Replacement fasteners must be the correct part number for that application. Fasteners requiring replacement or fasteners requiring the use of thread locking compound or sealant are identified in the service procedure. Do not use paints, lubricants, or corrosion inhibitors on fasteners or fastener joint surfaces unless specified. These coatings affect fastener torque and joint clamping force and may damage the fastener. Use the correct tightening sequence and specifications when installing fasteners in order to avoid damage to parts and systems.
Tighten
Tighten the nut to 95 N·m (70 lb ft). Refer
to
Fastener Tightening Specifications
.
Tighten
Tighten the nut to 159 N·m (117 lb ft). Refer
to
Fastener Tightening Specifications
.


Tighten
Tighten the adjuster tube bolts to 68 N·m (50 lb ft).
