FRT. DOOR GLASS DISENGAGES REPAIR PROCEDURE OUTLINED

VEHICLES AFFECTED: 1987 CORSICA/TEMPEST
Customer comments of disengaged front door glass on 1987 Corsica and Tempest styles may be due to either the front door glass rear guide becoming unglued or the glass front run channel retainer being mislocated.
These conditions can be regaired by replacing the, door glass and guide with a new door glass and mechanically retained guide and/or repositioning the front run channel retainer and tightening in a proper sequence.
In either case the front run channel retainer may have become bent or distorted and should be inspected and replaced if necessary.
The following procedure should be used when replacing the door glass and guide. A rework of the rear sealing strip must be performed when doing this operation and is included in the procedure.
If the glass is disengaged with the door glass and rear guide still intact, the front run channel retainer will require repositioning. After inspection (and replacement if damaged), refer to steps 7, 8 and 9 in the install or connect portion of the procedure for the proper sequence.
As always, operate the door glass prior to door trim installation to insure a satisfactory repair.
Service Procedure:
1. Remove door trim panel. Refer to the Corsica/Beretta Preliminary Service Manual (ST-374-87) for further instructions on trim panel removal/ installation.
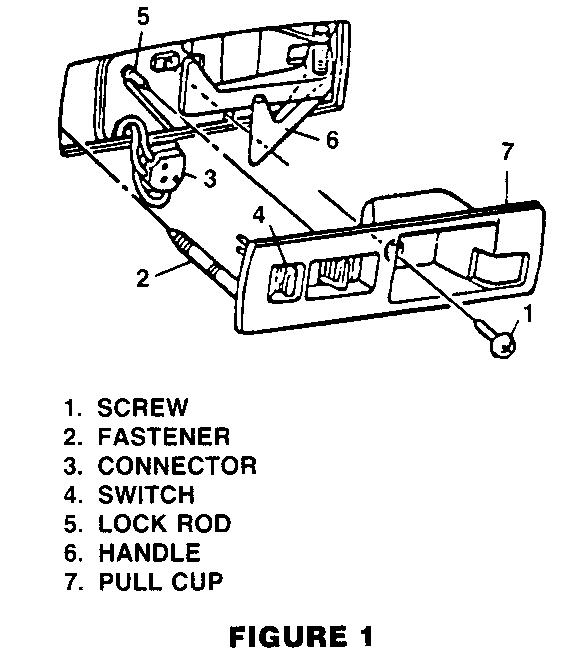
Special Care is required when removing door handle, pull cup so as not to damage plastic fastener (See Figure 1, #2).
2. Remove inner belt sealing strip.
3. Remove water deflector.
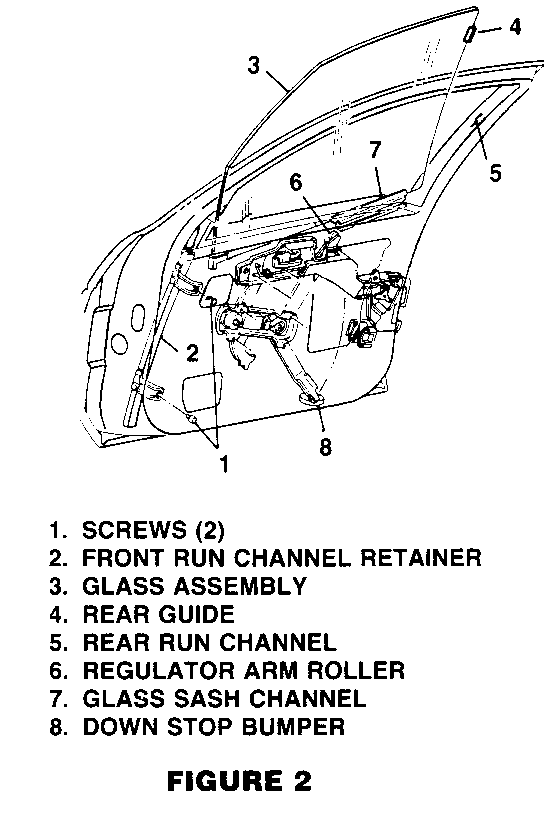
4. Remove front run channel retainer screws (Figure 2).
5. Remove front run channel retainer (Figure 2).
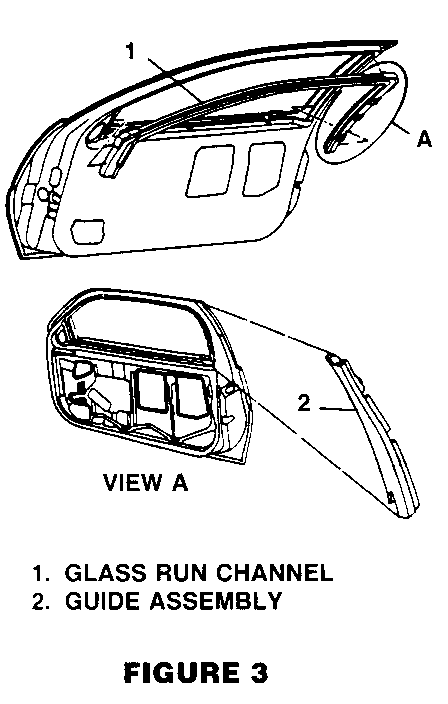
6. Remove rear guide assembly on inner rear leg of upper door frame by carefully using hammer and block of wood to drive forward, releasing clips (3) from metal flange (Figure 3).
7. Remove rear run channel by lowering door glass and pulling run channel forward out of door frame and sliding upward to disengage rear glass guide from run channel retainer.
8. Remove door glass assembly by rotating to disengage regulator roller from sash channel and lifting glass up and inboard of door frame.
The following steps are to be performed to remove the door frame scalp mouldings in order to modify the lower corner of the sealing strip on the rear portion of scalp moulding.
1. Remove trim cover to access outside mirror mounting screws.
2. Remove outside rear view mirror.
3. Remove outer belt sealing strip.
4. Remove screw at forward location of door frame scalp moulding.
5. Tape the painted surface of the door frame next to scalp moulding to prevent damage during scalp moulding removal.
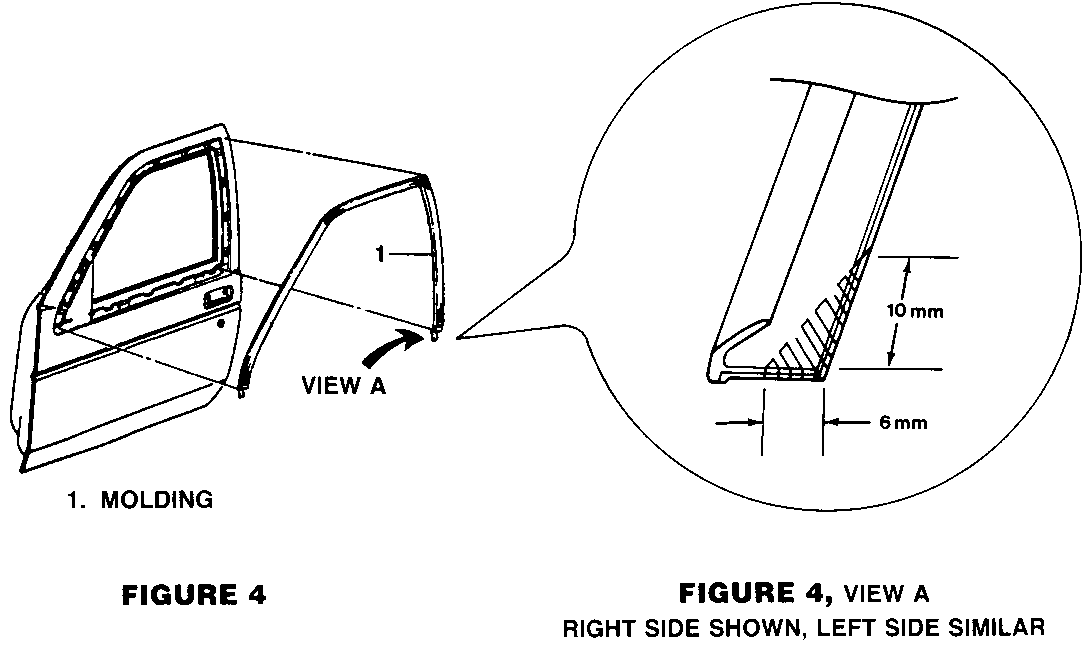
6. Remove door frame scalp moulding by using hammer and block of wood to disengage clips from door frame flanges (Figure 4).
7. After placing the scalp moulding face down on a clean protected work surface, remove the shaded portion (as shown in Figure 4, View A) of the rear sealing strip by using metal shears. (Be careful not to bend or distort the sealing strip during this operation).
Inspect and Replace (As required)
1. Inspect the front run channel retainer for damage - replace only as required.
1. Install door frame scalp moulding by installing the rear upper corner to the flange first and seating the remaining moulding to flange. Install the screw on the front portion of the scalp moulding.
2. Install rear guide on inner flange of rear upper door frame.
3. Install rear run channel assembly by locating the rear upper corners and front portion near mirror assembly first and seating the remaining portions into the door upper frame. (Lube with soap solution to installation).
4. Install outer belt sealing stip.
5. Install outside rear view mirror.
6. Install new door glass by lowering glass inboard of frame and rotating to engage regulator roller and sash channel. Position lower rear edge of glass in run channel and pull glass rearward to snap guide into rear run channel retainer.
7. Install front run channel retainer by snapping onto front glass guide and positioning to mounting slots on door inner panel. (Loosely install mounting screws).
8. Run glass to up position and tighten upper front run channel retainer mounting screw.
9. Run glass to down position and tighten lower front run channel retainer mounting screw.
10. Install inner belt sealing strip.
11. Install water deflector.
12. Install trim.cover to access mirror mounting screws.
13. Install door trim panel.
Labour Allowances: Front Run Channel Retainer -
Use Published Allowance
Door Glass Replacement and Sealing Strip Rework:
Use the most applicable labour operation from the Canadian Labour Time Guide and claim 1.2 hours per side.
Parts Listing
10087224 - Door Glass (clear) R.H.
10087225 - Door Glass (clear) L.H.
10087226 - Door Glass (tinted) R.H.
10087227 - Door Glass (tinted) L. H.
20493424 - Run Channel Retainer R. H.
20493425 - Run Channel Retainer L. H.
10087223 - Door Glass Rear Guide (Figure 2, Item 4)
.
General Motors bulletins are intended for use by professional technicians, not a "do-it-yourselfer". They are written to inform those technicians of conditions that may occur on some vehicles, or to provide information that could assist in the proper service of a vehicle. Properly trained technicians have the equipment, tools, safety instructions and know-how to do a job properly and safely. If a condition is described, do not assume that the bulletin applies to your vehicle, or that your vehicle will have that condition. See a General Motors dealer servicing your brand of General Motors vehicle for information on whether your vehicle may benefit from the information.
