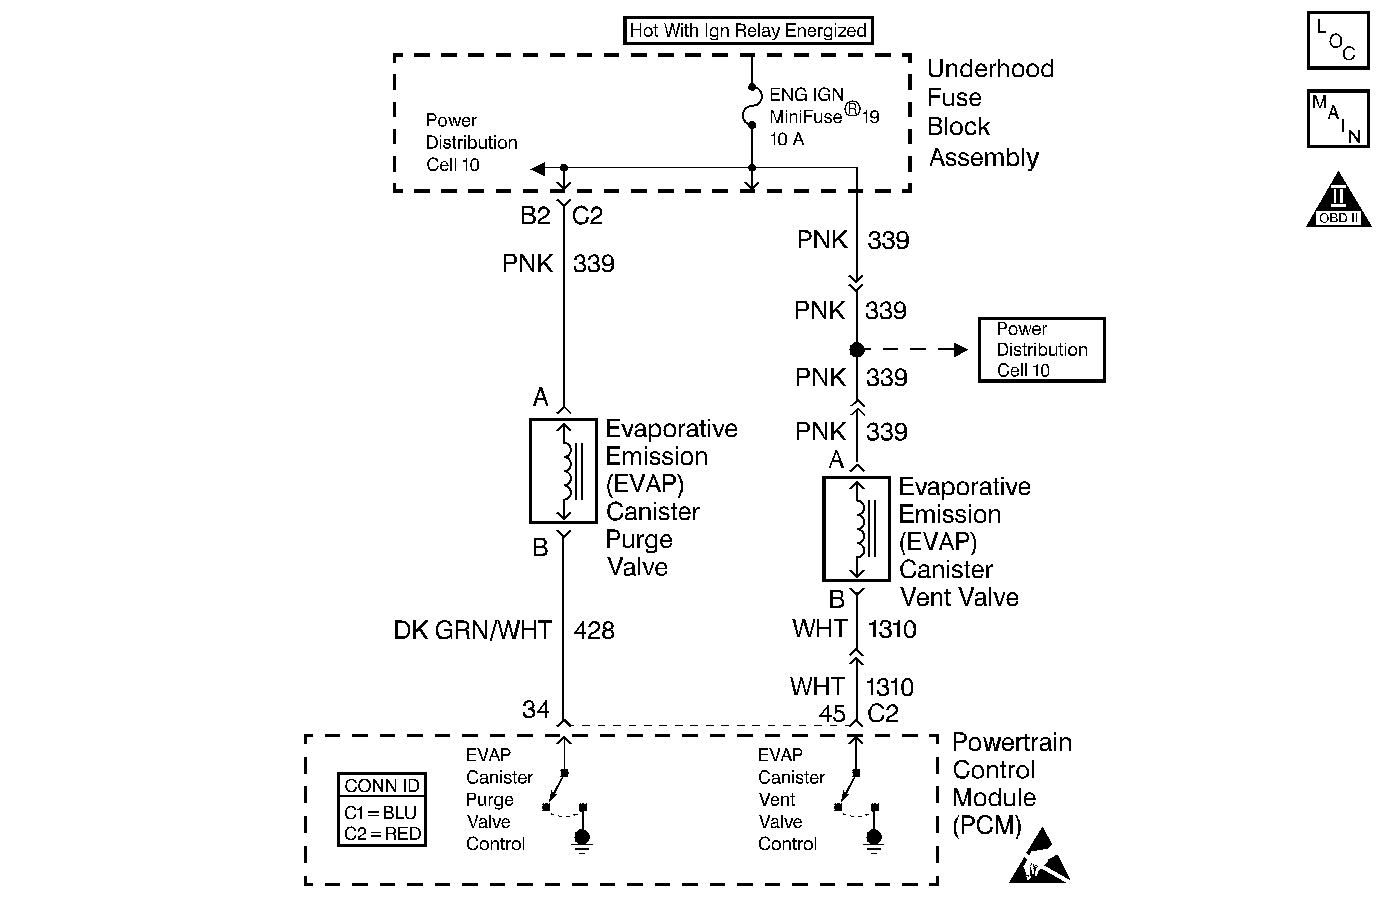
Circuit Description
The PCM tests the EVAP system for the following conditions:
| • | Large and small leaks |
| • | Excess vacuum |
| • | Purge flow during non-commanded conditions |
| • | Fuel Level and Fuel Pressure sensor faults |
| • | EVAP Purge and Vent Valve faults |
The PCM monitors the Fuel Tank Pressure sensor in order to determine the level of vacuum/pressure in the EVAP system. The PCM commands both the EVAP Purge Solenoid and the EVAP Vent Valve ON when the Conditions for Running the DTC are met in order to apply an engine vacuum to the EVAP system. The PCM commands the EVAP Purge Solenoid OFF once the system has reached a predetermined level of vacuum. This diagnostic tests for a vacuum in the EVAP system during a non-purge condition. This DTC sets if a vacuum continues to develop in the EVAP system after the EVAP purge solenoid has been commanded OFF.
Conditions for Running the DTC
| • | DTCs P0107, P0108, P0112, P0113, P0117, P0118, P0125, P0420, P0430, P0500, P0502, P0503, P0562, P0563, P1111, P1112, P1114, P1115, P1120, P1220, P1221, and HO2S DTCs are not set. |
| • | The ignition voltage is between 10 volts and 18 volts. |
| • | The barometric pressure is greater than 75 kPa. |
| • | The fuel level is between 15 and 85 percent of full capacity. |
| • | The engine coolant temperature is between 4°C (39°F) and 30°C (86°F). |
| • | The intake air temperature is between 4°C (39°F) and 30°C (86°F). |
| • | The start up engine coolant and intake air temperatures are within 9°C (16°F) of each other. |
Conditions for Setting the DTC
The PCM detects a vacuum in the EVAP system when purge is not commanded.
Action Taken When the DTC Sets
| • | The PCM illuminates the malfunction indicator lamp (MIL) on the second consecutive ignition cycle that the diagnostic runs and fails. |
| • | The PCM records the operating conditions at the time the diagnostic fails. The first time the diagnostic fails, the PCM stores this information in the Failure Records. If the diagnostic reports a failure on the second consecutive ignition cycle, the PCM records the operating conditions at the time of the failure. The PCM writes the conditions to the Freeze Frame and updates the Failure Records. |
Conditions for Clearing the MIL/DTC
| • | The PCM turns OFF the malfunction indicator lamp (MIL) after 3 consecutive ignition cycles that the diagnostic runs and does not fail. |
| • | A last test failed, or current DTC, clears when the diagnostic runs and does not fail. |
| • | A history DTC clears after 40 consecutive warm-up cycles, if no failures are reported by this or any other emission related diagnostic. |
| • | Use a scan tool in order to clear the MIL and the DTC. |
Diagnostic Aids
Important:
• Remove any debris from the PCM\TAC module connector surfaces before
servicing the PCM\TAC module. Inspect the PCM\TAC module connector gaskets
when diagnosing/replacing the modules. Ensure that the gaskets are installed
correctly. The gaskets prevent contaminate intrusion into the PCM\TAC
modules. • For any test that requires probing the PCM or a component
harness connector, use the Connector Test Adapter Kit J 35616
. Using this kit prevents damage
to the harness/component terminals. Refer to
Using Connector Test Adapters
in Wiring Systems.
| • | Before replacing any components, visually/physically inspect for the following: |
| - | Mis-routed harness. |
| - | Rubbed through wire insulation |
| - | Broken wire inside the insulation |
| - | Kinked or damaged vacuum hoses |
| - | Physically damaged system components |
| - | Inspect components and vacuum lines for traces of carbon or other contaminants. The presence of foreign material may be causing a restriction in the system or preventing the solenoid valve from closing properly. Either condition may cause a DTC to set. |
| • | For an intermittent condition, refer to Symptoms . |
Test Description
The numbers below refer to the step numbers on the Diagnostic Table.
Step | Action | Value(s) | Yes | No |
|---|---|---|---|---|
1 | Did you perform the Powertrain On-Board Diagnostic (OBD) System Check? | -- | ||
Does the vacuum gauge indicate a vacuum? | -- | Go to Diagnostic Aids | ||
3 |
Important: Check for carbon contamination. Refer to Evaporative Emission System Cleaning . Replace the EVAP Purge Solenoid Valve. Refer to Evaporative Emission Canister Purge Solenoid Valve Replacement . Is the action complete? | -- | -- | |
4 |
Does the scan tool indicate that this test ran and passed? | -- | ||
5 | Select the Capture Info option and the Review Info option using the scan tool. Does the scan tool display any DTCs that you have not diagnosed? | -- | Go to the applicable DTC | System OK |
