GM Service Manual Online
For 1990-2009 cars only

The secondary air injection (AIR) system helps reduce hydrocarbon (HC), carbon monoxide (CO), and oxides of nitrogen (NOx) exhaust emissions. It also helps to warm up the 3-way catalytic converters quickly on engine start-up so conversion of exhaust gases can occur sooner.
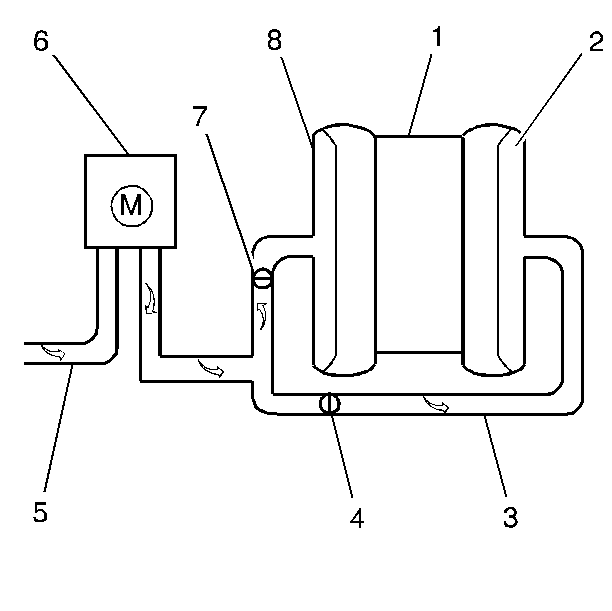
The system includes the following:

    • AIR pump -- The AIR pump is mounted to the lower left front of the engine Compartment and supplies the air to the AIR system. The electric air pump pressurizes air from the filtered air intake and pumps it through the AIR Shut Off Valve to the check valves near the exhaust manifolds. The AIR pump is controlled by the PCM. Battery voltage to the AIR pump is controlled by the AIR pump relay. The AIR Shut Off valve prevents air flow through the pump during OFF periods. When the PCM provides a ground for the secondary AIR pump relay, battery voltage is applied to the AIR pump.
    • AIR Solenoid Valve -- The AIR Solenoid Valve is mounted in the right fender well, above the PCM. The AIR Solenoid Valve is PCM controlled. When the AIR System is enabled, the PCM provides a ground to the AIR Solenoid Valve. Enabling the AIR Solenoid Valve allows engine vacuum to applied to the AIR Shut Off Valve.
    • AIR Shut Off Valve -- The AIR Shut Off Valve is a vacuum operated valve. When the AIR System is enabled, the PCM turns ON the AIR Pump, and the AIR Solenoid Valve. When the system is enabled, an engine vacuum is applied to the AIR Shut Off Valve, through the AIR Solenoid Valve. This vacuum opens the AIR Shut Off Valve and allows air from the AIR Pump to flow to the check valves.
    • Check valves -- The check valves prevent back flow of exhaust gases into the AIR pump in the event of an exhaust backfire.
    • Necessary plumbing, including the following components:
       - Hoses
       - Pipes
       - Clamps

AIR System (Typical)


Object Number: 425006  Size: SH
(1)Intake Manifold
(2)Exhaust Manifold
(3)AIR Injection Pipe
(4)Check Valve
(5)From Air Cleaner Assembly
(6)AIR Pump
(7)Check Valve
(8)Exhaust Manifold

The AIR pump is controlled by the PCM. The PCM will turn ON the AIR pump by providing the ground to complete the circuit which energizes the AIR pump relay. When air to the exhaust ports is desired, the PCM will turn ON the AIR Solenoid Valve and then the AIR pump.

The PCM turns ON the AIR pump during start up any time engine coolant temperature is above -10°C (14°F). The AIR pump will operate for a maximum of 240 seconds, or until the system enters Closed Loop operation. At the same time the PCM turns the AIR pump OFF, it also de-energizes the AIR Solenoid Valve so no air is directed to the exhaust ports.

The AIR system will be disabled under the following conditions:

    • When the PCM recognizes a condition and sets a diagnostic trouble code.
    • When the fuel system is operating in Closed Loop.
    • The AIR pump has been ON for 240 seconds.
    •  Engine Speed is greater than 2825 RPM.
    • MAP is greater than 96 kPa (14 psi) with VSS over 96 km/h (60 mph).
    • MAP is less than 20 kPa (2.9 psi).
    • ECT less than -10°C (14°F).
    • 3-way catalytic converters over temperature detected.
    • Short and long term fuel trim (FT) are not in their normal ranges.
    • Power enrichment is detected.

Results of Incorrect Operation

If no air (oxygen) flow enters the exhaust stream at the exhaust ports, HC and CO emission levels will be too high.

Air flowing to the exhaust ports at all times could increase temperature of the 3-way catalytic converter.

DTCs P0410, P0412, P1415, and P1416 will set if there is a malfunction in the following components:

    • The AIR pump
    • The AIR pump relay
    • The AIR Solenoid Valve
    • The AIR Shut Off Valve
    • Hoses or pipes that are leaking
    • The Check valves that are leaking
    • Circuits going to the AIR pump and the AIR pump relay

AIR Pump

The AIR pump is a regenerative turbine type which is permanently lubricated and requires no periodic maintenance.

The engine should be at normal operating temperature in neutral at idle. Using the scan tool enable the AIR pump system. Select HO2S voltages for both Bank 1 and Bank 2 HO2S. The HO2S voltages for both sensors should remain under 350 mV because air is being directed to the exhaust ports. If the HO2S voltages remain low during the Output Test, the AIR pump and integral stop valve are operating satisfactorily. If the HO2S voltage does not remain low when the AIR pump is enabled, inspect for the following:

    • For voltage at the AIR pump when it is energized
    • For a seized AIR pump
    • Hoses, pipes and all connections for leaks and proper routing
    • For air flow going to the exhaust ports
    • AIR pump for proper mounting
    • Hoses and pipes for deterioration or holes

Hoses and Pipes

If a leak is suspected on the pressure side of the system or if a hose or pipe has been disconnected on the pressure side, the connections should be checked for leaks with a soapy water solution. With the AIR pump running, bubbles will form if a leak exists.

Caution: Allow the check valve to cool off before proceeding with the next check in order to avoid being burned. Tap on the check valve in order to remove any debris that may be inside the valve.

Check Valve

A check valve should be inspected whenever the hose is disconnected or whenever check valve failure is suspected. (An AIR pump that had become inoperative and had shown indications of having exhaust gases in the outlet port would indicate check valve failure.)

  1. Remove the check valve from the vehicle. Refer to Secondary Air Injection Check Valve and Check Valve Pipe Replacement - Bank 1 or Secondary Air Injection Check Valve and Check Valve Pipe Replacement - Bank 2 for removal procedures.
  2. Install a vacuum pump to the nipple side (AIR pump side) of the check valve.
  3. Pump the vacuum pump to 10 inches Hg. and observe the gauge.
  4. If the vacuum bleeds down to zero within 5 seconds, replace the check valve.