Circuit Description
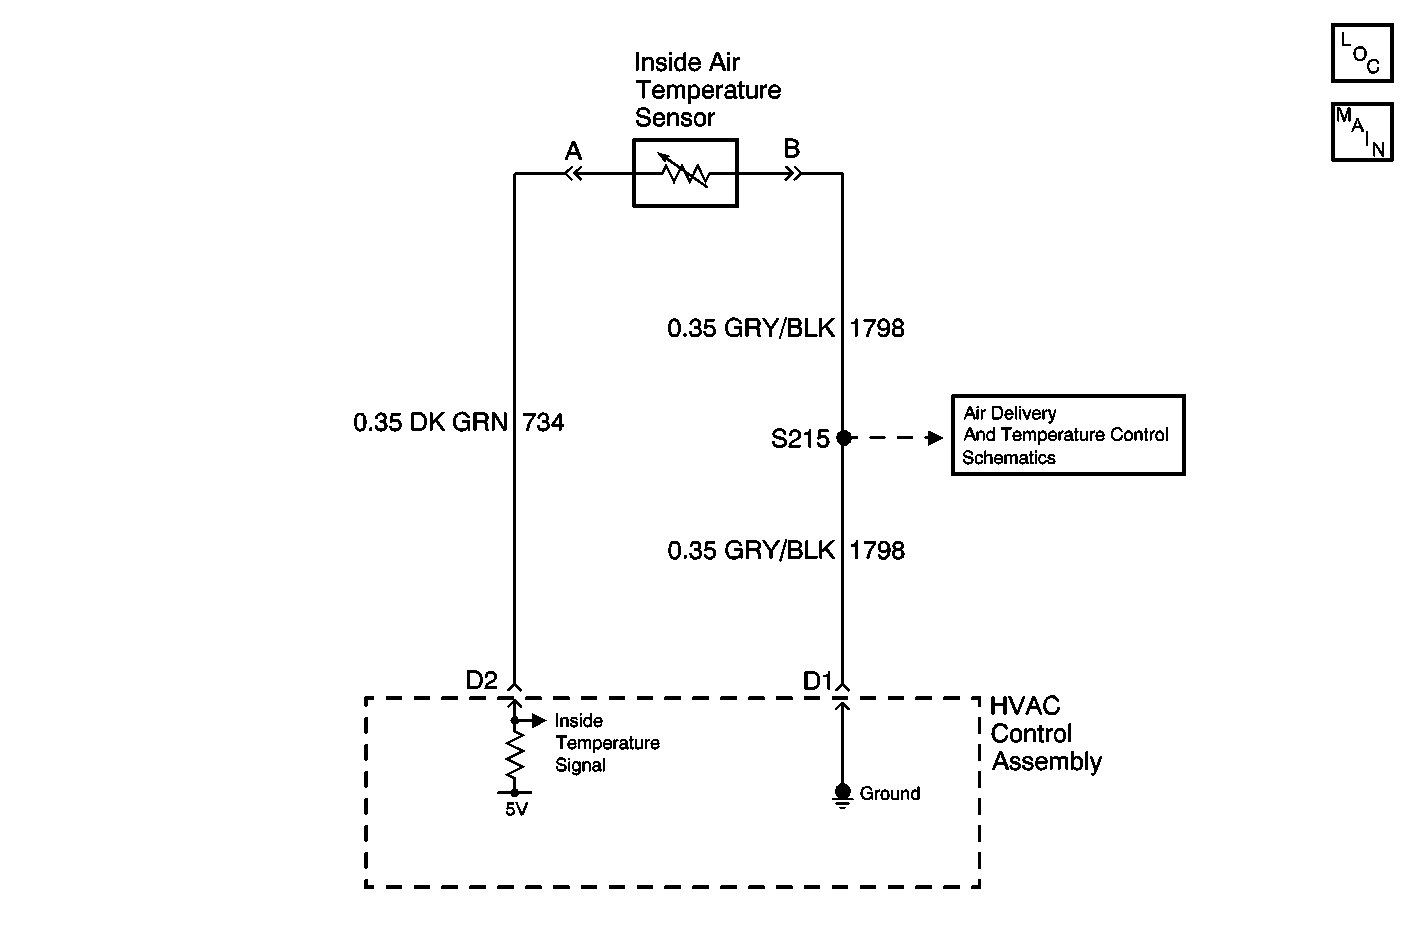
The inside air temperature sensor is located in the air outlet vent at the RH side of the steering column. In this position, it is exposed to the air that is present in the passenger compartment. This provides a sample of the inside air temperature to the sensor.
The sensor is a thermistor used to control the signal voltage at the HVAC Control Assembly. The HVAC Control Assembly supplies a reference voltage (about 5 volts internally) to the sensor and measures the voltage drop in the circuit to obtain a temperature signal. This signal is an input that tells the HVAC Control Assembly how much cooling or heating will be required for the passenger compartment. When the inside air temperature is cold, the thermistor resistance is high; therefore, the HVAC Control Assembly will receive a high signal voltage input. If the inside air temperature is hot, the thermistor resistance is low, the HVAC Control Assembly will receive a low signal voltage input.
Conditions for Setting the DTC
| • | With the ignition in the ON position, CKT 734 is checked continuously. |
| • | CKT 734 stays at 4.5 volts or higher. |
Action Taken When the DTC Sets
| • | The system will use 24°C (75°F) as a default value. |
| • | The HVAC Control Assembly stores a DTC B0338 in memory. |
Conditions for Clearing the DTC
| • | Using the IPC clearing feature. |
| • | Using a scan tool. |
| • | A history DTC will clear after 50 consecutive ignition cycles if the conditions for the fault is no longer present. |
Diagnostic Aids
| • | If the DTC is a history or an intermittent. Try to perform the tests shown while "wiggling" wiring and connectors, this can often cause the malfunction to appear. |
| • | Visually inspect sensor connector and harness for damage, corrosion or water intrusion. |
| • | Check for adequate terminal tension, mis-routed harness, rubbed through wire insulation, and broken wire inside insulation. |
| • | The resistance value of the sensor must be close to the values given in the chart. If not the sensor is considered skewed and must be replaced. |
Test Description
The number(s) below refer to the step number(s) on the diagnostic table.
-
Tests for the proper operation of the circuit in the high voltage range.
-
Tests for the proper operation of the circuit in the low voltage range. If the fuse in the jumper opens when you perform this test, the signal circuit is shorted to voltage.
Step | Action | Value(s) | Yes | No |
|---|---|---|---|---|
1 | Did you perform the HVAC (CJ2) Diagnostic System Check? | -- | Go to Step 2 | Go to Diagnostic System Check |
2 |
Does the scan tool indicate that the Inside Air Temp Sensor parameter is within the specified range? | 0.1-4.9 Volts | Go to Diagnostic Aids | Go to Step 3 |
Does the scan tool indicate that the Inside Air Temp Sensor parameter is greater than the specified value? | 4.9 Volts | Go to Step 4 | Go to Step 5 | |
Does the scan tool indicate that the Inside Air Temp Sensor parameter is less than the specified value? | 0.1 Volts | Go to Step 8 | Go to Step 6 | |
5 | Test the signal circuit of the Inside Air Temp Sensor for a short to ground. Refer to Circuit Testing and Wiring Repairs in Wiring Systems. Did you find and correct the condition? | -- | Go to Step 12 | Go to Step 9 |
6 | Test the signal circuit of the Inside Air Temp Sensor for a short to voltage, a high resistance, or an open. Refer to Circuit Testing and Wiring Repairs in Wiring Systems. Did you find and correct the condition? | -- | Go to Step 12 | Go to Step 7 |
7 | Test the ground circuit of the Inside Air Temp Sensor for a high resistance or an open. Refer to Circuit Testing and Wiring Repairs in Wiring Systems. Did you find and correct the condition? | -- | Go to Step 12 | Go to Step 9 |
8 | Inspect for poor connections at the harness connector of the Inside Air Temp Sensor. Refer to Testing for Intermittent Conditions and Poor Connections and Connector Repairs in Wiring Systems. Did you find and correct the condition? | -- | Go to Step 12 | Go to Step 10 |
9 | Inspect for poor connections at the harness connector of the HVAC Control Assembly. Refer to Testing for Intermittent Conditions and Poor Connections and Connector Repairs in Wiring Systems. Did you find and correct the condition? | -- | Go to Step 12 | Go to Step 11 |
10 | Replace the Inside Air Temp Sensor. Refer to Inside Air Temperature Sensor Replacement . Did you complete the replacement? | -- | Go to Step 12 | -- |
11 | Replace the HVAC Control Assembly. Refer to Control Assembly Replacement . Did you complete the replacement? | -- | Go to Step 12 | -- |
12 |
Does the DTC reset? | -- | Go to Step 2 | System OK |
