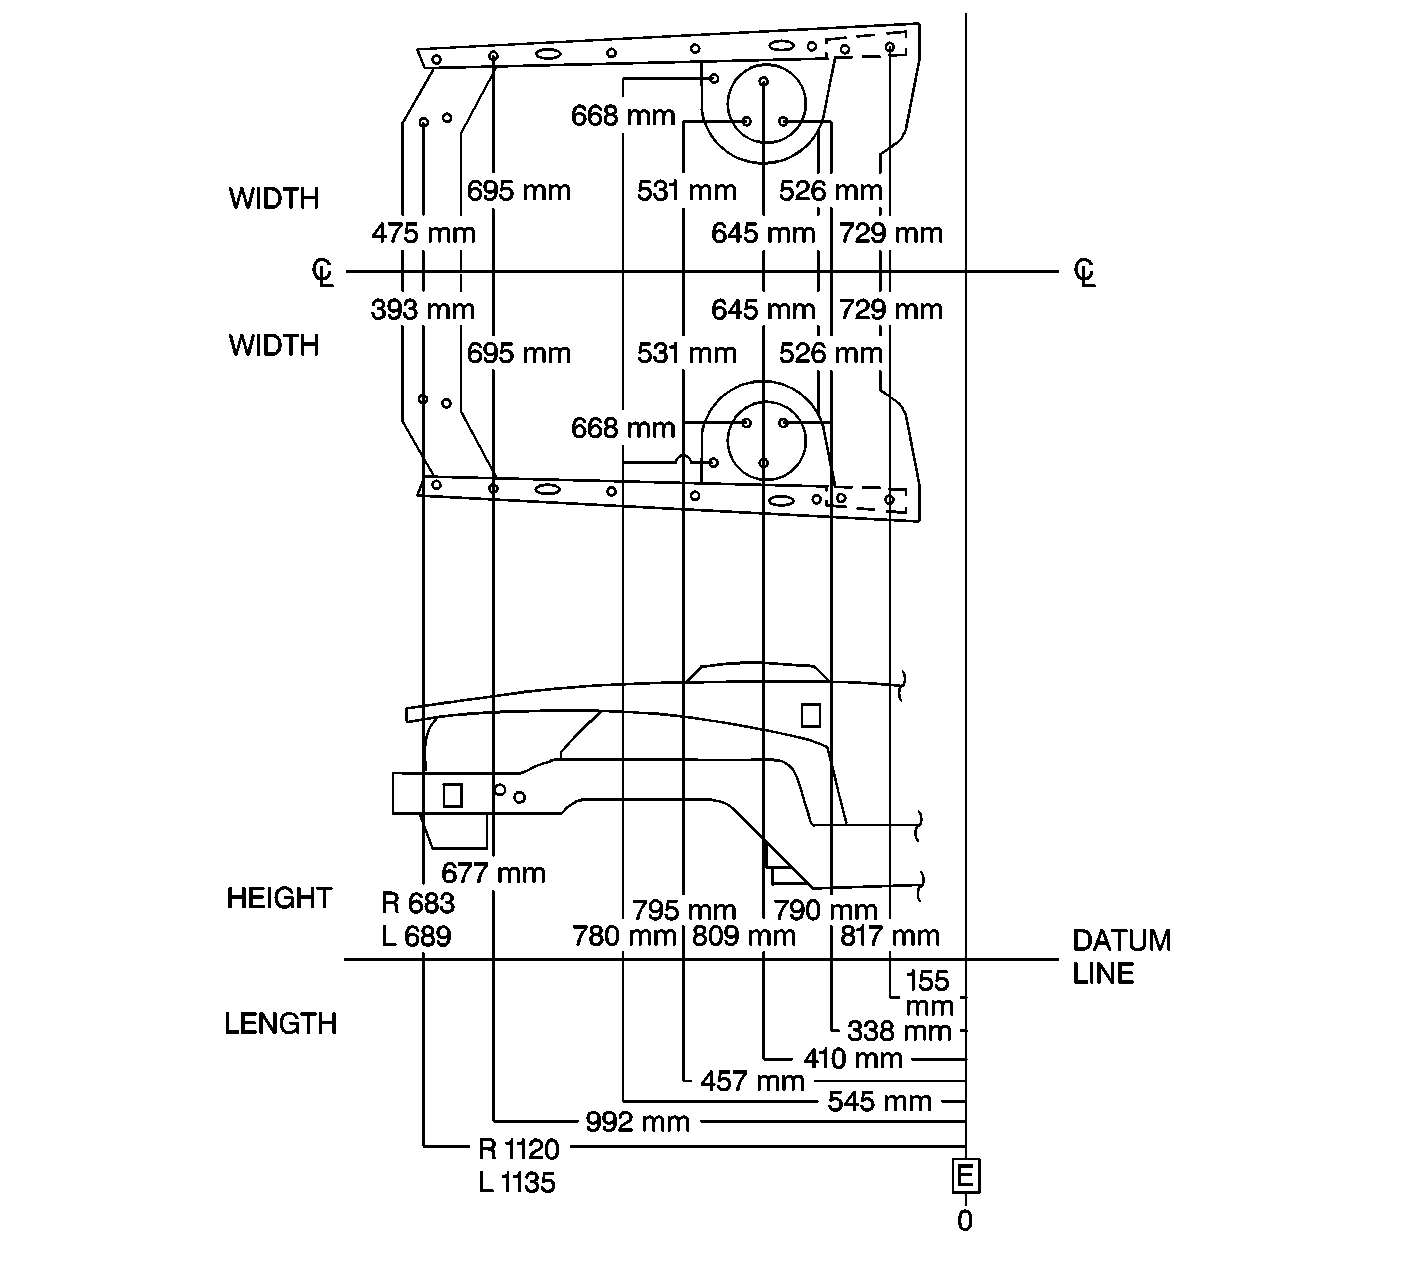
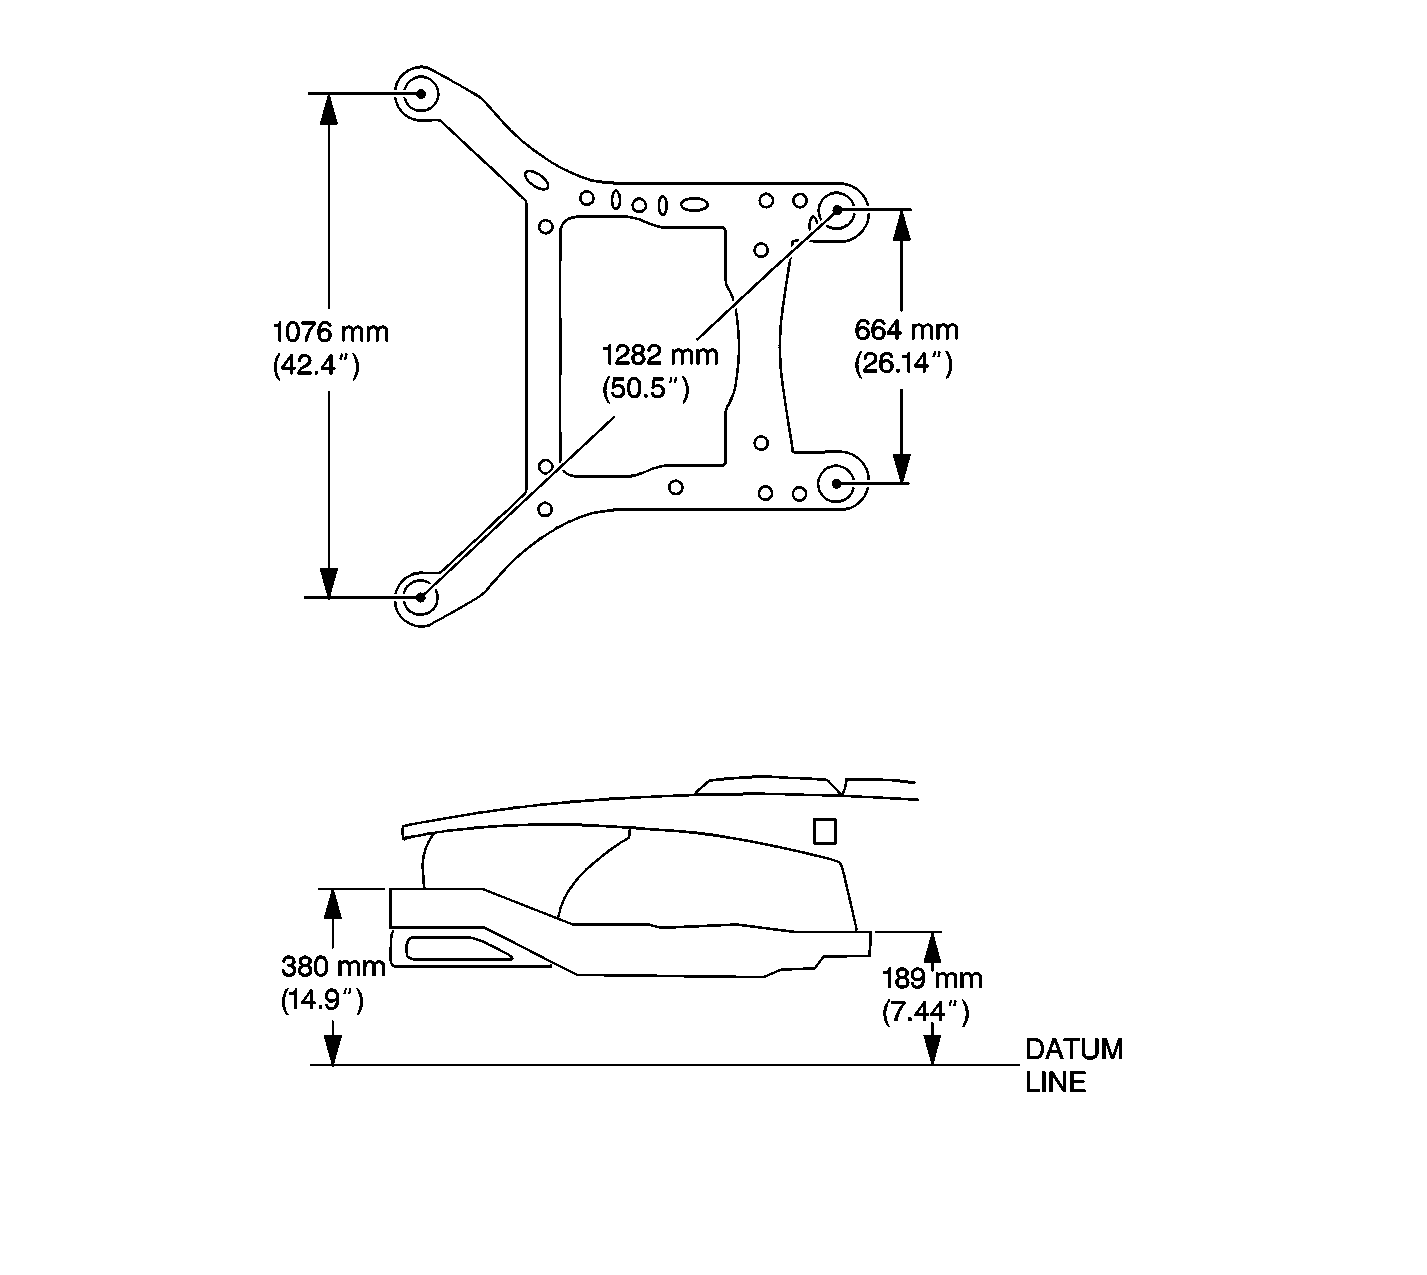
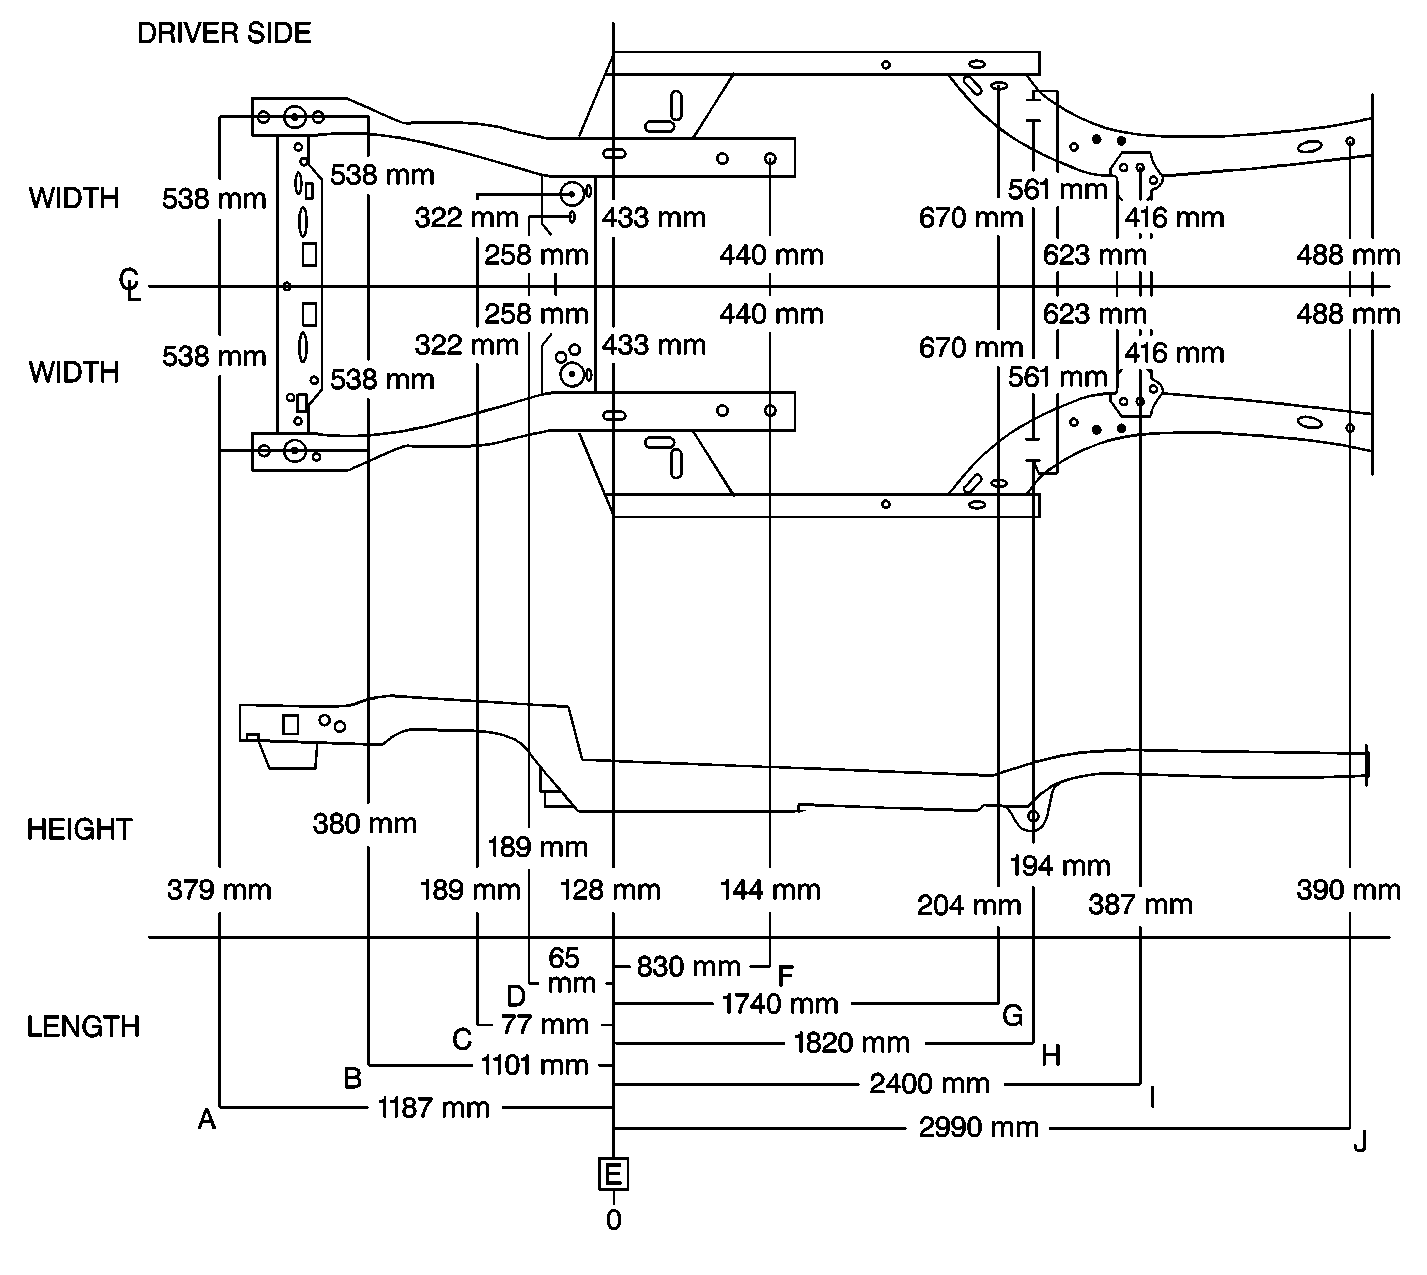
There are two ways of determining vehicle measurements.
Tram Gage Method
A tram gage is used as a quick reference in order to determine vehicle damage. Use a tram gage set which includes a vertical pointer capable of reaching 914 mm (36 in).

Measurements of the engine compartment components are made from point to point with the vertical pointers equally set.

Other measurements are made on the horizontal plane, or datum line, parallel to the underbody with the vertical pointers set as specified for each point.

Dimensions that are measured to gage holes are measured to the center of the holes and flush to adjacent surface metal unless otherwise specified. Cross check diagonal dimensions in order to verify the dimensional accuracy of the vehicle underbody.
Three-Dimensional Method
In order to measure structural repair, use repair equipment capable of measuring multiple points of length, height, and width at the same time. Measure 2/3 of the vehicle body in order to obtain accurate comparisons to the vehicle structure.
Universal measuring systems combine the equipment and techniques used in order to make underbody and upperbody 3-Dimensional measurements. The universal system provides accurate measurements of length, width, and height measurements at the same time.
Letter | Quantity | Feature Size* | Usage |
|---|---|---|---|
A | 2 | 14 mm (0.55118110 in) hole | GAGE HOLE |
B | 2 FRT | 22 mm (0.86614173 in) frame crossmember nut hole | FRAME ATTACH |
C | 2 RR | 28 mm (1.10236 in) frame crossmember nut hole | FRAME ATTACH |
D | 2 | 16 mm (0.6299 in) hole left/16 mm x 32 mm (0.6299 x 1.2598 in) slot right | GAGE HOLE (LF) SLOT (RT) |
E | 2 | 16 mm x 22 mm (0.6299 in x 0.8661 in) slot | GAGE SLOT |
F | 2 | 16 mm (0.6299 in) hole | GAGE HOLE |
G | 2 | 18 mm x 24 mm (0.7086 x 0.9448 in) slot | GAGE SLOT |
H | 2 | 12 mm (0.4724 in) hole | REAR SUSPENSION ATTACH |
I | 2 | 23 mm (0.9055 in) hole | REAR SUSPENSION ATTACH |
J | 2 | 19 mm (0.74803 in) hole | GAGE HOLE |
K | 2 | 7 mm (0.2755 in) hole | BRACE ATTACH |
L | 2 | 5.3 mm (0.2086 in) hole | FENDER ATTACH |
M | 2 | 13 mm (0.5118 in) Class 1 hole | BRACE ATTACH |
N | 2 FRT | 12 mm (0.4724 in) hole | FRONT STRUT ATTACH |
O | 2 CENTER | 12 mm x 14 mm (0.4724 in x 0.5511 in) slot | FRONT STRUT ATTACH |
P | 2 RR | 12 mm x 14 mm (0.4724 in x 0.5511 in) slot | FRONT STRUT ATTACH |
Q | 2 RR | 12 mm (0.4724 in) hole | HOOD HINGE ATTACH |
R | 2 FRT | 12 mm hole left x 9.3 mm hole right (0.4724 in hole left x 0.3661 in hole right) | REAR SHOCK ATTACH |
S | 2 RR | 12 mm hole left x 9.3 mm hole right (0.4724 in hole left x 0.3661 in hole right) | REAR SHOCK ATTACH |
T | 2 FRT | 12 mm (0.4724 in) hole front | REAR SHOCK ATTACH |
U | 2 CENTER | 14 mm (0.55118110 in) hole center | REAR STRUT ATTACH |
V | 2 RR | 12 mm x 14 mm (0.4724 in x 0.5511 in) slot rear | REAR STRUT ATTACH |
*All measurements are to the center of the holes and slots. | |||
