ASI Resolution - Growl or Howl Type Noise From Transmission/Engine Compartment During Light to Moderate Acceleration from a Stop (Replace Drive Link, Drive Sprocket and Driven Sprocket)

| Subject: | Growl or Howl Type Noise From Transmission/Engine Compartment During Light to Moderate Acceleration from a Stop (Replace Drive Link, Drive Sprocket and Driven Sprocket) |
| Models: | 2004 Chevrolet Malibu, Malibu Maxx |
| 2004 Oldsmobile Alero |
| 2004 Pontiac Grand Am |
| Built After January 16, 2004 |
| with 4T45E Automatic Transaxles (RPO MN5) Built Between Julian Date 4016 and 4126 and |
| 3.4L or 3.5L V6 Engine (VINs E, 8 - RPOs LA1, LX9) |
This bulletin is being revised to include a repair procedure and parts availability information.
Please discard Corporate Bulletin Number 04-07-30-021 (Section 07-Transmission/Transaxle).
Condition
Some customers may comment on a growl or howl type noise during light to moderate acceleration from a stop. This noise is load and engine RPM sensitive and will occur between 1500 RPM to approximately 2300 RPM. The noise is most noticeable in first and second gear. The noise may dissipate prior to the 1-2 shift, but will be noticed again in second gear depending on the load and engine RPM. The pitch of the noise will change during the 1-2 shift.
Cause
The noise is due to the new 5/8 inch drive link assembly being at a resonant frequency during certain driving conditions.
Correction
Important: Only RPO MN5 transaxles built between Julian date 4016 and 4126 have 5/8 inch drive link assemblies. Refer to Transmission ID and VIN Derivative Location, SI Document ID #760312 for Julian date location information.
Follow the service procedure below to replace the 5/8 inch drive link and sprockets with a 7/8 inch drive link and sprockets.
- Remove the transaxle from the vehicle. Refer to the appropriate Service Information listed below.
- Install the transaxle in the bench support fixture.
- Remove the torque converter.
- Remove the Park Neutral Position (PNP) switch.
- Remove the side cover transmission mount bracket from the transmission.
- Remove the control valve side cover.
- Remove the wiring harness from the valve body and solenoids.
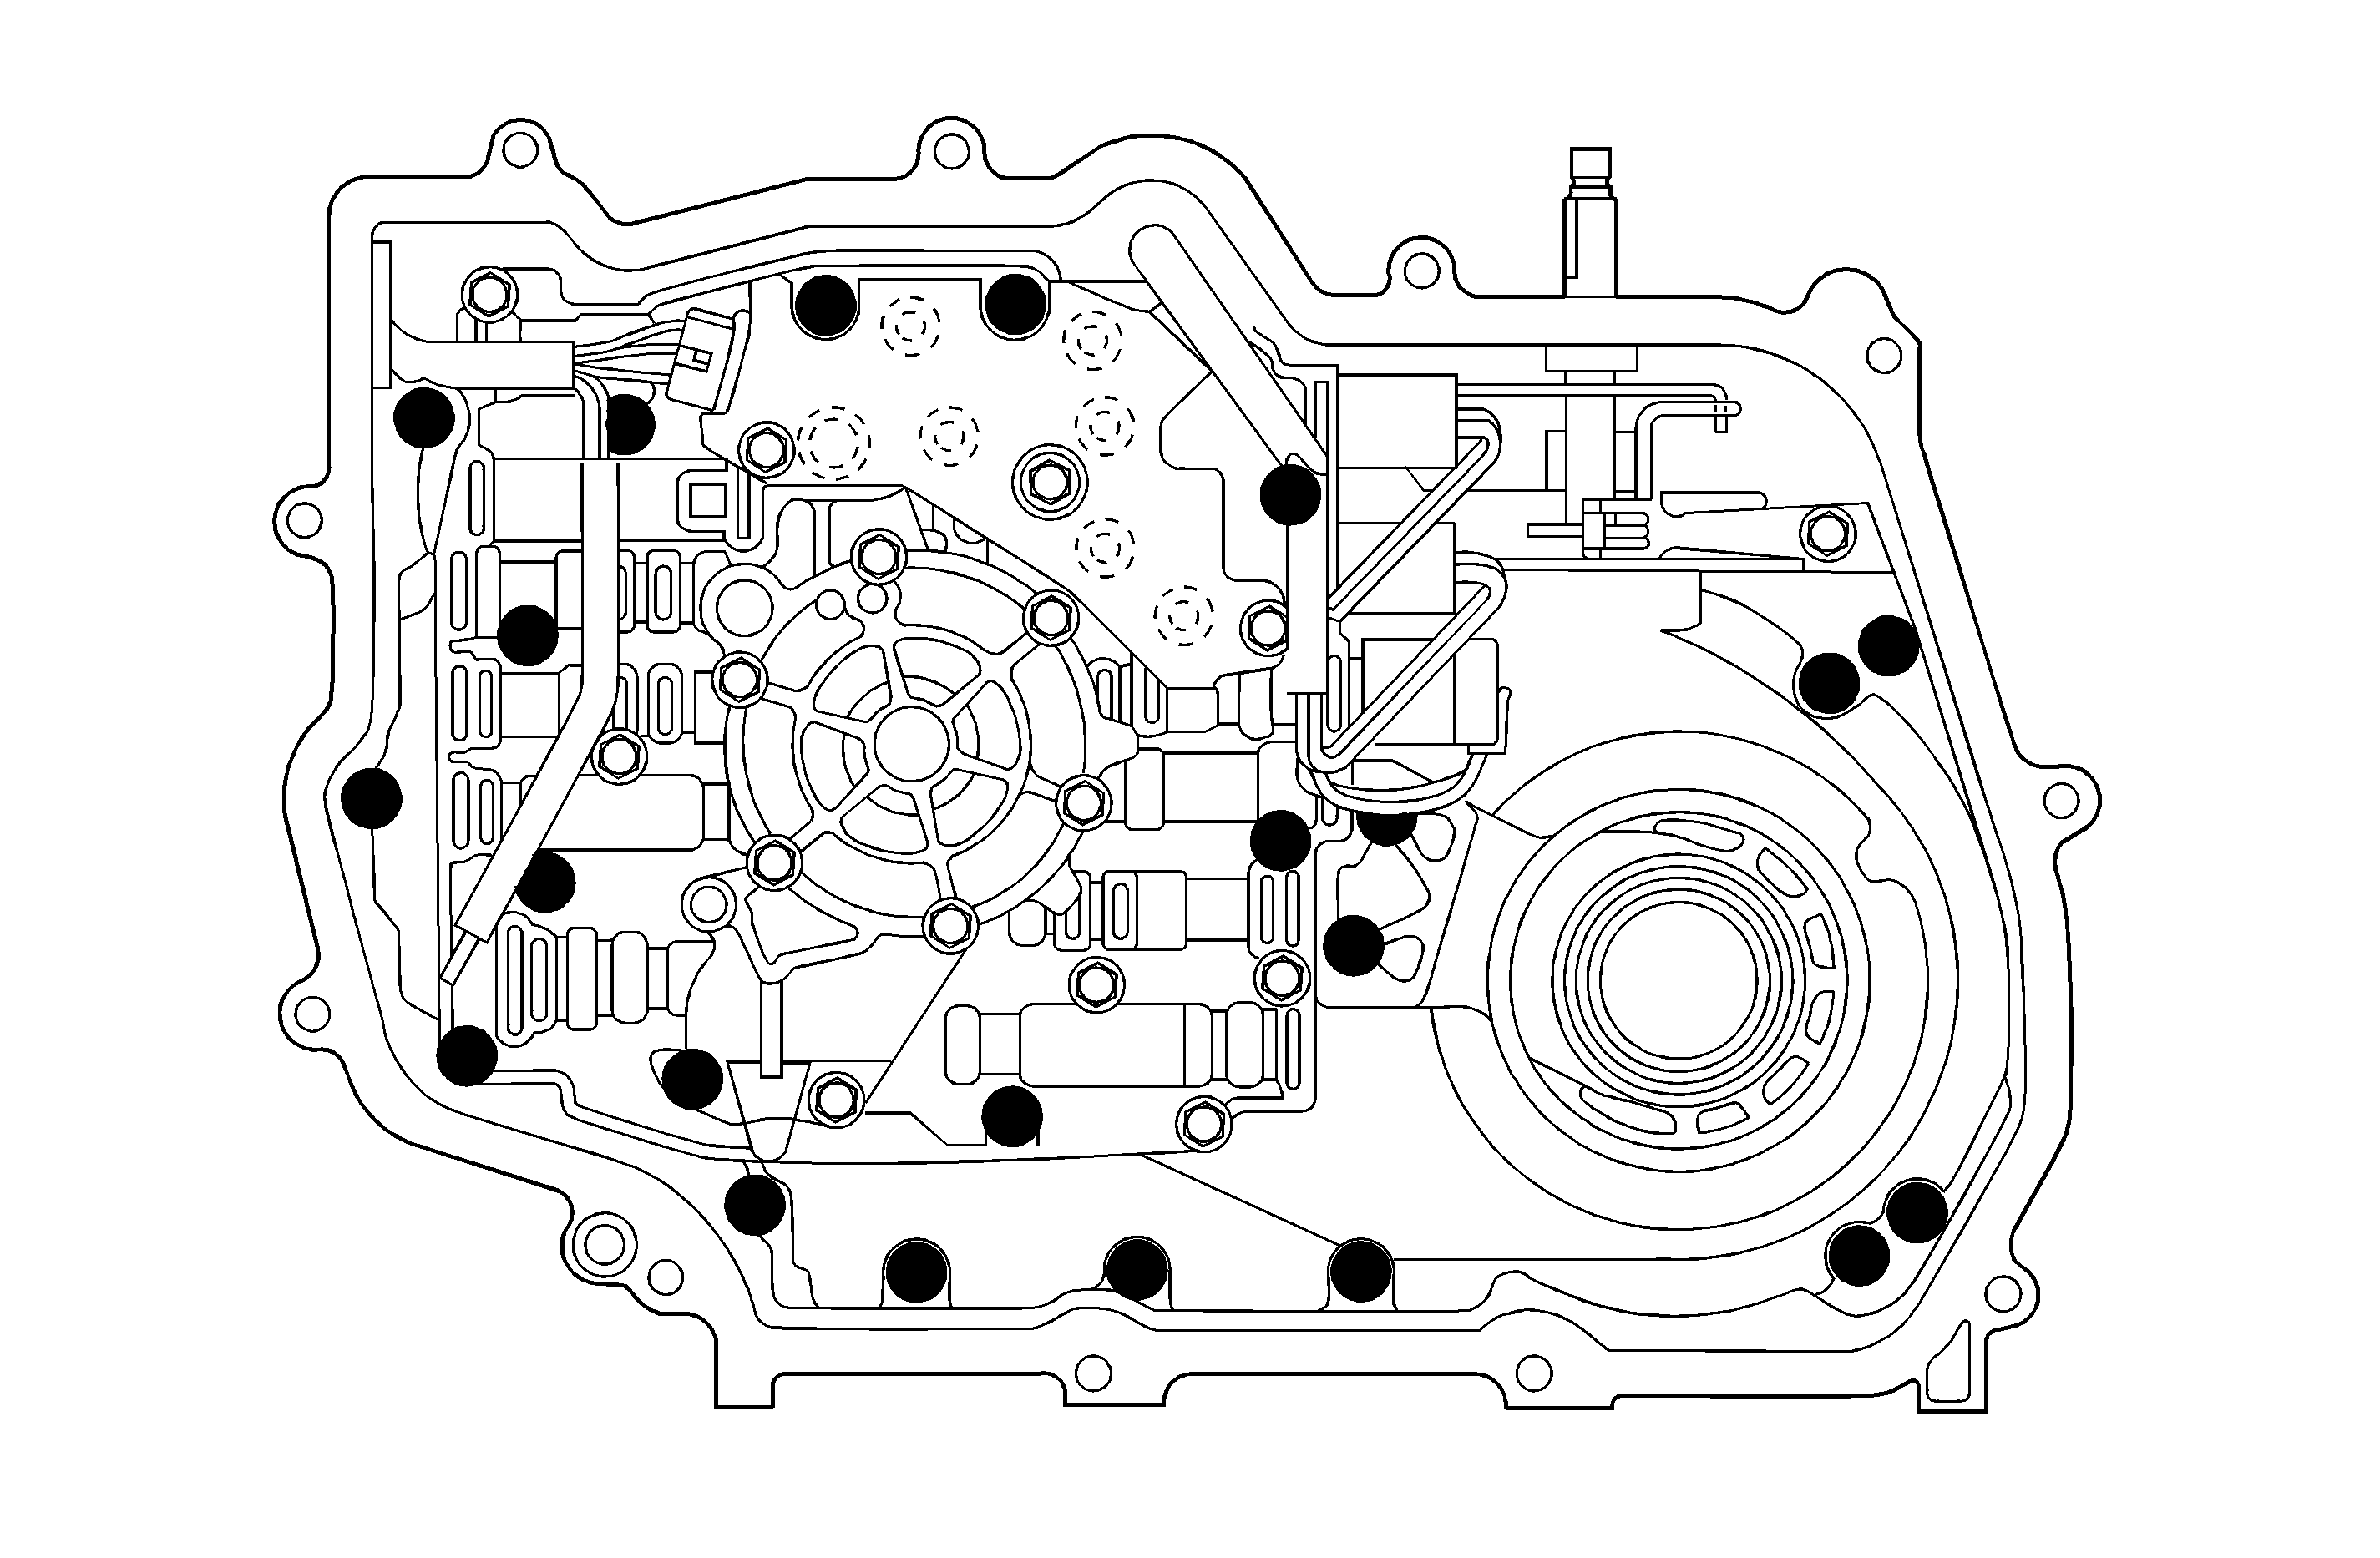
- Only remove the twenty-two bolts shown bolded in the illustration above to remove the channel plate from the transaxle.
- Remove the manual shift valve link from the manual valve.
- Remove the channel plate from the transaxle case.
- Remove the snap ring (57) and pry the axle seal sleeve from the output shaft.
- Remove the 5/8 inch drive link and sprockets.
- Remove the snap ring (35) to separate the turbine shaft from the 5/8 inch drive sprocket.
- Install the new 7/8 drive sprocket, P/N 24210128, on the turbine shaft with snap ring (35).
- Install the new 7/8 inch drive link, P/N 24210129, and sprockets, P/N's 24210128 and 24210130. Refer to Drive Sprocket, Driven Sprocket, and Drive Link Installation, SI Document ID #474526.
- Install a new channel plate gasket, P/N 24201096.
- Carefully align the channel plate on the two dowels and rotate the oil pump shaft to permit installation of the channel plate to the case. Refer to Channel Plate Assembly Installation, SI Document ID #474529.
- Reconnect transaxle wiring harness to the solenoids.
- Reconnect the manual shift valve link to the manual valve.
- Install the valve control side cover.
- Install the side cover bolts. Refer to Side Cover/Gaskets, Disassemble, Assemble, Installation SI Document ID #474531.
- Install the new output shaft sleeve seal, P/N 24201936, and snap ring (57). Refer to Output Shaft Sleeve Assembly Installation, SI Document ID #480900.
- Install the PNP switch.
- Install the TCC lock up clutch ‘O’ ring and torque converter.
- Transfer the transaxle from the bench fixture to the transmission jack.
- Reinstall the transaxle into the vehicle using the appropriate Service Information.
| • | Chevrolet Malibu, Transmission Replacement SI Document ID #1246862. |
| • | Oldsmobile Alero, Transmission Replacement SI Document ID #791086. |
| • | Pontiac Grand Am, Transmission Replacement SI Document ID #791086. |
Important:
• It is not necessary to remove either the valve body or the oil pump from
the channel plate assembly. • Remove only the twenty-two bolts shown bolded in the illustration below
in order to remove the channel plate assembly from the transaxle case.

Notice: The channel plate assembly is now held in place by two dowel pins and the oil pump shaft. Use caution when removing the channel plate from the case not to damage the channel plate or case when removing.
Notice: The axle seal sleeve will not be reused. A new axle seal sleeve is required on reassembly or a leak may accrue.

Notice:
• The Driven sprocket thrust washer should be installed on the case instead
of the channel plate. Damage to the washer, case or channel plate may occur if it
is not installed correctly. • Lubricate the new drive link assembly by pouring ATF on it prior to installation.
Failure to pre-lube the chain may damage the assembly.
Tighten
Tighten the channel plate bolts and valve body bolts
per SI Document ID #591061.
Notice: Use J 41228 when installing the new axle shaft sleeve seal or fluid leaks will occur.
Dealer Action
Please contact all customers that were told they would be called when a repair became available.
Parts Information
Part Number | Description | Qty |
|---|---|---|
24210129 | Link, 7/8" Drive Link | 1 |
24210128 | Sprocket, 7/8" Drive | 1 |
24210130 | Sprocket, 7/8" Driven | 1 |
24201096 | Gasket, Case to Channel Plate | 1 |
24201936 | Seal. Output Shaft Seal Kit | 1 |
Parts are currently available from GMSPO.
Warranty Information
For vehicles repaired under warranty, use:
Labor Operation | Description | Labor Time |
|---|---|---|
K7520 | Link Assembly, Transaxle Drive -- Replace | 5.1 hrs |
