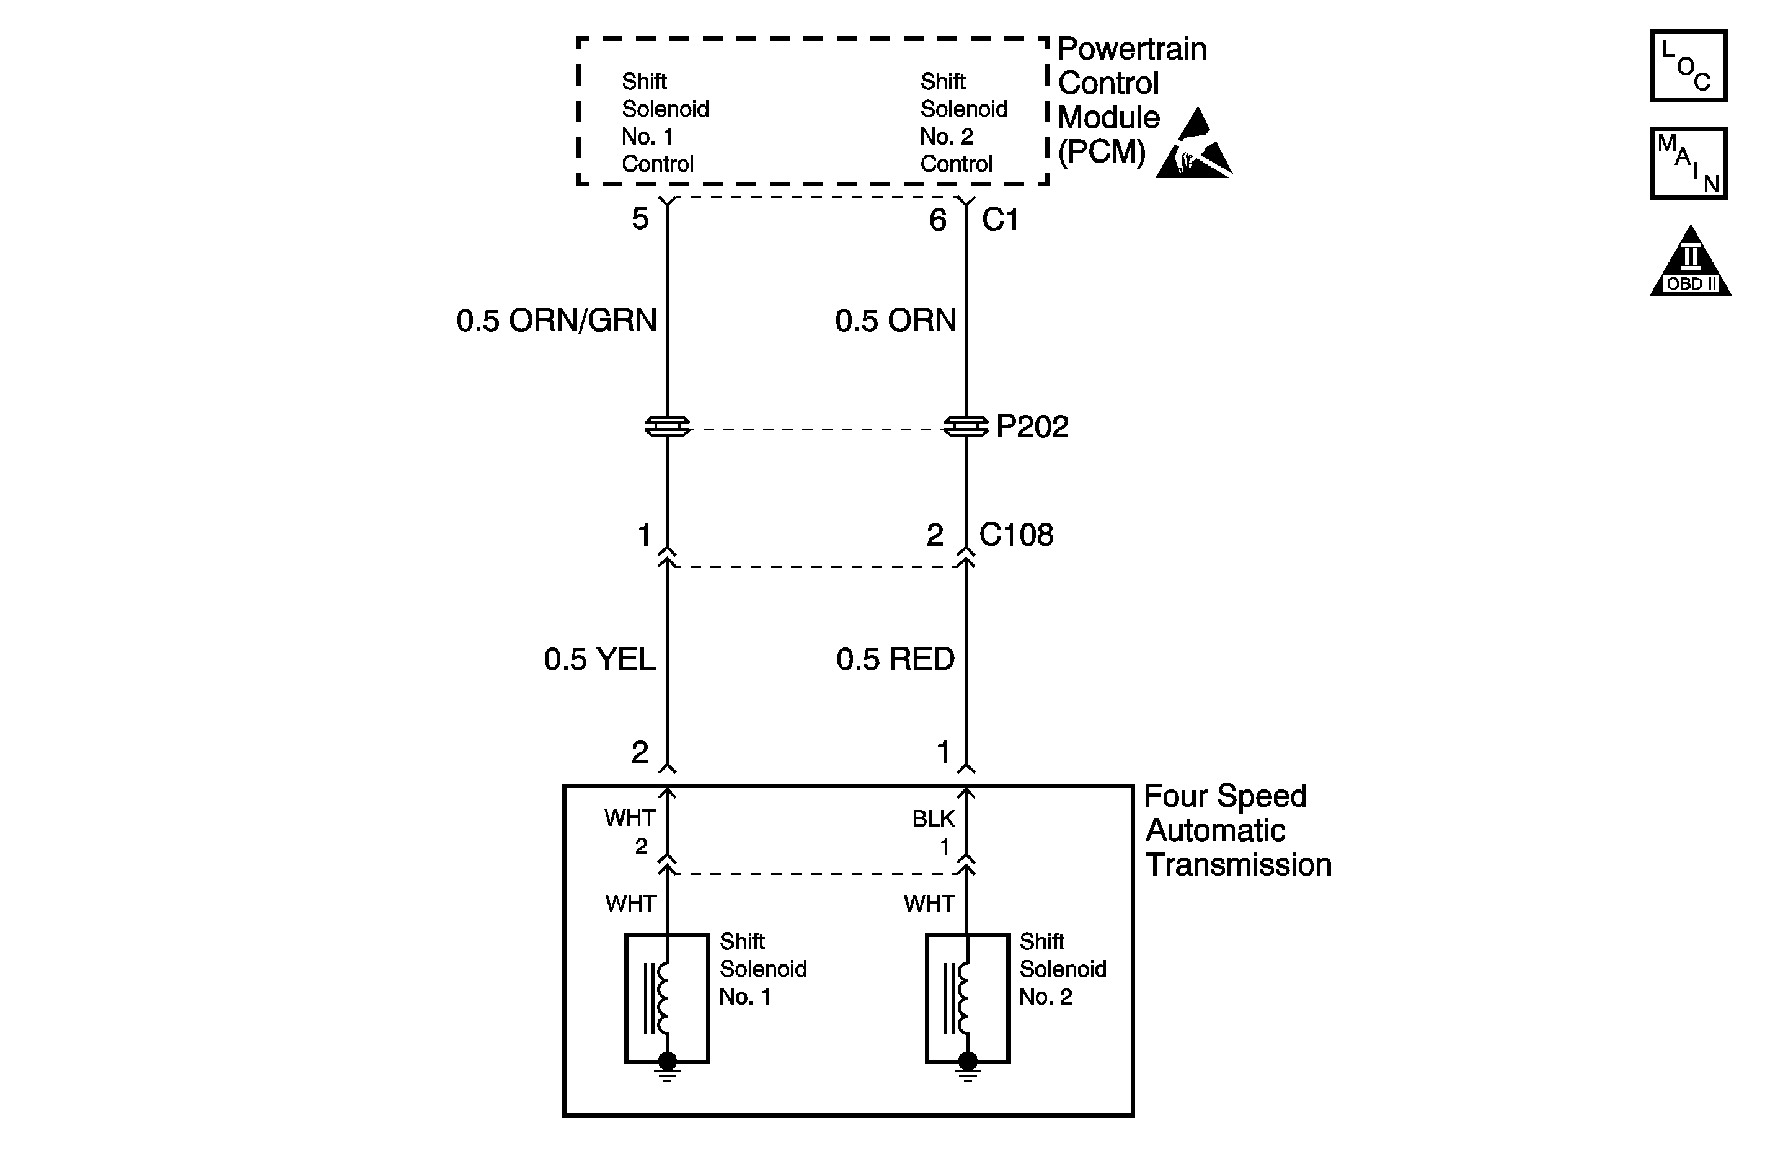
Circuit Description
The Powertrain Control Module (PCM) monitors the following conditions:
| • | The throttle opening |
| • | The engine speed |
| • | The vehicle speed |
| • | The gear position |
The PCM compares the actual engine speed to the PCM specified value. The PCM specified value is the engine speed the PCM obtains through calculation by using the above conditions.
Conditions for Setting the DTC
| • | When running the engine in DRIVE range after the engine is warmed up, the PCM compares the engine speed with the vehicle speed. If the value is not within the acceptable range, the PCM will set the DTC. The above condition occurs even though solenoid valve #1 is electrically in good condition. |
| • | Two driving cycle detection logic. |
Action Taken When the DTC Sets
| • | DTC P0751 stores. |
| • | The Malfunction Indicator Lamp (MIL) turns ON. |
Diagnostic Aids
Inspect for the following conditions:
| • | The Throttle Valve (TV) cable out of adjustment. |
| • | The shift select cable out of adjustment. |
| • | A clogged or leaky shift solenoid valve #1. |
| • | A transaxle mechanical malfunction exists. |
| • | A clogged valve body fluid passage. |
| • | A torque converter clutch malfunction. |
| • | A faulty PCM exists. |
If DTC P0751 cannot duplicate, the information included in the Freeze Frame data may be useful in determining the vehicle operating conditions when the DTC set.
DTC Confirmation Procedure
- Turn the ignition switch to the LOCK position.
- Connect the scan tool to the Data Link Connector (DLC).
- Turn the ignition switch ON.
- Use the scan tool in order to clear the following items:
- Start the engine.
- Warm the engine up to normal operating conditions.
- Accelerate the vehicle in DRIVE range.
- Stop the vehicle.
- Use the scan tool in order to test for a pending DTC.
| • | DTC P0751 |
| • | Any pending DTCs |
| • | The freeze frame data in the PCM memory. |
Inspect for upshifting in the following gears as the vehicle speed increases:
| 7.1. | 1st gear |
| 7.2. | 2nd gear |
| 7.3. | 3rd gear |
Test Description
The numbers below refer to the step numbers on the diagnostic table.
-
The Powertrain OBD System Check prompts the technician to complete some basic checks and to store the freeze frame data on the scan tool, if applicable. The scan tool creates an electronic copy of the data that was taken when the fault occurred. This information is stored in the scan tool for later reference.
-
This step tests for proper shift points.
-
This step inspects for a leaky solenoid #1.
Refer to the above figure.
-
This step inspects for a stuck closed TCC solenoid #1.
Refer to the above figure.
-
This step inspects the condition of the valve body assembly.
-
This step inspects for a faulty PCM.
Step | Action | Value(s) | Yes | No |
|---|---|---|---|---|
Was the On-Board Diagnostic (OBD) System Check performed? | -- | Go to Powertrain On Board Diagnostic (OBD) System Check or Powertrain On Board Diagnostic (OBD) System Check to in Engine Controls | ||
2 |
Does the scan tool display any other DTCs in addition to DTC P0751? | -- | Go to the applicable DTC table | |
Perform the Upshifts and Torque Converter Clutch (TCC) Apply procedure. Refer to Road Test . This procedure diagnoses the mechanical condition of the transmission and of the torque converter. Repair if necessary. Is the procedure complete? | -- | -- | ||
4 |
Did the outlet port of the shift solenoid #1 remain closed without any air leakage? | -- | ||
Did the outlet port of shift solenoid #1 open and enable air to escape? | - | |||
Refer to Valve Body and Accumulators . Is the valve body in good condition? | - | |||
7 |
Does DTC P0751 reset? | - | ||
8 | Repair or overhaul the valve body assembly. Refer to Valve Body and Accumulators . Is the repair complete? | - | - | |
9 | The Malfunction is not present at this time. Refer to Diagnostic Aids. Is the action complete? | - | System OK | - |
10 | Replace the shift solenoid assembly. Refer to Shift Solenoids and Solenoids Wiring Harness . Is the procedure complete? | - | - | |
11 | Diagnose the mechanical condition of the transmission. Refer to Hydraulic/Mechanical Diagnosis for additional diagnostics. Is the action complete? | - | - | |
12 | Replace the PCM. Refer to Powertrain Control Module Replacement or Powertrain Control Module Replacement to in Engine Controls. Is the procedure complete? | - | - | |
13 | Perform the DTC Confirmation Procedure. Does the scan tool display any DTCs? | - | Go to the applicable DTC table | System OK |
