CAMPAIGN: HIGH ALTITUDE CO EXHAUST EMISSIONS

Subject: PRODUCT EMISSION CAMPAIGN 88C32 - HIGH ALTITUDE CO EXHAUST EMISSIONS
Model and Year: 1988 CHEVROLET NOVA WITH 1.6L ENGINE (RPO LC9)
To: All Chevrolet Dealers
THIS BULLETIN CANCELS AND SUPERSEDES CAMPAIGN EMISSION BULLETIN 88C30 ISSUED OCTOBER, 1992 AND SUPPLEMENT 88C30(a) ISSUED DECEMBER, 1992. THE SERVICE PROCEDURE HAS BEEN REVISED TO PREVENT A DRIVEABILITY CONCERN WHICH COULD OCCUR AS A RESULT OF PERFORMING CAMPAIGN 88C30.
OWNER"S OF ALL INVOLVED VEHICLES (PREVIOUSLY REPAIRED AND UNREPAIRED) WILL BE SENT NEW NOTIFICATION LETTERS INFORMING THEM:
A> TO HAVE THE CAMPAIGN PERFORMED IF THEY HAVE NOT DONE S0, OR
B> TO RETURN TO THEIR DEALER IF THEY HAVE HAD THE ORIGINAL CAMPAIGN ACTION PERFORMED AND ARE EXPERIENCING A DRIVEABILITY CONCERN, OR
C> TO DO NOTHING IF THEY HAVE HAD THE ORIGINAL CAMPAIGN ACTION PERFORMED AND THEIR VEHICLE IS PERFORMING SATISFACTORILY.
THE CLAIM INFORMATION SECTION HAS ALSO BEEN REVISED TO REFLECT THESE CHANGES INCLUDING THE ADDITION OF LABOR OPERATIONS V7414 AND V7415 TO CORRECT DRIVEABILITY CONCERNS FOR VEHICLES WHICH WHERE REPAIRED UNDER CAMPAIGN 88C30.
General Motors has determined that certain 1988 Chevrolet Nova model vehicles with 1.6L (RPO LC9 - VIN CODE "4") engines may exceed high altitude carbon monoxide (CO) Federal Emission Standards. This condition applies to vehicles registered in Colorado, Nevada, New Mexico and Utah (vehicles which have moved to these states from California which are equipped with RPO YF5 do not require this campaign repair).
To correct this condition, vehicles registered in the four affected states will have an improved electronic bleed-air control valve (EBCV) installed and related vacuum hoses replaced with increased diameter vacuum hoses. Additionally, the 6-way vacuum tee will be replaced with two 3-way vacuum tees and a 2nd HAC (High Altitude compensation) valve will be added.
It has also been determined that some vehicles repaired under the original issue of this campaign may be experiencing hesitation during engine warm-up and manual transmission vehicles may experience a rough idle condition. A procedure is included in this bulletin to correct this driveability condition on these previously repaired vehicles.
VEHICLES INVOLVED
Involved are certain 1988 Chevrolet Nova model vehicles with 1.6L (RPO LC9 - VIN CODE "4") engines built within the following VIN breakpoints:
PLANT YEAR MODEL PLANT CODE FROM THROUGH ------------------------------------------------------- 1988 S-Car Fremont "Z" JZ000111 JZ109133
Involved vehicles have been identified by Vehicle Identification Number Computer Listings. Computer listings contain the complete Vehicle Identification Number, owner name and address data, and are furnished to involved dealers with the campaign bulletin. Owner name and address data furnished will enable dealers to follow-up with owners involved in this campaign.
These listings may contain owner names and addresses obtained from State Motor Vehicle Registration Records. The use of such motor vehicle registration data for any other purpose is a violation of law in several states. Accordingly, you are urged to limit the use of this listing to the follow-up necessary to complete this campaign. Any dealer not receiving a computer listing with the campaign bulletin has no involved vehicles currently assigned.
OWNER NOTIFICATION
Owners will be notified of this revised campaign on their vehicles by Chevrolet Motor Division (see copy of owner letter included with this bulletin).
DEALER CAMPAIGN RESPONSIBILITY
All unsold new/used vehicles in dealers' possession and subject to this campaign must be held and inspected/repaired per the service procedure of this campaign bulletin before owners take possession of these vehicles.
Dealers are to service all vehicles subject to this campaign at no charge to owners, regardless of mileage, age of vehicle, or ownership, from this time forward.
Owners of vehicles recently sold from your new/used vehicle inventory with no owner information indicated on the dealer listing, are to be contacted by the dealer, and arrangements made to make the required correction according to the instructions contained in this bulletin.
This could be done by mailing to such owners a copy of the owners letter accompanying this bulletin. Campaign follow-up cards should not be used for this purpose, since the owner may not as yet have received the notification letter.
In summary, whenever a vehicle subject to this campaign enters your vehicle inventory, or is in your dealership for service in the future, please take the steps necessary to be sure the campaign correction has been made before selling or releasing the vehicle.
PARTS INFORMATION
Dealers will be preshipped High Altitude Compensator (HAC) Valve kits (with no delivery charge) equivalent to 35% of their involved vehicles beginning on December 6, 1993. EBCV kits will not be preshipped.
Additional parts required to perform this campaign are to be obtained from General Motors Service Parts Operations (GMSPO). To ensure these parts will be obtained as soon as possible, they should be ordered from GMSPO on a "C.I.O." order with no special instruction code, but on an advise code (2).
Quantity/ Part Number Description Vehicle ----------- ----------- --------- 94853959 EBCV Kit - Manual Transmission 1
94853960 EBCV Kit - Automatic Transmission 1
EBCV Kit Contents:
1 - Electronic Bleed-Air Control Valve (EBCV)
2 - Replacement Vacuum Hoses (Increased Diameter)
2 - 3-Way Vacuum Tees
94855179 High Altitude Compensator (HAC) Valve Kit 1 (All Vehicles)
High Altitude Compensator (HAC) Valve Kit Contents:
1 - High Altitude Compensator (HAC) Valve Sub Assembly
1 - High Altitude Compensator (HAC) Valve Bracket
1 - Bolt (W/ Washer)
3 - Vacuum Port Plugs 1 - Washer Plate
1 - 3-Way Vacuum Tee 1 - MAS Plug Plate
1 - 120mm Vacuum Hose
2 - 150mm Vacuum Hose
1 - 250mm Vacuum Hose
1 - No. 1 Carburetor Gasket
2 - No. 2 Carburetor Gasket
SERVICE PROCEDURE
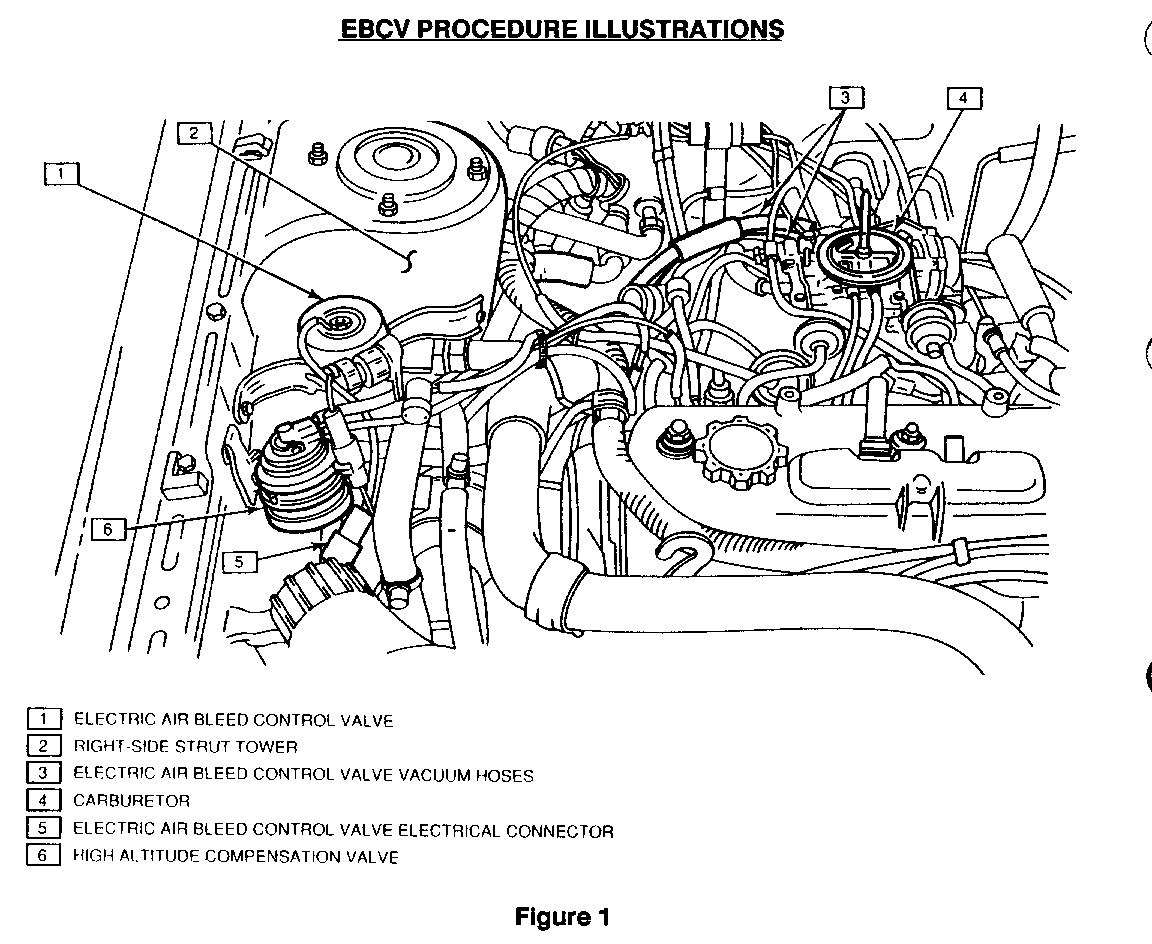
FIGURES REFERENCED IN THE FOLLOWING PROCEDURES ARE LOCATED ON PAGES 6 THROUGH 15. FIGURE 1 MAY BE HELPFUL IN LOCATING CERTAIN COMPONENTS.
NOTICE:
For vehicles receiving campaign correction for the first time, perform the EBCV procedure, HAC procedure and for manual transmission vehicles also perform the idle mixture procedure.
For vehicles which have received campaign correction previously, only perform the HAC procedure and for manual transmission vehicles also perform the idle mixture procedure.
EBCV PROCEDURE
Begin With This Procedure If Original Campaign 88C30 Was Not Previously Performed.
1. Remove air cleaner housing:
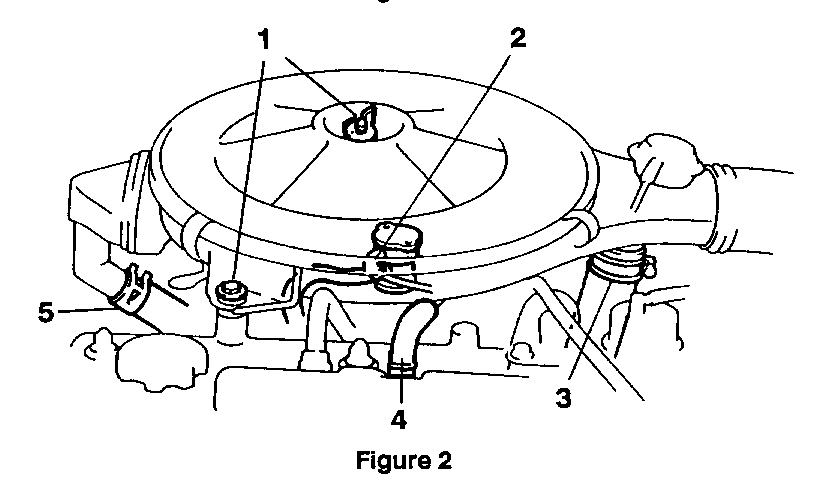
a. Remove bolt and nut (Figure 2, 1).
b. Disconnect the following hoses:
- AS (Air Suction) hose (Figure 2, 5)
- HAI (Hot Air Intake) hose ((Figure 2, 3)
- PCV (Positive Crankcase Ventilation) hose (Figure 2, 4)
- HIC (Hot Idle Compensator) hose (Figure 2, 2)
c. Remove air cleaner housing.
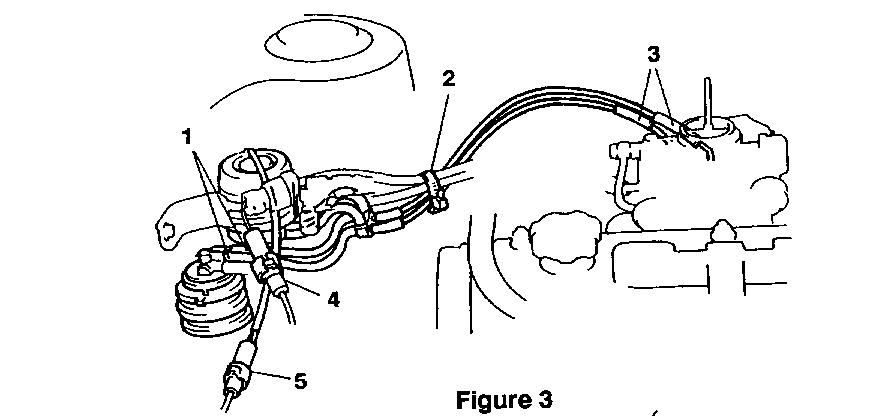
2. Loosen and remove vacuum hose tie strap (Figure 3, 2). Be certain to note which hoses are retained by tie strap so proper hoses can be regathered when tie strap is reinstalled in step 20.
3. Disconnect, at 6-way vacuum tee, the two (2) vacuum hoses running from EBCV to 6-way vacuum tee.
4. Disconnect and remove 2 vacuum hoses (Figure 3, 3) which run from 6-way connector to carburetor. These hoses will not be reused.
5. Remove 6-way connector. This connector will be replaced with two 3-way connectors supplied in kit.
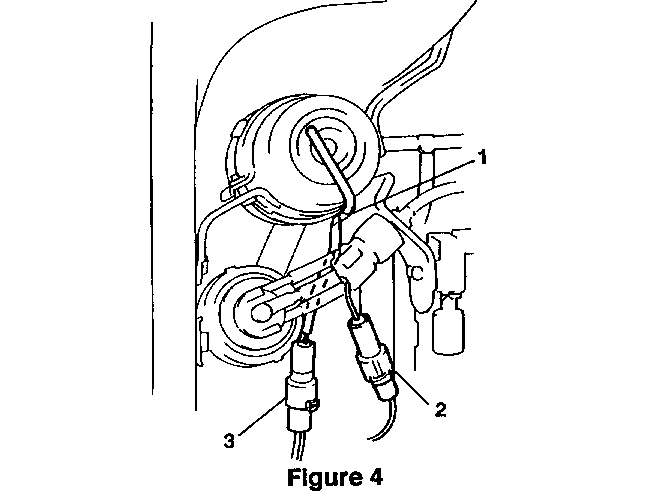
6. Disconnect EBCV electrical connector (Figure 4, 3) and vacuum switch electrical connector (Figure 4, 2).
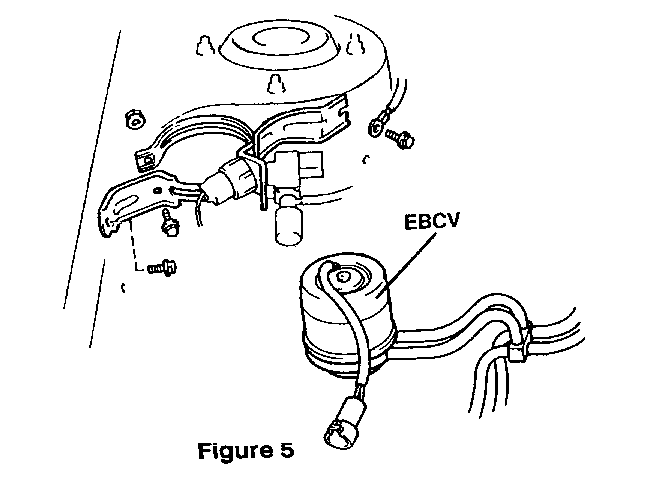
7. Remove two (2) bolts attaching EBCV bracket to strut tower and fender (Figure 5).
8. Remove EBCV wire harness from EBCV bracket clamp (Figure 4, 1).
9. Remove EBCV from EBCV bracket by removing securing bolt and nut (EBCV should still have two (2) vacuum hoses attached). See Figure 5.
10. Remove two (2) vacuum hoses still attached to EBCV and install hoses on new EBCV from kit.
11. Install new EBCV into EBCV bracket with securing bolt and nut (Figure 5).
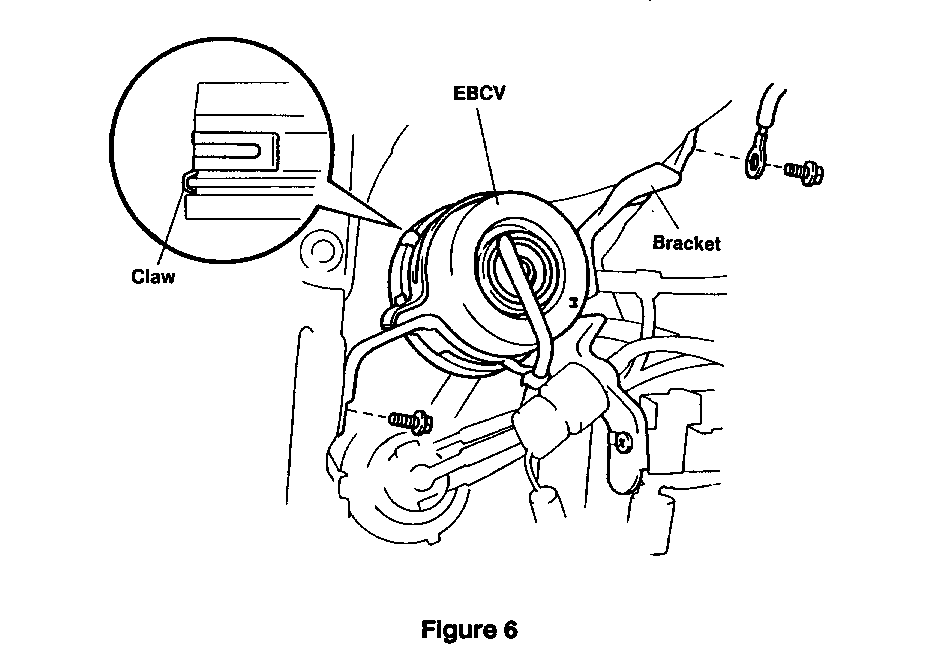
NOTICE: Seat EBCV into claw on EBCV bracket (Figure 6).
12. Reinstall EBCV bracket to strut tower with 2 bolts (Figure 5).
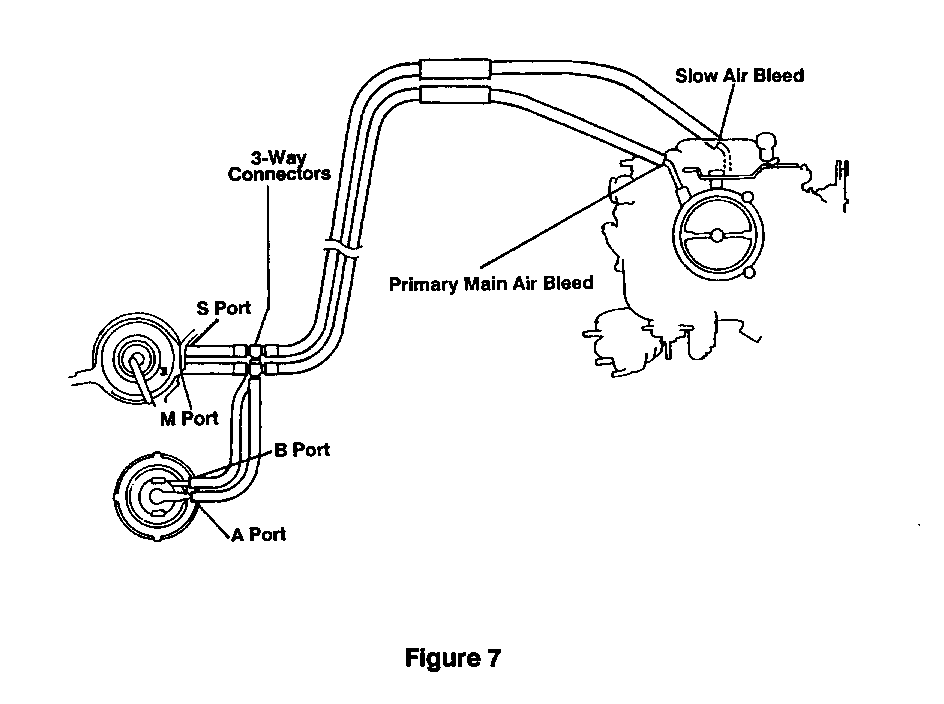
13. For Manual Transmission equipped vehicles, connect new red 3-way connector to end of vacuum hose from EBCV port M. Connect new blue 3-way connector to end of vacuum hose from EBCV port S (Figure 7) .
For Automatic Transmission equipped vehicles, connect new brown 3-way connector to end of vacuum hose from EBCV port M. Connect new white 3-way connector to end of vacuum hose from EBCV port S (Figure 7).
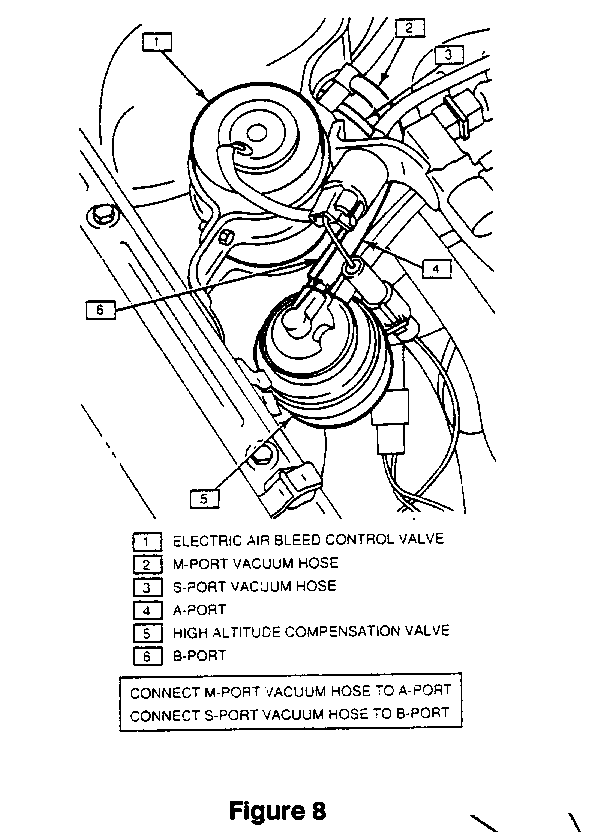
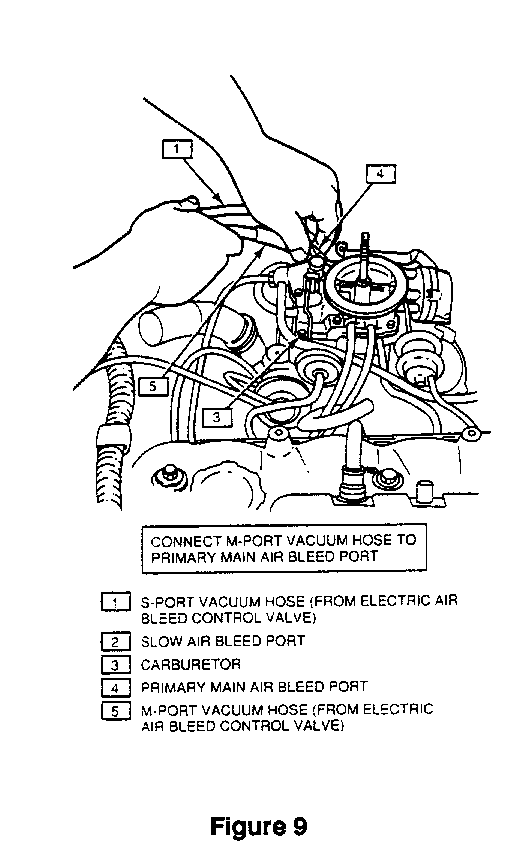
14. Connect vacuum hose from EBCV port M to vacuum hose from A port of HAC (High Altitude Compensation) valve. Be certain to connect vacuum hose from HAC to center outlet of 3-way connector (Figures 7 and 8).
15. Connect vacuum hose from S port of EBCV to vacuum hose from B port of HAC. Be certain to connect vacuum hose from HAC to center outlet of 3-way connector (Figure 7 and 8).
16. Install one end of new 480mm vacuum hose to remaining outlet of 3- way connector from EBCV M port (Figure 7).
17. Connect remaining end of 480mm vacuum hose to Primary Main Air Bleed Port of carburetor (Figure 7 and 8).
18. Connect one end of new 510mm vacuum hose to remaining outlet of 3-way connector from EBCV S port (Figure 7).
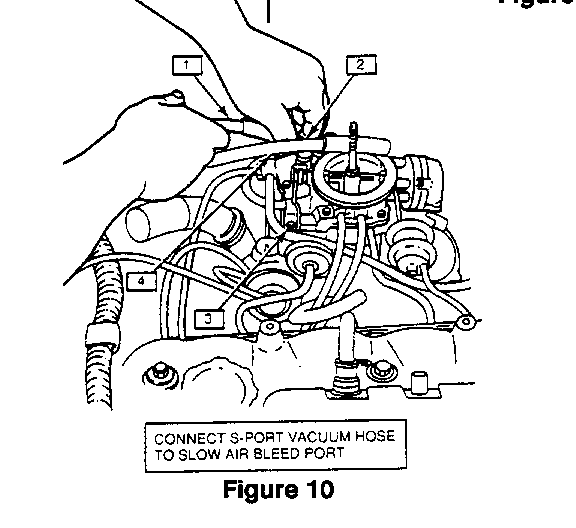
19. Connect remaining end of 510mm vacuum hose to Slow Air Bleed Port of carburetor (Figure 7 and 10).
20. Reinstall vacuum hose tie strap being certain to gather all hoses previously retained by tie strap.
21. Reconnect EBCV wiring harness to EBCV bracket clamp (Figure 4, 1).
22. Reconnect EBCV electrical connector (Figure 4, 3) and vacuum switch electrical connector (Figure 4, 2).
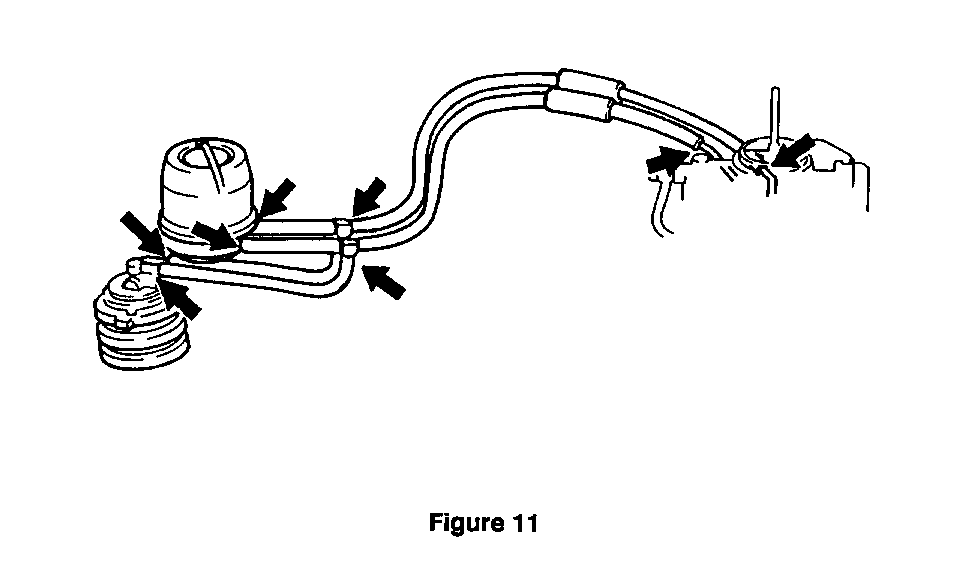
23. Check hose connections in locations shown in Figure 11.
24. Reinstall air cleaner housing.
a. Connecting the following hoses:
- HIC hose (Figure 2, 2) - PCV hose (Figure 2, 4)
- HAI hose (Figure 2, 3) - AS hose (Figure 2, 5)
b. Reinstall air cleaner housing with bolt and nut (Figure 2, 1).
-- CONTINUE TO HAC PROCEDURE--
HAC INSTALLATION PROCEDURE
Begin With This Procedure If EBCV Was Installed Previously Under Campaign 88C30 And Owner Is Experiencing DRIVEABILITY Concerns.
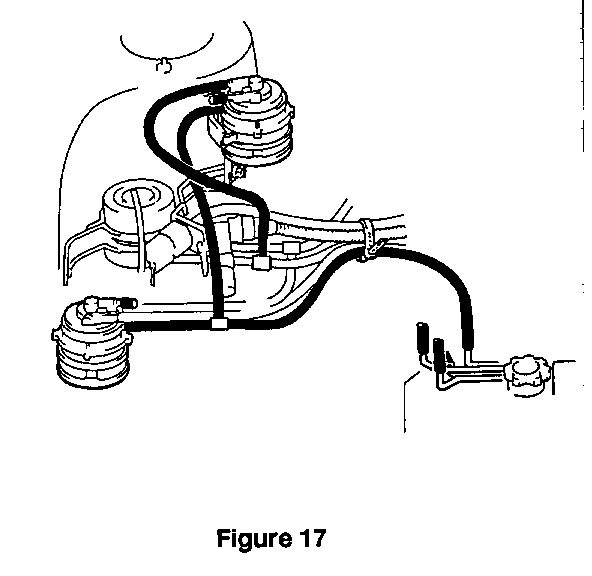
Notice: The purpose of this procedure is to install an additional HAC to work in conjunction with existing HAC and HAC bracket - Figure 17 shows both HAC's as finally installed).
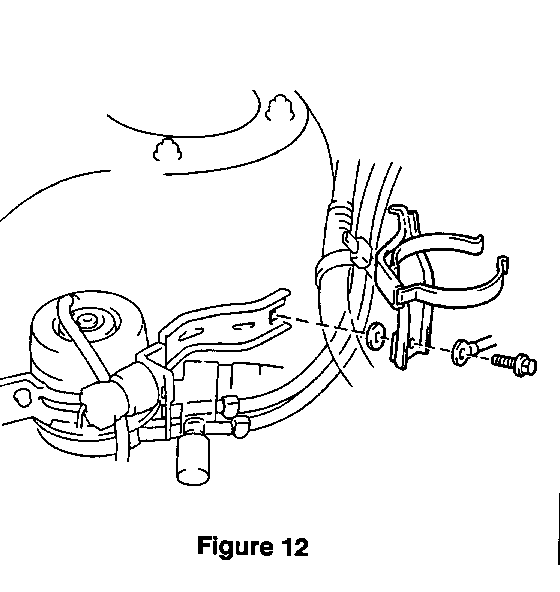
1. Remove EBCV bracket bolt (not to be reused) and install new HAC bracket with new bolt and new washer provided in kit as shown in Figure 12.
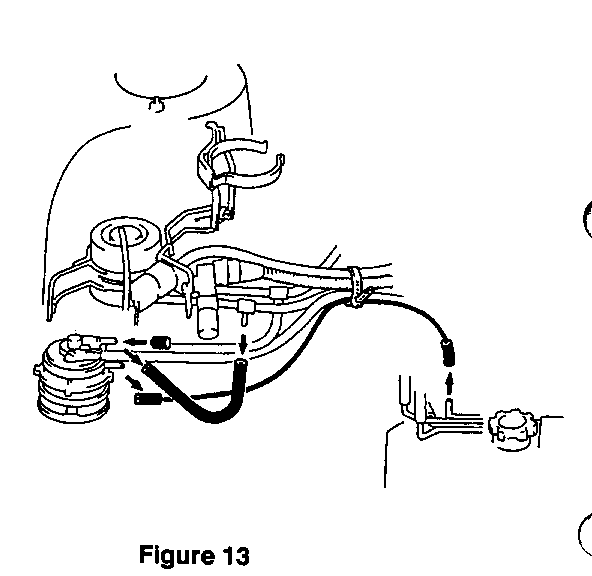
2. Remove vacuum hose from existing HAC to 3-way connector and plug HAC port using plug provided in kit (Figure 13).
3. Loosen band and remove vacuum hose from existing HAC to vacuum pipe (Figure 13).
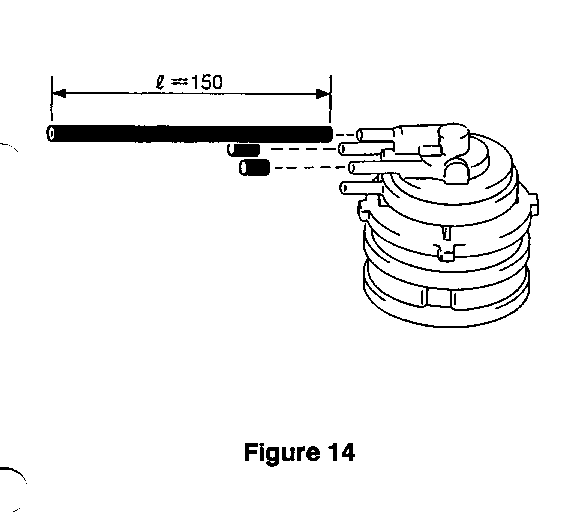
4. Install two (2) new plugs and new 150mm hose from kit to new HAC from kit (Figure 14 shows installation positions).
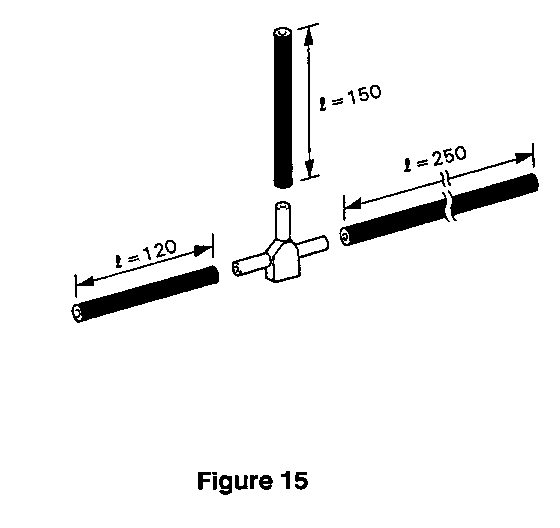
5. Install 3 new vacuum hoses from kit (120mm, 150mm and 250mm) to new 3-way connector from kit (Figure 15 shows proper placement of each hose).
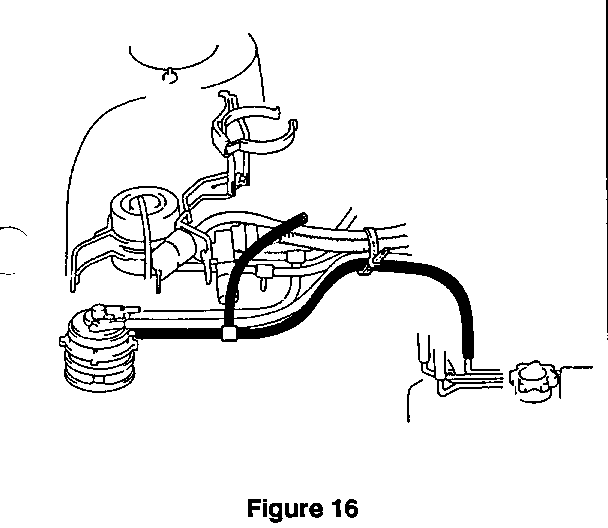
6. Connect hose assembly from step 5 to existing HAC and vacuum pipe as shown in Figure 16 (connect 120 mm hose to existing HAC and connect 250mm hose to vacuum pipe).
7. Carefully tighten band around wires and vacuum hose. Do not overtighten band around hoses (Figure 16).
8. Install new HAC (with 150mm vacuum hose still attached) to bracket (Figure 17).
9. Connect loose vacuum hose from new HAC to existing 3-way connector (from EBCV).
10. Connect remaining loose vacuum hose from new 3-way connector to remaining open port on new HAC (Figure 17).
11. Check all hose connections.
12. For automatic transmission vehicles repairs are complete, install Campaign Identification Label.
For manual transmission vehicles continue to "Idle Mixture Procedure".
IDLE MIXTURE ADJUSTMENT PROCEDURE (PERFORM ON ALL MANUAL TRANSMISSION VEHICLES)
1. Remove air cleaner housing:
a. Remove bolt and nut (Figure 2, 1).
b. Disconnect the following hoses:
- AS (Air Suction) hose (Figure 2, 5)
- HAI (Hot Air Intake) hose ((Figure 2, 3)
- PCV (Positive Crankcase Ventilation) hose (Figure 2, 4)
- HIC (Hot Idle Compensator) hose (Figure 2, 2)
c. Remove air cleaner housing.
2. Disconnect accelerator cable from carburetor.
3. Disconnect carburetor wiring connectors and attach tags to identify where connectors should be reconnected.
4. Disconnect the following hoses from carburetor:
a. Emission control hoses.
b. Fuel inlet hose.
c. Outer vent hose.
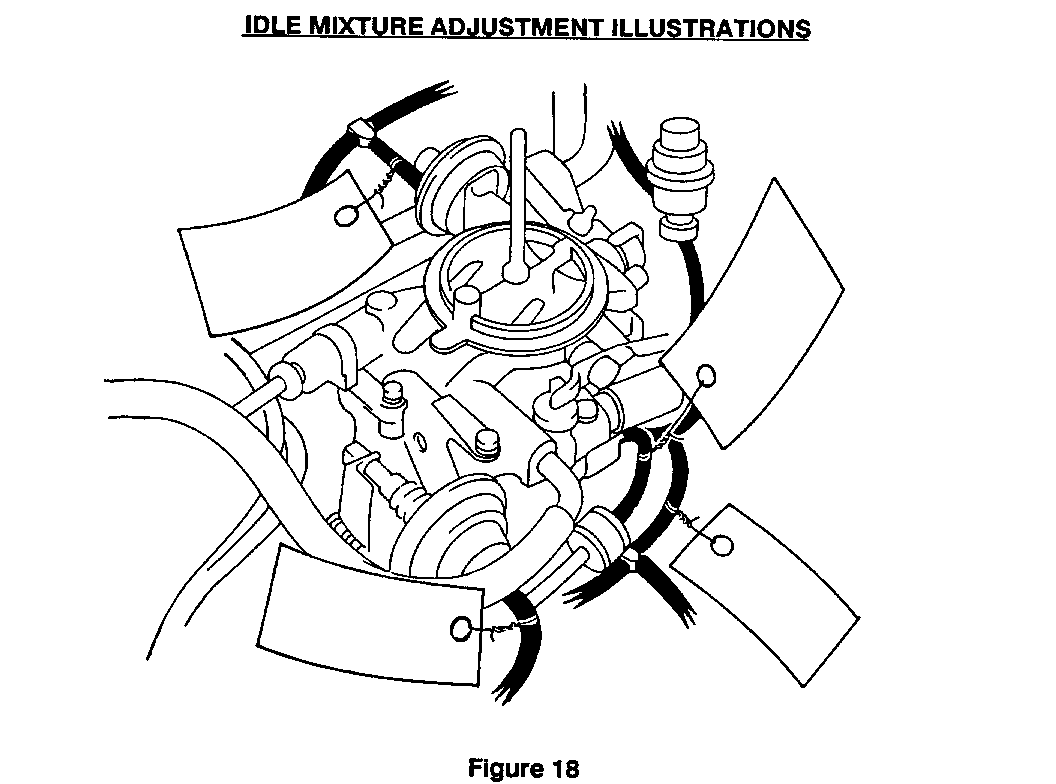
NOTICE: Before disconnecting these hoses attach tags to identify where hoses should be reconnected (Figure 18). The vacuum hose routing label and service manual diagrams may also be used to identify proper hose connections.
5. Remove carburetor as follows:
NOTICE: DO NOT SMOKE OR WORK NEAR AN OPEN FLAME WHEN SERVICING CARBURETOR!
a. Remove carburetor mounting nuts.
b. Remove cold mixture heater wire clamp and lift out EGR vacuum modulator bracket.
c. Lift out carburetor.
d. Remove old carburetor gasket.
e. Cover inlet hole of intake manifold with a clean shop rag.
6. Remove mixture adjusting screw plug (MAS plug) from carburetor using the following procedure:
a) Plug each carburetor vacuum port to prevent entry of steel particles when drilling.
b) Prick punch center of MAS plug.
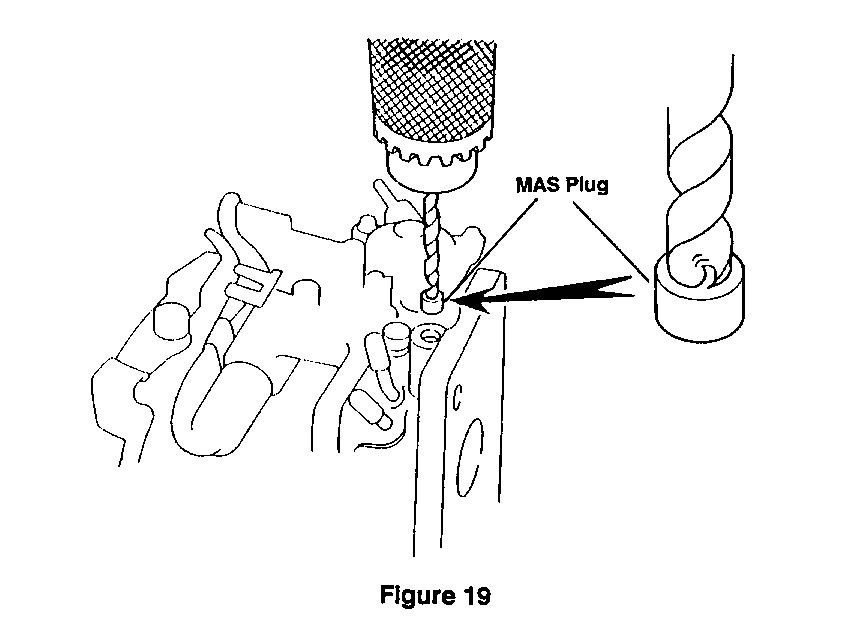
c) Drill a 6.5mm (0.256 in.) hole in center of plug (Figure 19) being careful not to drill down onto mixture adjustment screw.
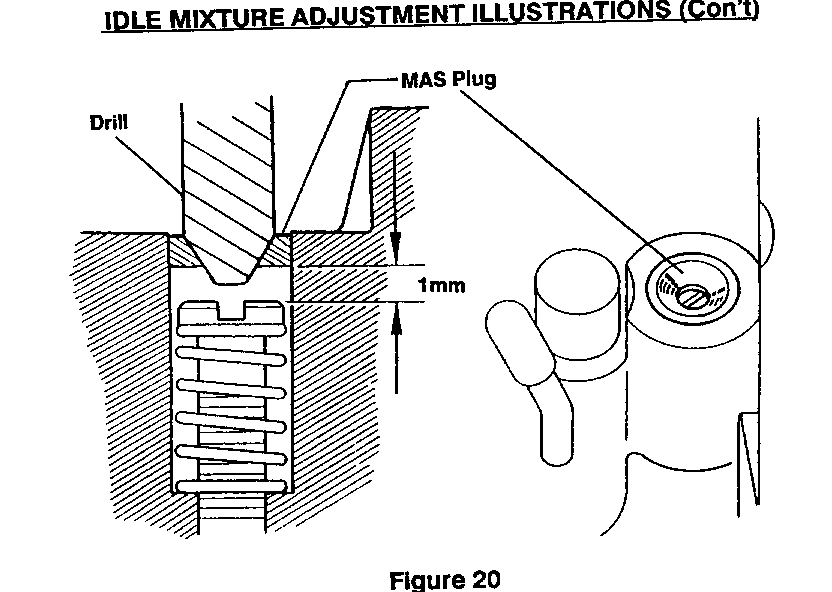
NOTICE: THERE IS ONLY 1mm (0.04 in.) CLEARANCE BETWEEN MAS PLUG AND THE MIXTURE ADJUSTMENT SCREW. DRILL CAREFULLY AND SLOWLY TO AVOID DRILLING INTO SCREW.
The drill may have forced MAS plug out completely at this time. If MAS plug has been forced out, go on to step 7. If MAS plug has not been forced out, continue to step 6d.
d. Through hole drilled in MAS plug, fully screw in mixture adjusting screw.
NOTICE: BE CAREFUL NOT TO DAMAGE SCREW TIP BY TIGHTENING SCREW DOWN TOO TIGHTLY.
e. Use a 7.5mm (0.295 in.) drill to remove remainder of MAS plug (Figure 20).
7. Using compressed air, blow any steel particles away from mixture adjusting screw.
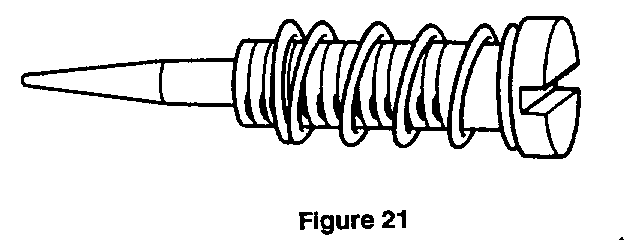
8. Remove mixture adjusting screw and inspect for damage (Figure 21 shows screw in proper condition). If drill has gnawed into screw, or if tapered portion of screw is damaged, replace screw.
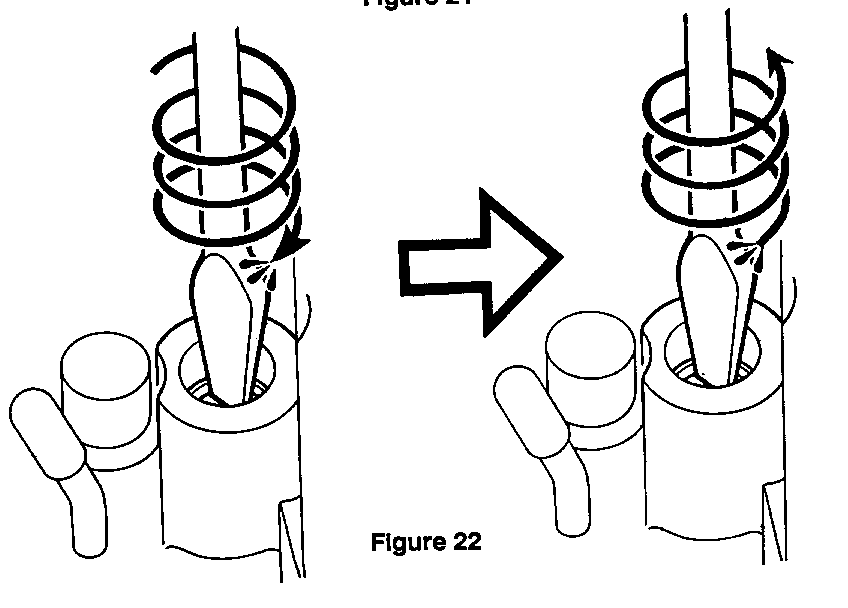
9. Fully screw in mixture adjusting screw and then unscrew it 3 and 1/4 revolutions (Figure 22).
NOTICE: BE CAREFUL NOT TO DAMAGE SCREW TIP BY TIGHTENING SCREW DOWN TOO TIGHTLY.
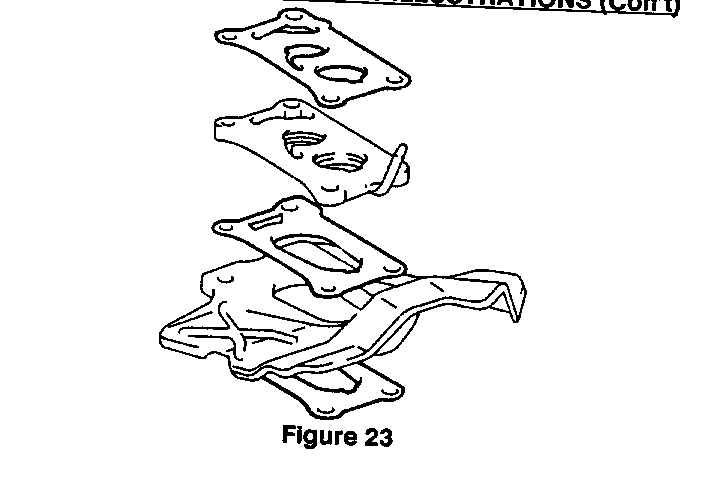
10. Reinstall carburetor using new gaskets from kit as shown in Figure 23. Tighten 4 bolts to 15 Nm (11 lb. ft.).
11. Reconnect carburetor vacuum hoses to proper locations referring to tags attached in step 4 and to vacuum hose routing label located under hood (or refer to 1988 Nova Service Manual).
12. Reinstall air cleaner.
a. Connect the following hoses:
- HIC (Hot Idle Compensator) hose (Figure 2, 2)
- PCV (Positive Crankcase Ventilation) hose (Figure 2, 4)
- HAI (Hot Air Intake) hose ((Figure 2, 3)
- AS (Air Suction) hose (Figure 2, 5)
b. Install air cleaner housing with bolt and wing nut.
13. Adjust idle speed and mixture as follows:
a. These initial conditions must be met:
- Air cleaner installed
- Normal operating coolant temperature
- Choke fully open
- All accessories switched off
- All vacuum lines connected
- Ignition timing set correctly
- Transmission in neutral
- Fuel level should be even with correct level mark in carburetor sight glass
- Front wheels in straight ahead position for power steering equipped vehicles
b. Start engine.
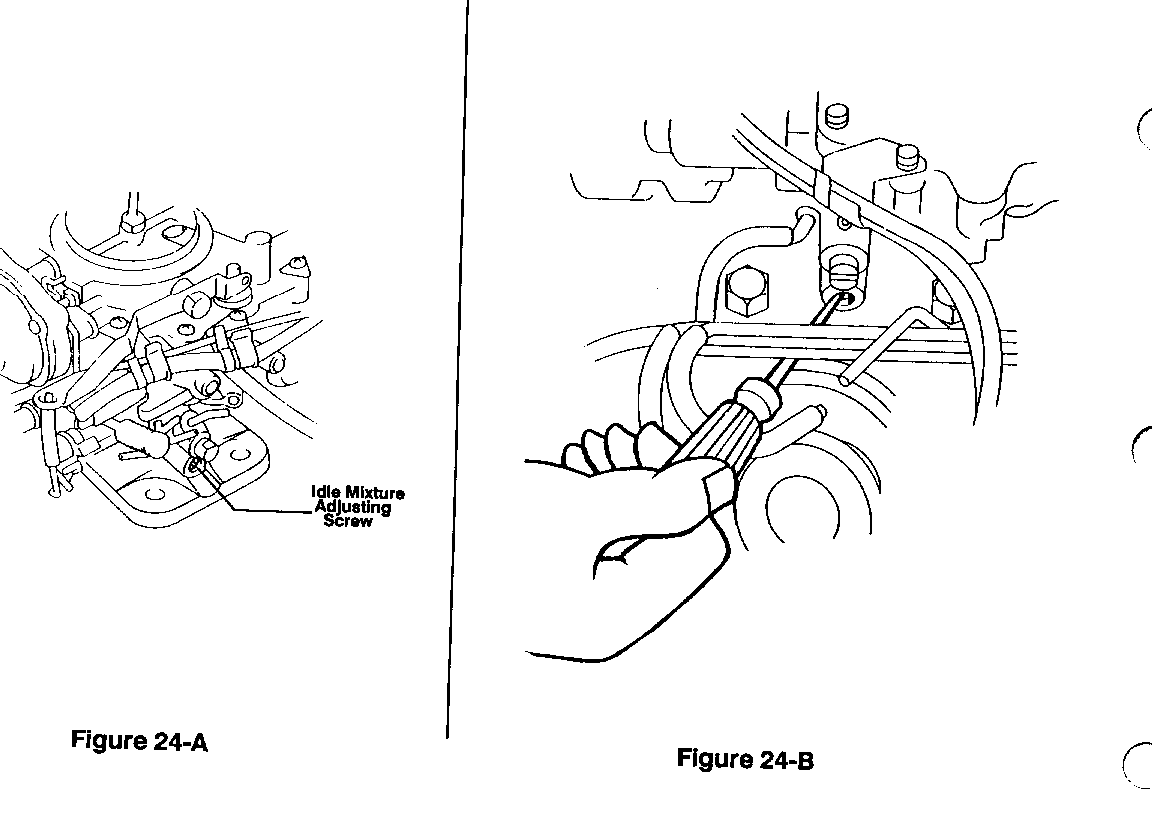
c. Set to maximum idle speed by turning idle mixture adjusting screw (Figure 24-A). This screw can be reached by inserting a screwdriver between EGR valve and EGR vacuum modulator bracket (Figure 24-B).
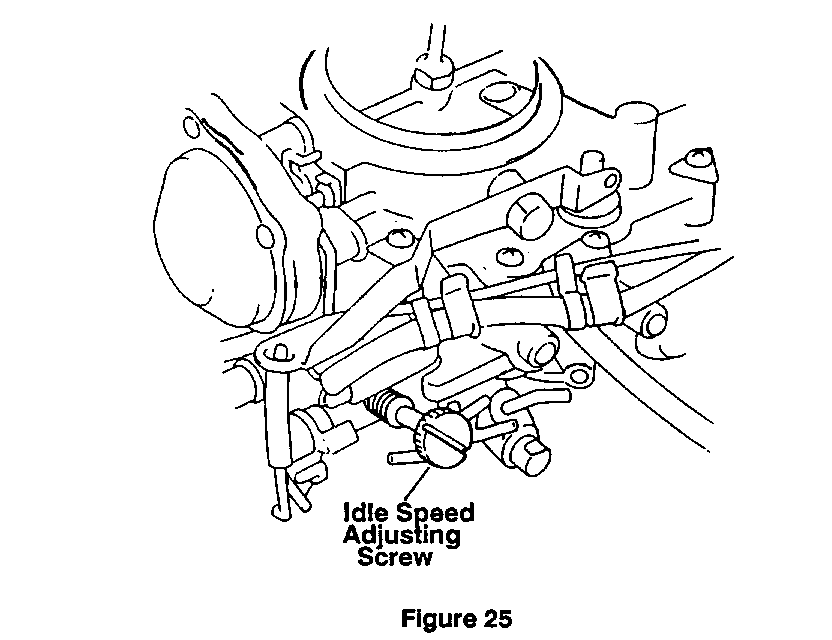
d. Set idle speed by turning idle speed adjusting screw (Figure 25). Idle speed should be 700 RPM.
e. Continue to adjust idle mixture screw and idle speed screw until maximum speed will not rise any further no matter how much the idle mixture adjusting screw is adjusted.
f. Set to 650 RPM by screwing in idle mixture adjusting screw.
Notice: This is the lean drop method for setting idle speed and mixture.
14. Plug idle mixture adjusting screw as follows:
a. Remove air cleaner and EGR vacuum modulator bracket.
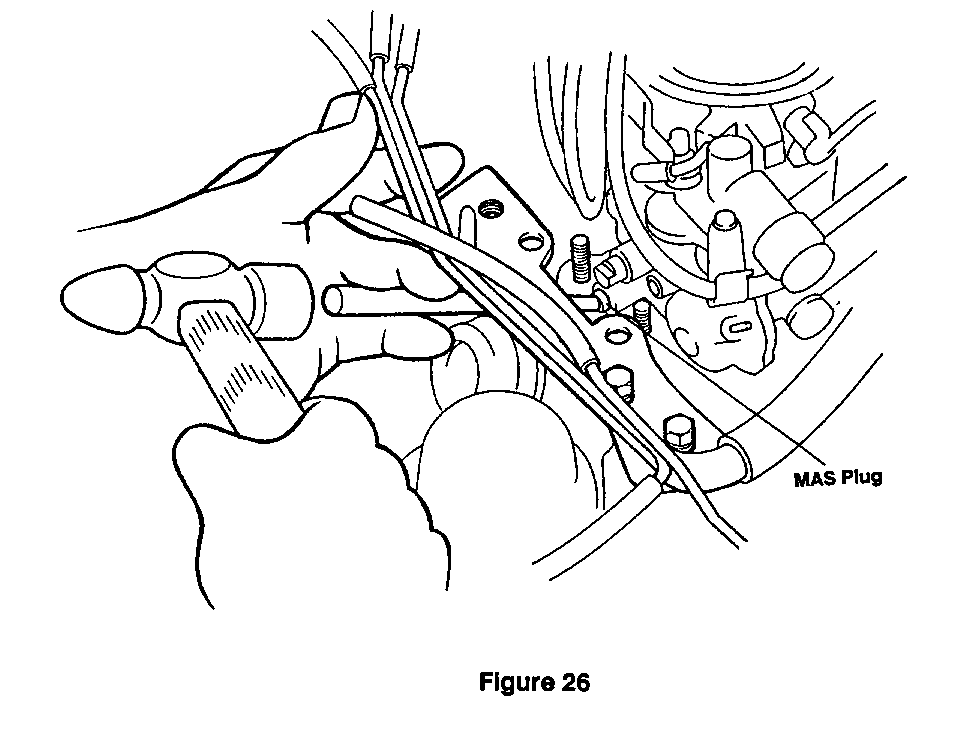
b. With tapered end inward, tap in new MAS plug (from HAC kit) until it is flush with carburetor surface (Figure 26).
c. Reinstall EGR vacuum modulator bracket and air cleaner.
15. Install Campaign Identification Label. For vehicles which were previously corrected under the original campaign 88C30 repair, install a second Campaign Identification Label identifying 88C32.
CAMPAIGN IDENTIFICATION LABEL
Each vehicle corrected in accordance with the instructions outlined in this Product Campaign Bulletin will require a "Campaign Identification Label". Each label provides a space to include the campaign number and the five (5) digit dealer code of the dealer performing the campaign service. This information may be inserted with a typewriter or a ball point pen.
Each "Campaign Identification Label" is to be located on the radiator core support in an area which will be visible when the vehicle is brought in for periodic servicing by the owner. Additional "Campaign Identification Labels" can be obtained from DAC.
Apply "Campaign Identification Label" only on a clean, dry surface.
CLAIM INFORMATION
Submit a Product Campaign Claim with the information indicated below:
* FAILED PARTS CC-FC LABOR LAB OTH REPAIR PERFORMED PC PART NO. ALLOW OP HRS HRS -------------------------------------------------------------------------- Replace EBCV, Install 2nd HAC and Adjust Idle 2 94853959 ** SK-00 V7412 1.4 0.1 Mixture - Manual Transmission
Replace EBCV And Install 2nd HAC 2 94853960 ** SK-00 V7413 0.4 0.1 Automatic Trans.
EBCV Previously Replaced - Vehicle Experiencing DRIVEABILITY 1 94855179 ** SK-00 V7414 1.3 0.1 Concerns - Install 2nd HAC And Adjust Idle Mixture Manual Trans.
EBCV Previously Replaced - Vehicle Experiencing DRIVEABILITY 1 94855179 ** SK-00 V7415 0.3 0.1 Concerns Install 2nd HAC Automatic Trans.
* Campaign Administrative Allowance.
** The "Parts Allowance" should be the sum total of the current GMSPO Dealer Net price plus 30% of all parts required for the repair.
Dealers will automatically receive the correct labor and material allowance based on the labor operation performed.
Refer to the Chevrolet Claims Processing Manual for details on Product Campaign Claim Submission.
Dear Chevrolet Nova Owner:
This notice is sent to inform you that Chevrolet Motor Division has made changes to an emission recall campaign that includes your vehicle.
During October 1992, General Motors notified owners of certain 1988 Chevrolet Nova vehicles with 1.6L engines, that their vehicle may exceed high altitude carbon monoxide (CO) Federal Emission Standards. This condition only applies to vehicles registered in Colorado, Nevada, New Mexico and Utah. Owners were advised to take their vehicle to their Chevrolet dealer so that the condition could be repaired.
It has been brought to our attention that some vehicles which were previously repaired for this condition may be experiencing driveability concerns (hesitation during engine warm-up and, for manual transmission vehicles only, rough engine idle). We have determined the cause of these conditions, and Chevrolet dealers can make the necessary corrections.
If you have not yet returned your vehicle to correct the original condition, please make an appointment as soon as possible with your Chevrolet dealer. We will correct the condition free of charge with a new repair procedure that will prevent the driveability condition from occurring.
Please also make an appointment with your Chevrolet dealer if you have had the original repair performed and are experiencing the driveability concerns mentioned above. The necessary corrections for these driveability conditions will also be made free of charge.
If you have already had the original repair performed and are not experiencing the driveability problems, there is no need for you to return to your dealership for any corrections.
Should you have any questions regarding this program, please feel free to call us. Our toll free number is 1-800-222-1020, and one of our Customer Assistance Specialists will be happy to answer any questions you may have.
We are very glad to have you as a customer and hope you will choose Chevrolet again when you make your next vehicle purchase.
Chevrolet Motor Division GENERAL MOTORS CORPORATION
Enclosure
General Motors bulletins are intended for use by professional technicians, not a "do-it-yourselfer". They are written to inform those technicians of conditions that may occur on some vehicles, or to provide information that could assist in the proper service of a vehicle. Properly trained technicians have the equipment, tools, safety instructions and know-how to do a job properly and safely. If a condition is described, do not assume that the bulletin applies to your vehicle, or that your vehicle will have that condition. See a General Motors dealer servicing your brand of General Motors vehicle for information on whether your vehicle may benefit from the information.
