For 1990-2009 cars only
Tools Required
| • | J 41413 EVAP Pressure/Purge Diagnostic Station |
| • | J 41416 Ultrasonic Leak Detector |
Inspection Procedure
Whenever the diagnostics lead to a no trouble found or an EVAP canister purge valve replacement, proceed with the following EVAP canister diagnostic.
Notice: Use the EVAP Pressure/Purge Diagnostic Station J 41413 in order to provide a clean, dry, low pressure gas source. Do not substitute any other pressurized gas source. Damage may result to the EVAP system.
- Turn OFF the ignition.
- Remove the EVAP canister purge valve from the vehicle. Refer to Evaporative Emission Canister Purge Solenoid Valve Replacement .
- Lightly tap the EVAP canister purge valve on a hard surface.
- Visually inspect for carbon particles exiting from either of the vacuum ports.
- If no carbon particle release is evident, reinstall the valve, the procedure is complete.
- If carbon particles have been released, the EVAP canister is faulty and the purge lines must be cleared.
- Remove the EVAP canister from the vehicle. Refer to Evaporative Emission Canister Replacement .
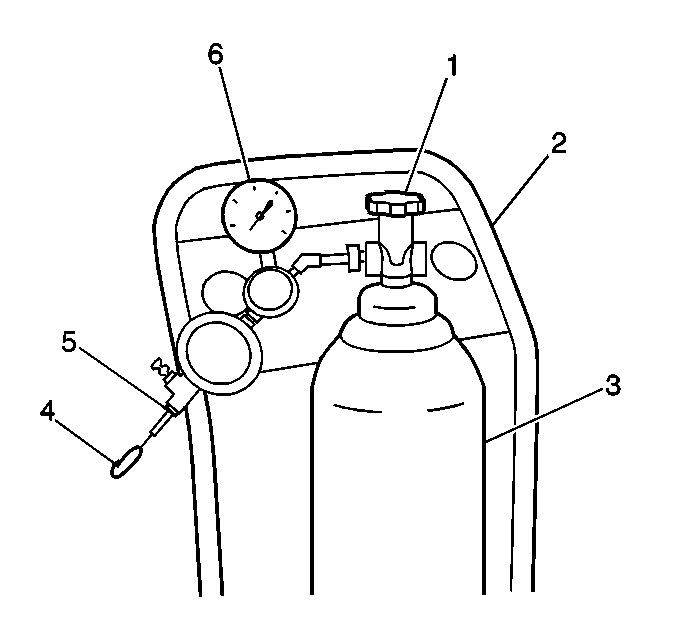
- Turn OFF the main cylinder valve (1) on the J 41413 .
- Disconnect the black hose (4) that connects to the pressure regulator valve (5) of the nitrogen cylinder (3) on the EVAP cart.
- Using a section of vacuum hose, connect one end onto the open fitting of the pressure regulator valve (5).
- Connect the other end of the vacuum hose to the EVAP purge line on the vehicle.
- Turn ON the main nitrogen cylinder valve (1) in order to blow out any charcoal particles and foreign material.
- Continue to blow any debris from the purge line for 15 seconds.
- Remove the vacuum hose from the vehicle purge line and return the J 41413 to its original condition as in step 9.
- Install a new EVAP canister purge solenoid valve.
- Install a new EVAP canister.
- Connect the J 41413 to the vehicle and test the EVAP system for leaks with the J 41416 . Repair any leaks as necessary.

