Removal Procedure
Tools Required
| • | J 41040 Camshaft
Sprocket Spanner Wrench |
Caution: Unless directed otherwise, the ignition and start switch must be in the OFF or LOCK position, and all electrical loads must be OFF before servicing
any electrical component. Disconnect the negative battery cable to prevent an electrical spark should a tool or equipment come in contact with an exposed electrical terminal. Failure to follow these precautions may result in personal injury and/or damage to
the vehicle or its components.
- Disconnect
the negative battery cable.
- Remove the front grille from the vehicle. Refer to
Grille Replacement
in Exterior Trim.
- Remove the two bolts and the hood latch from the front end panel.
- Remove the two electrical connectors from the horn.
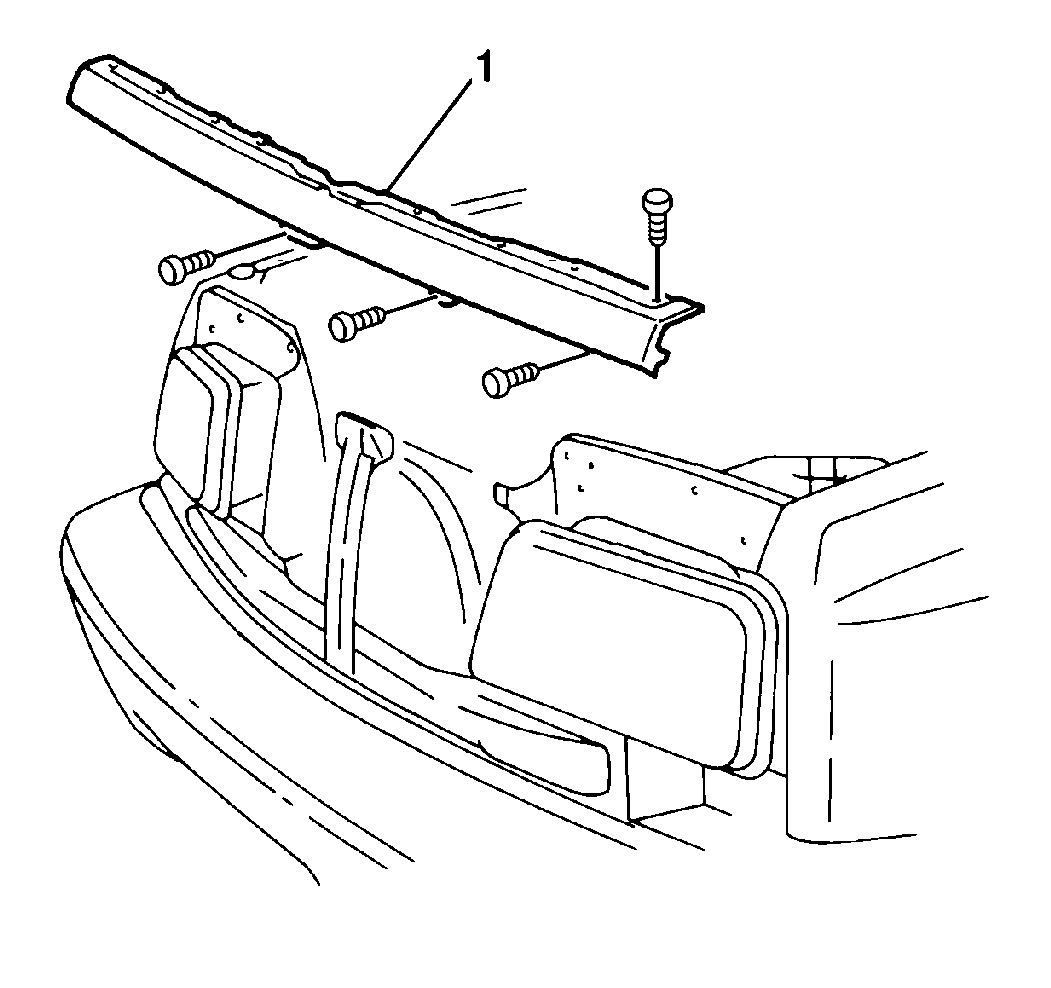
- Remove the twelve bolts
and the front end panel (1) from the vehicle.
- Remove the radiator from the radiator core support. Refer to Engine
Cooling.
- Remove the timing belt from the engine. Refer to
Timing Belt Replacement
.
- Use the J 41040
in
order to hold the camshaft timing belt gear stationary. Remove one bolt
and the camshaft timing belt gear from the camshaft .
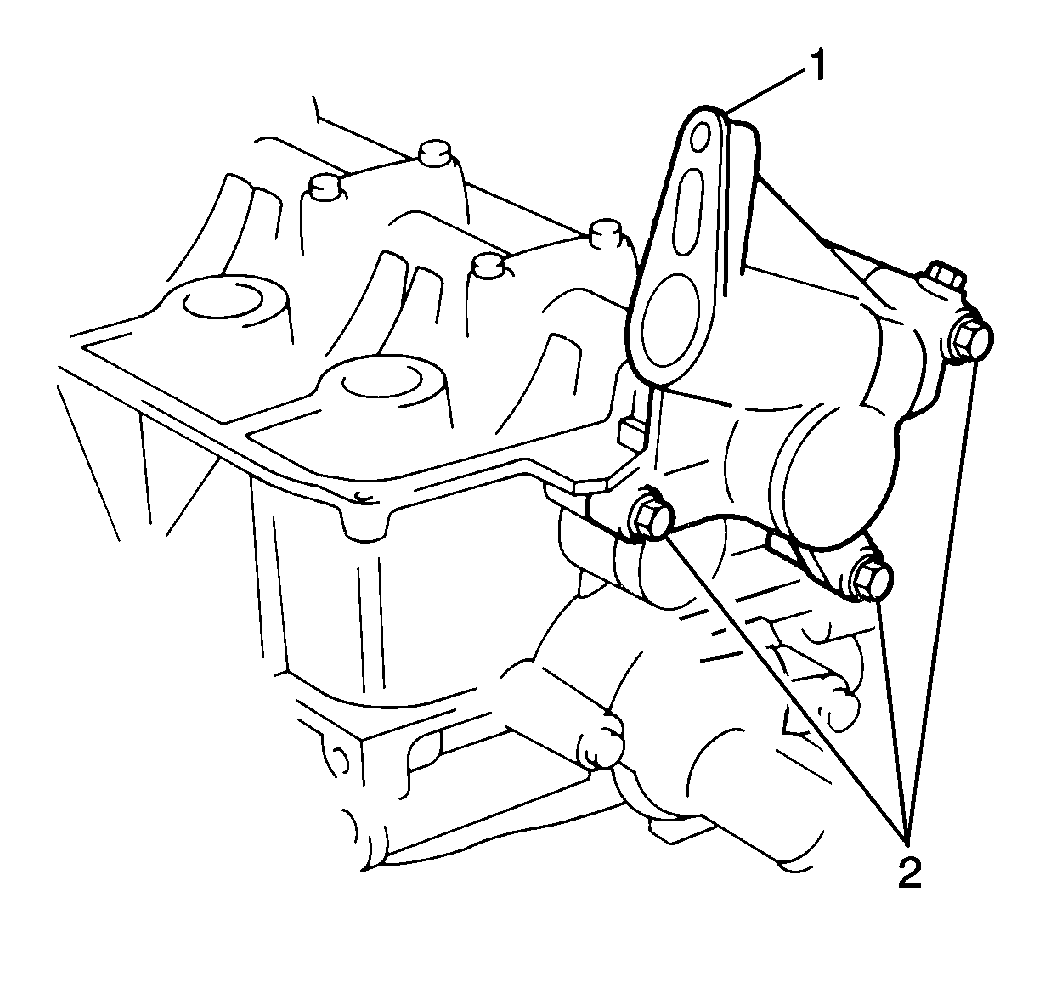
- Remove the cylinder head
cover from the cylinder head. Refer to
Cylinder Head Replacement
.
Important: A small amount of oil may drain from the distributor case upon removal
from the cylinder head. Place a suitable container underneath the case or
use a shop towel to catch and absorb oil.
- Remove the distributor from the distributor case. Refer to
Distributor Replacement
in Engine Electrical.
- Remove the three bolts and the distributor case (1) from the cylinder
head.
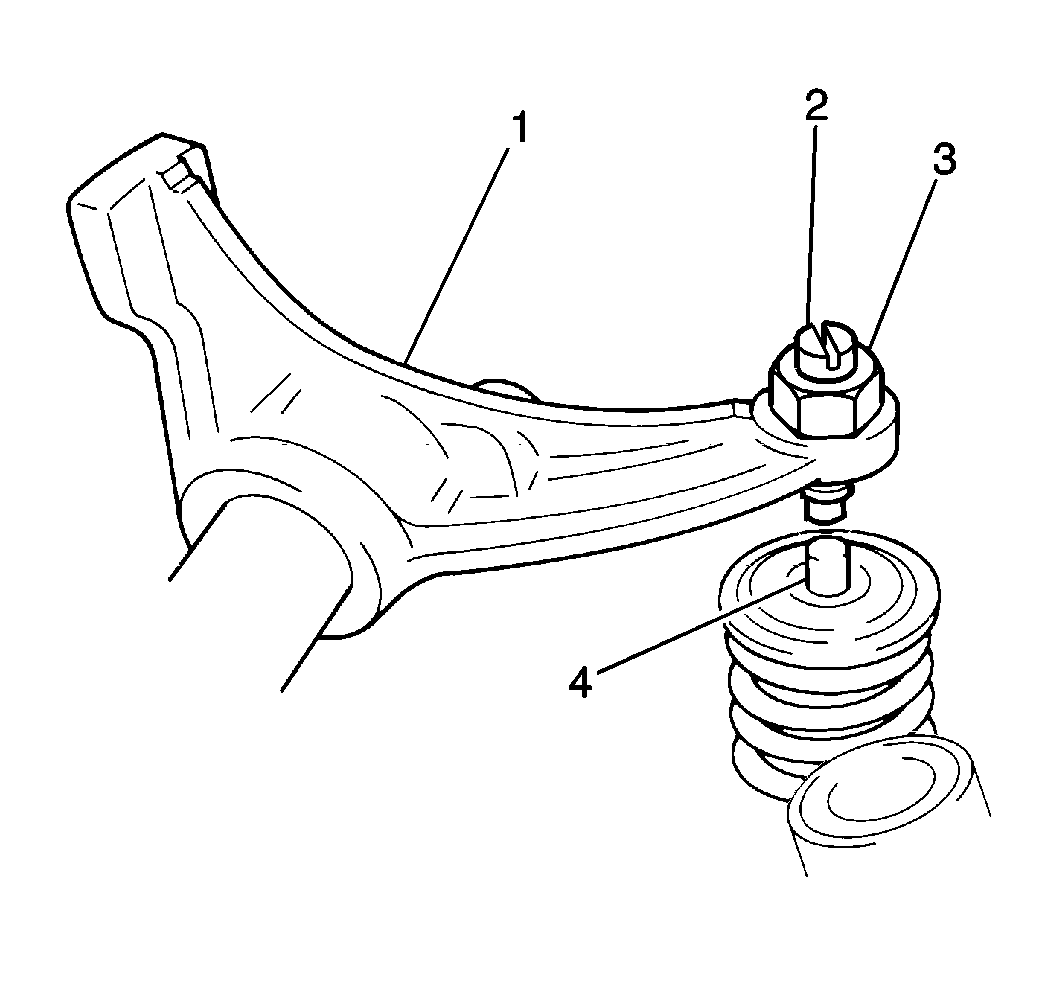
- Loosen all valve adjusting
screw locknuts (3).
- Loosen all valve adjusting screws (2) until all rocker arms (1)
move freely.
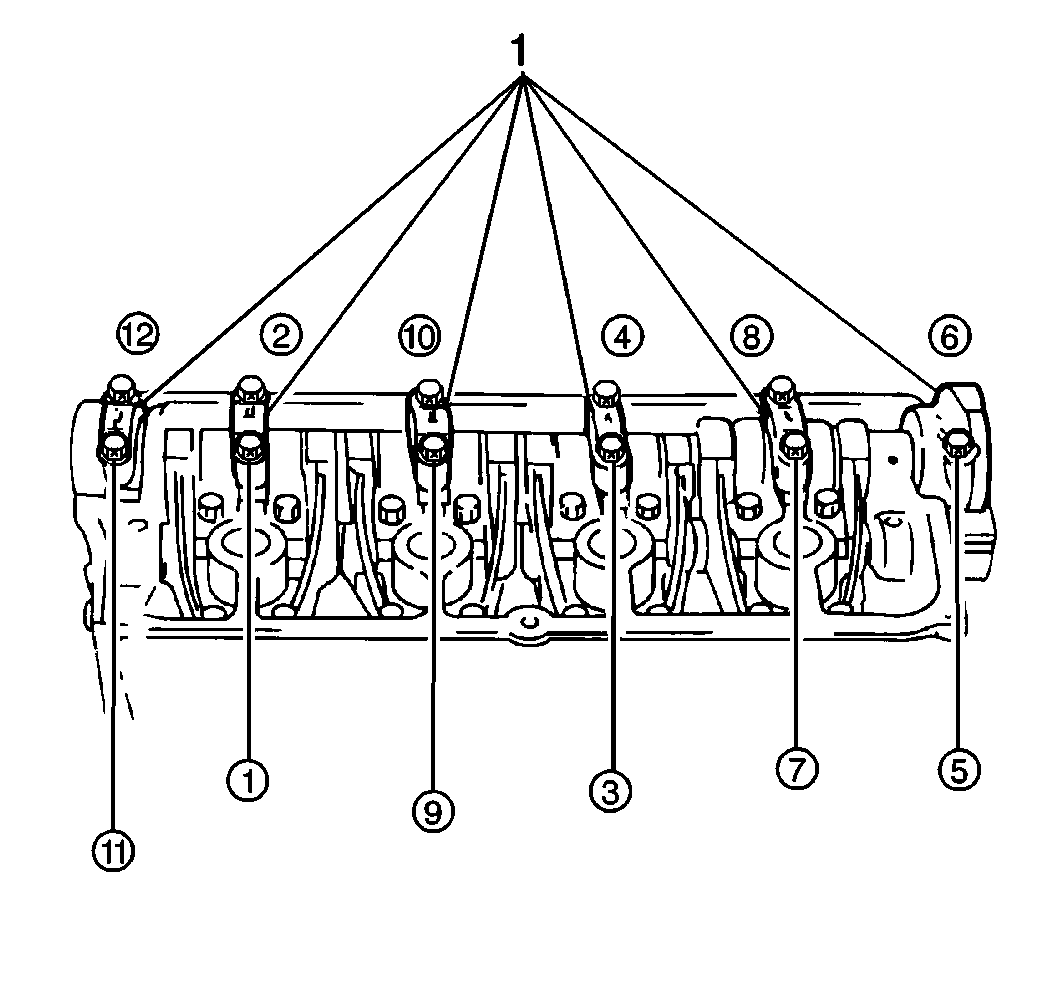
Notice: Always remove the camshaft carrier bolts gradually in the order specified
in order to relieve the tension on the camshaft. If the camshaft carrier bolts
are removed at random, damage to the camshaft may occur.
- Remove the following from the cylinder head:
| • | The camshaft carrier caps (1) |
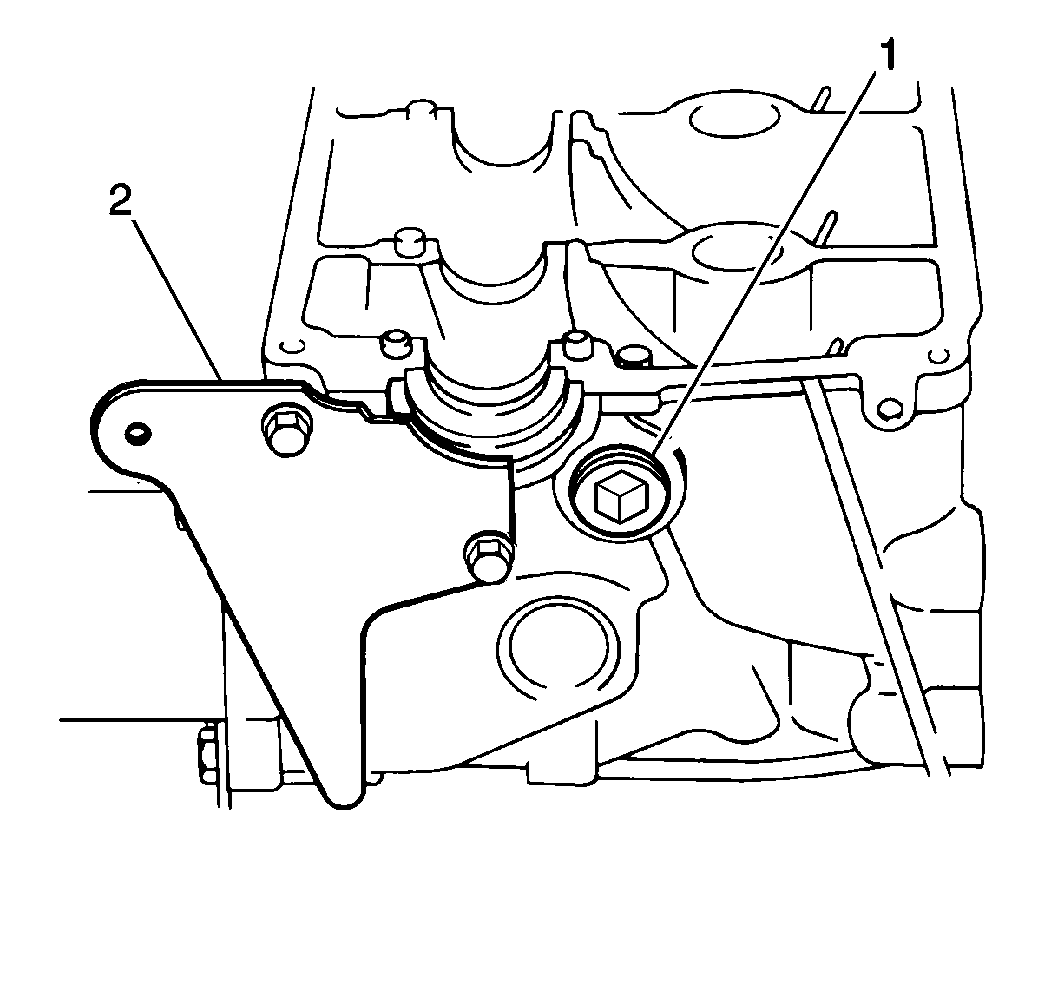
- Remove the rocker arm
shaft plug (1) from the cylinder head.
- Remove the two bolts and the timing belt inside cover from the
cylinder head.
- Remove all of the intake rocker arms with clips from the rocker
arm shaft.
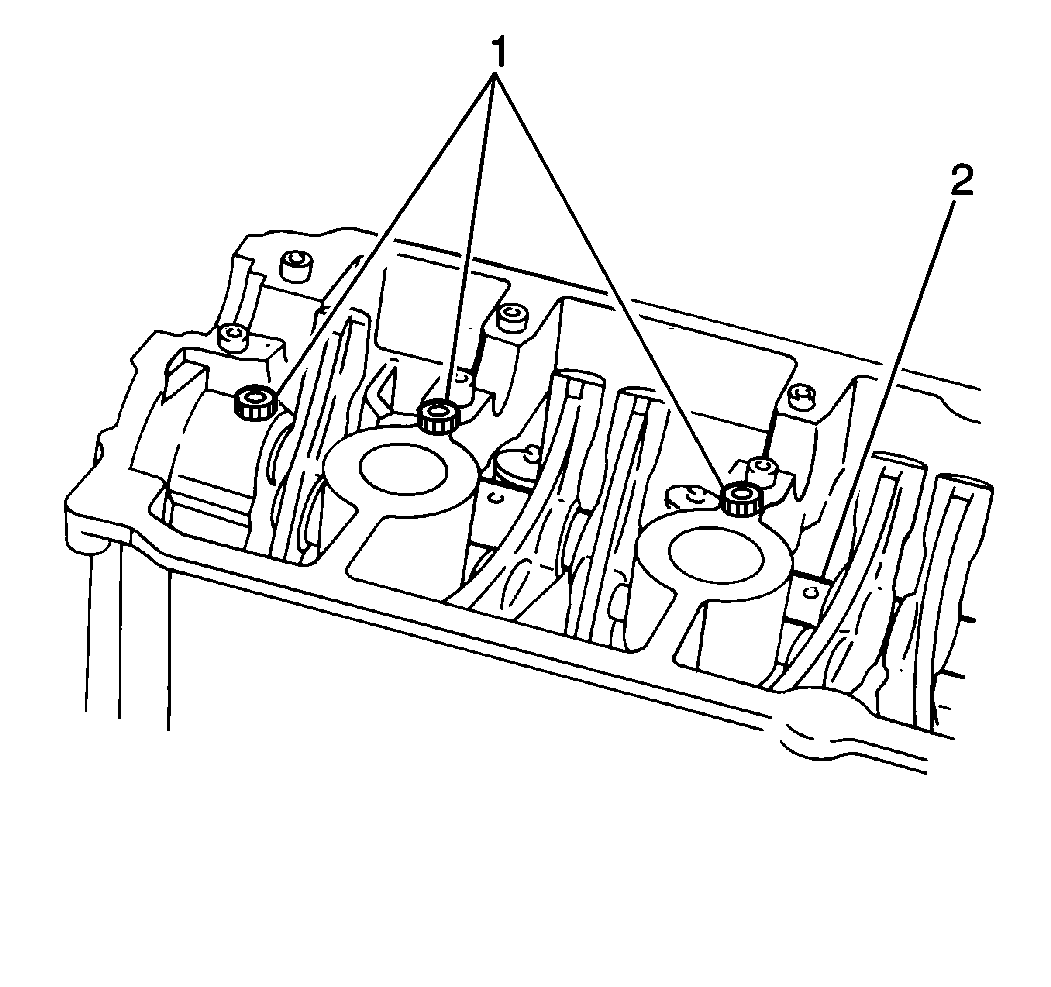
- Remove the six rocker
arm shaft bolts (1) from the cylinder head.
- Push the rocker arm shaft (2) back through the rear of the cylinder
head until the end of the rocker arm shaft appears.
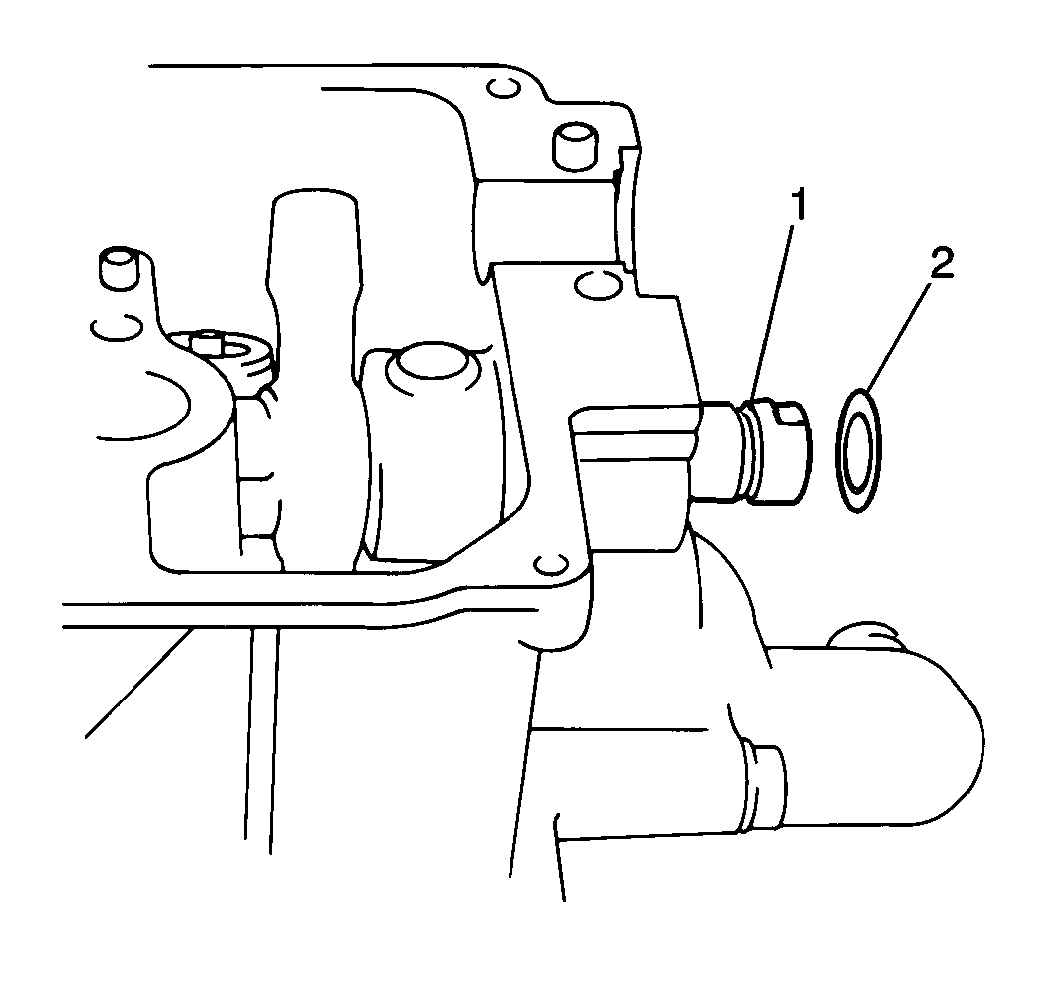
- Remove the O-ring (2)
from the rear of the rocker arm shaft (1).
- Remove the following components by pulling the rocker arm shaft
through the front of the cylinder head:
| • | The exhaust rocker arms |
- Clean all of the camshaft and rocker arm components thoroughly
with clean solvent.
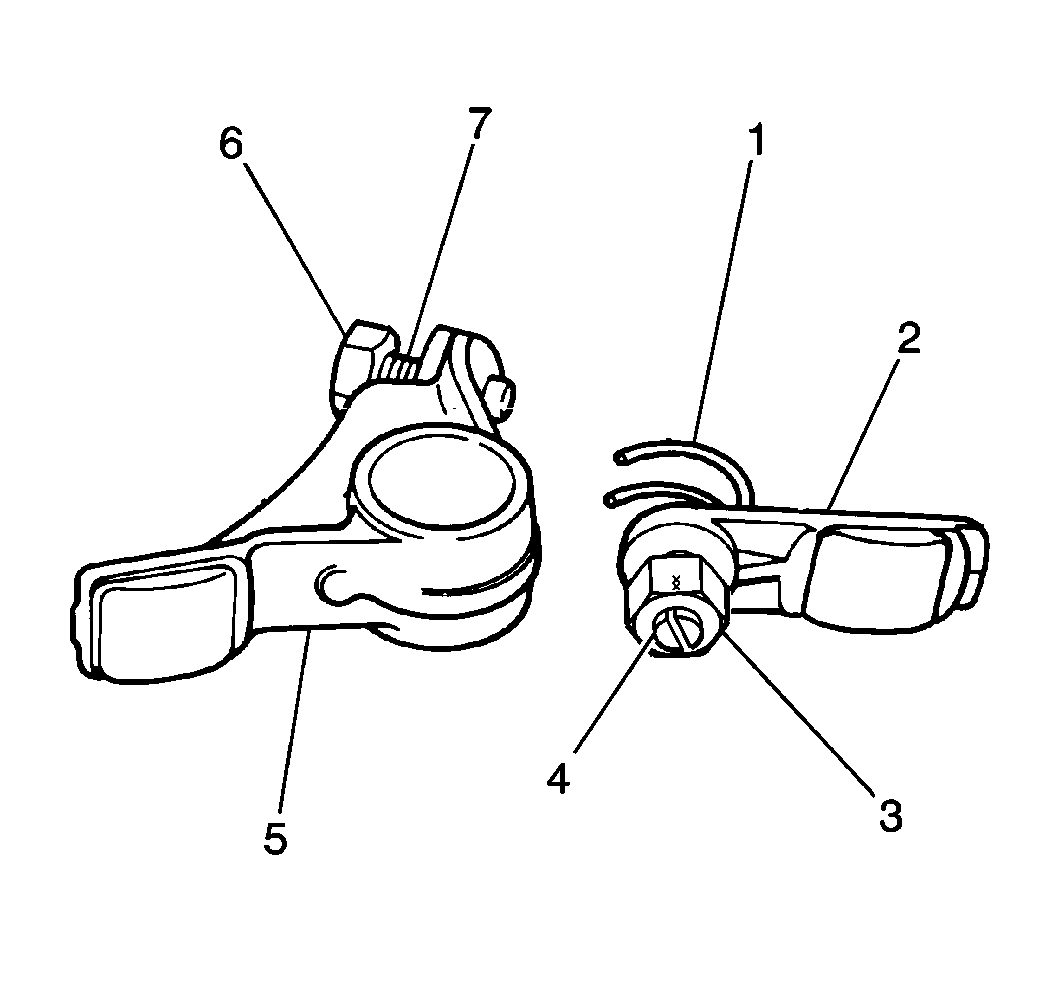
- Inspect the rocker arms
(2, 5) for excessive wear or damage. Pay particular attention to the rocker
arm adjusting screw tips (4, 7) and cam riding surfaces. If excessive
wear or damage exists, replace the rocker arms as necessary.
- Inspect the following for excessive wear or damage:
| • | Replace the components as necessary. |
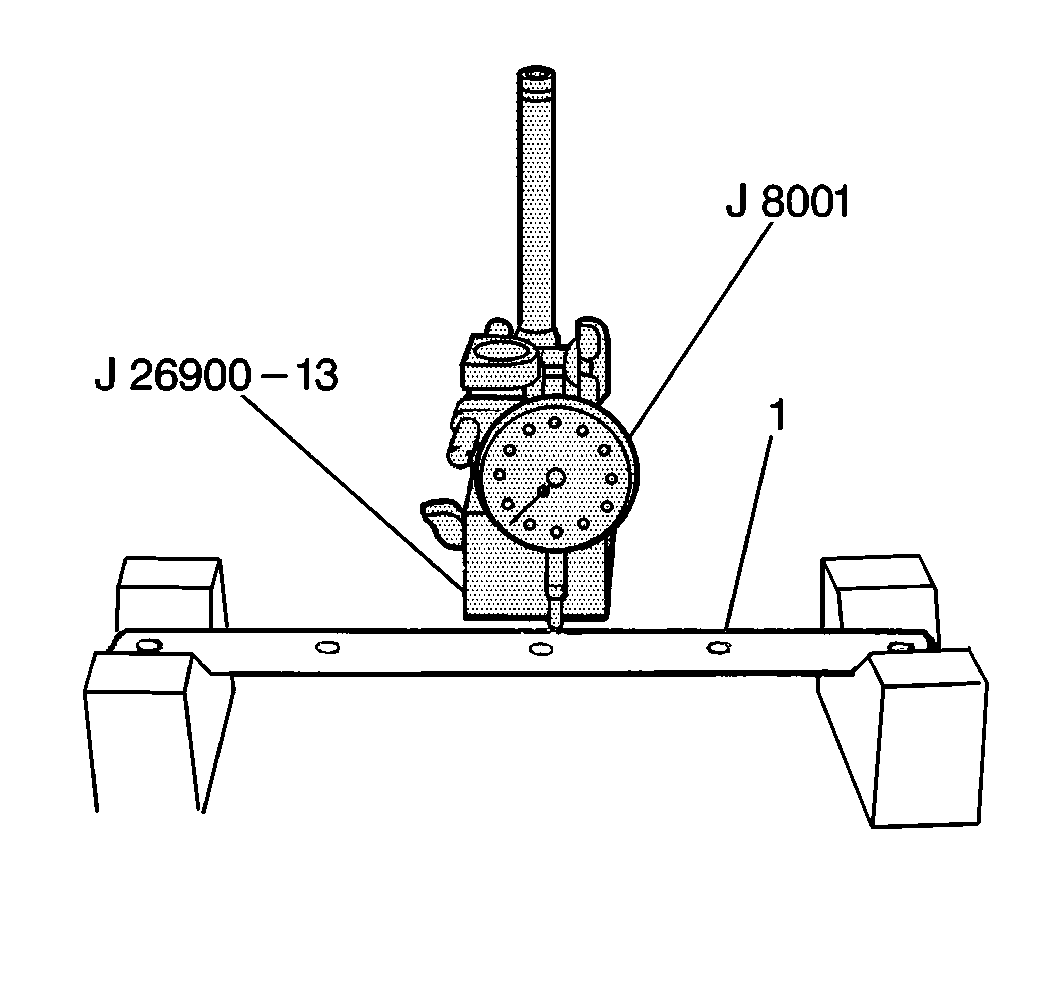
- Use a J 8001
with a J 26900-13
in order to measure the rocker arm shaft (1) runout.
| 25.1. | Place the rocker arm shaft (1) between two V-blocks and rotate
slowly while measuring the runout. The maximum rocker arm shaft runout is
0.20 mm (0.008 in). |
| 25.2. | Replace the rocker arm shaft if the rocker arm shaft runout exceeds
0.20 mm (0.008 in). |
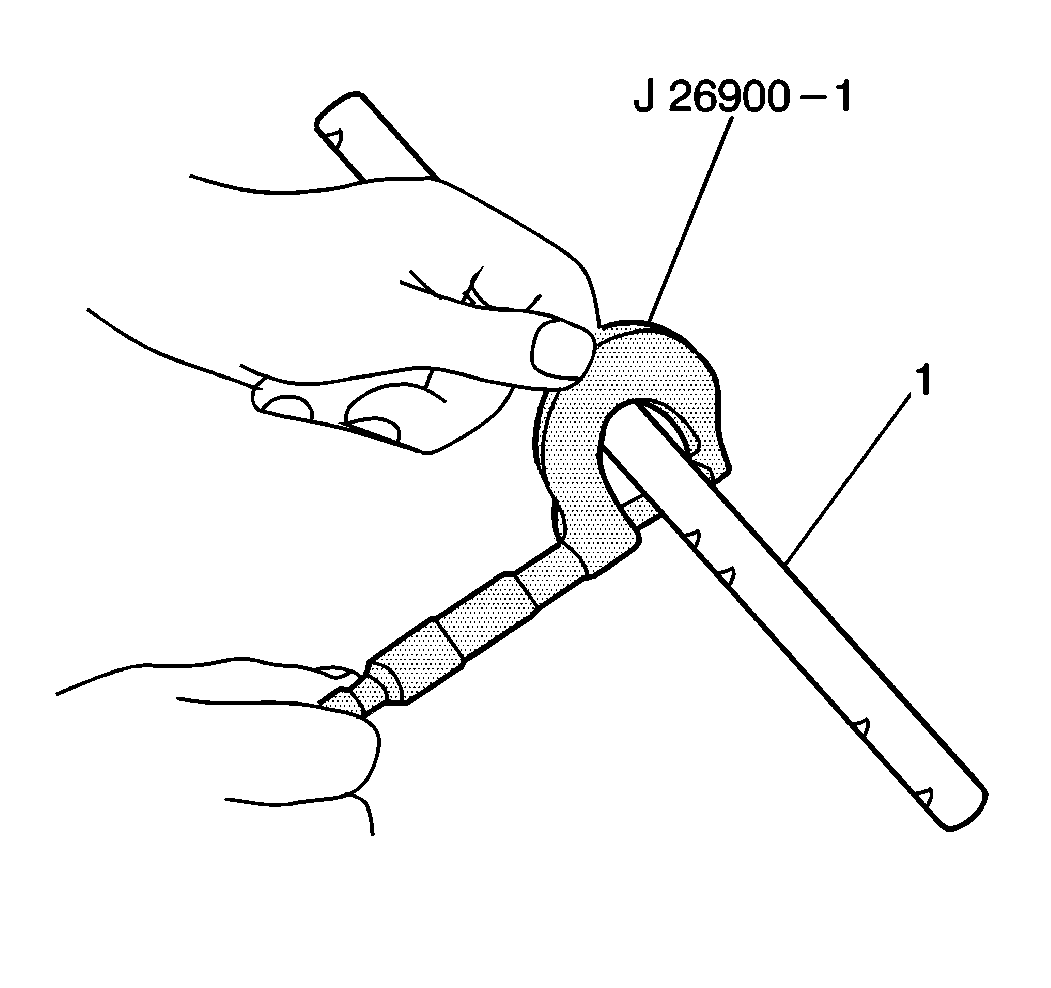
- Use the J 26900-1
and a telescopic micrometer in order
to measure the rocker arm-to-rocker arm shaft clearance.
| 26.1. | Use the J 26900-1
in order to measure the outside diameter of the rocker arm shaft (1).
The standard rocker arm outside diameter 15.969 to 15.984 mm (0.6287
to 0.6293 in). |
| 26.2. | Use a telescopic micrometer in order to measure the inside diameter
of the rocker arms. The standard rocker arm inside diameter is 15.985 to 16.005 mm
(0.629 to 0.630 in). |
- Subtract the outside diameter measurement of the rocker arm shaft
from the inside diameter measurement of the rocker arms to determine the rocker
arm-to-rocker arm shaft clearance.
| • | The standard rocker arm-to-rocker arm shaft clearance is 0.0011
to 0.036 mm (0.0001 to 0.0014 in). |
| • | The maximum rocker arm-to-rocker arm shaft is 0.09 mm (0.0035 in). |
- Replace the rocker arms and/or rocker arm shaft if the following
exceed specification:
| • | The rocker arm inside diameter |
| • | The rocker arm shaft outside diameter |
| • | The rocker arm-to-rocker arm shaft clearance |
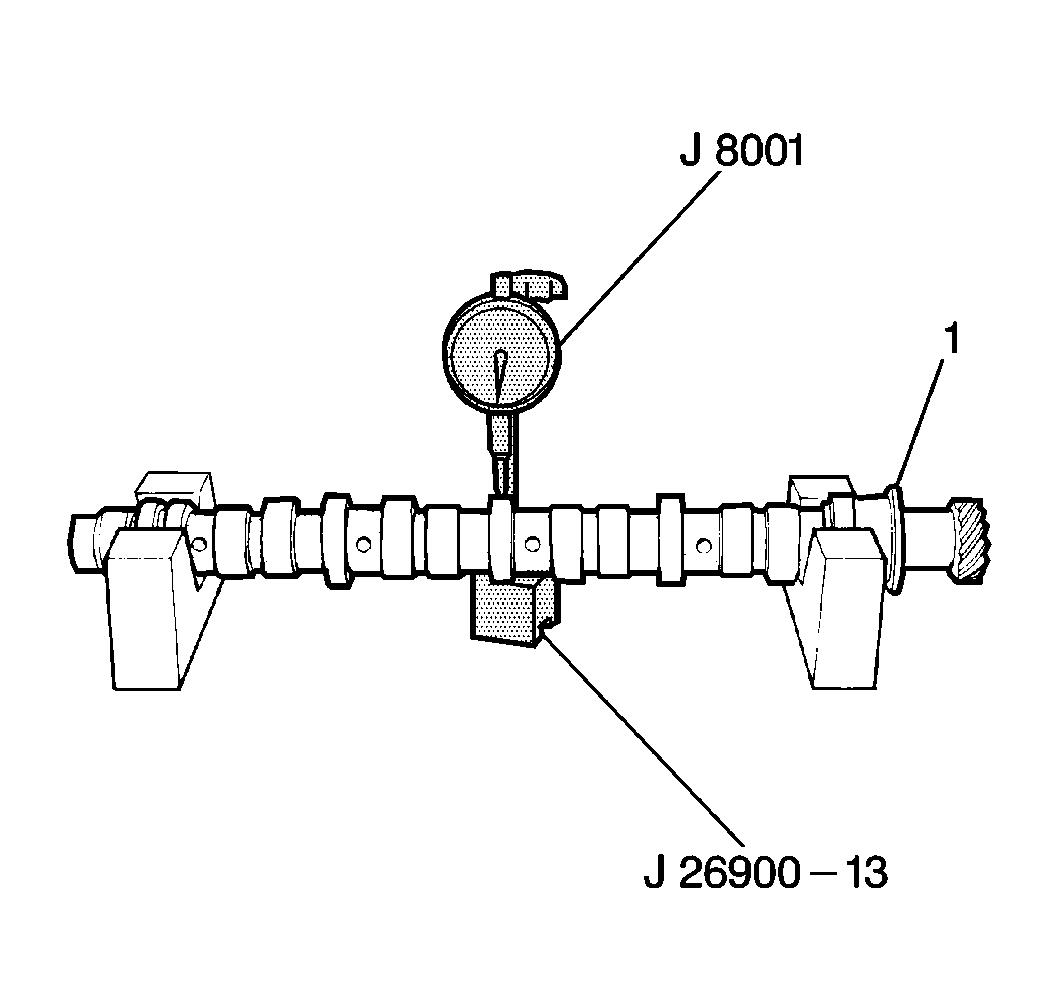
- Use the J 8001
with the J 26900-13
in order to measure the camshaft (1) journal runout.
| 29.1. | Place the camshaft (1) between two V-blocks and rotate slowly
while measuring the journal runout. The maximum camshaft journal runout is
0.10 mm (0.0039 in). |
| 29.2. | Replace the camshaft if the camshaft journal exceeds 0.10 mm
(0.0039 in). |
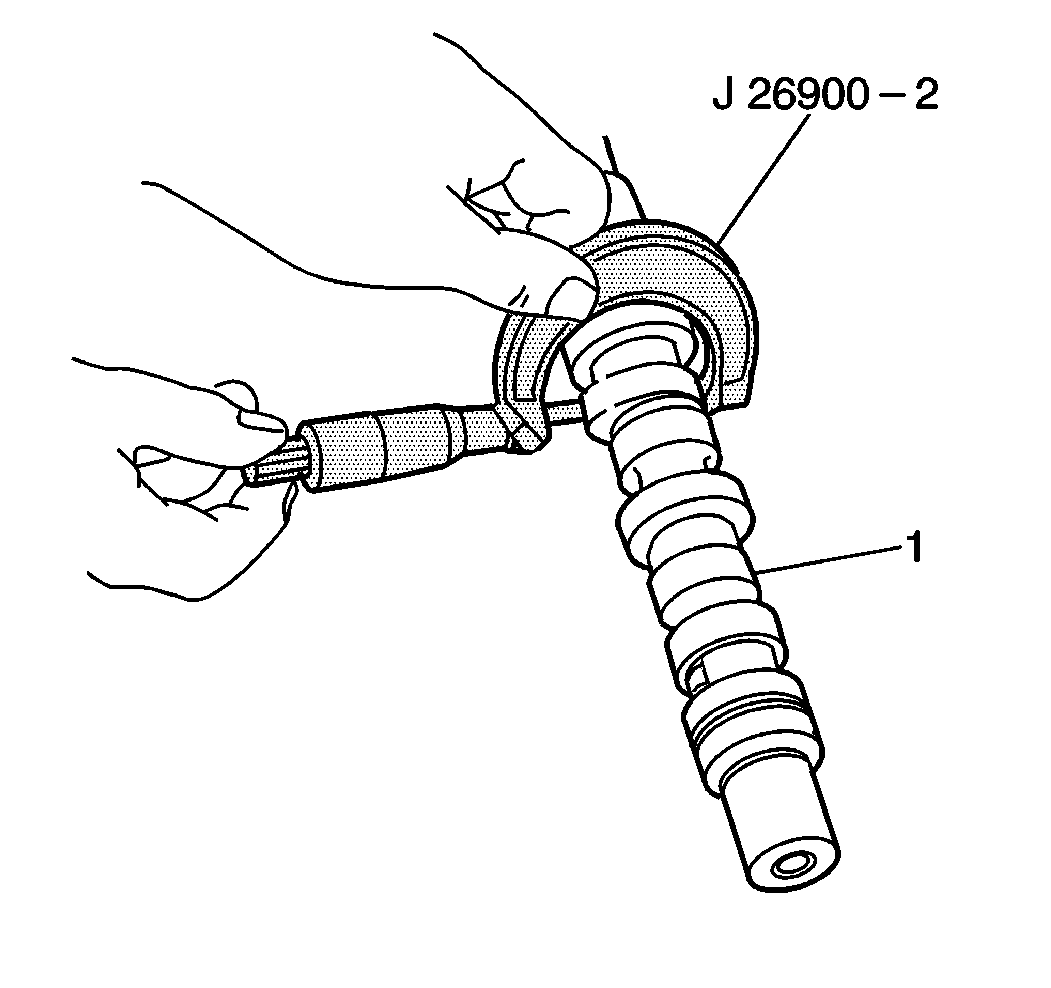
- Use the J 26900-1
in order to measure the camshaft
(1) lobe height.
| 30.1. | Measure the intake camshaft lobe height. The standard intake
camshaft lobe height is 36.171 to 36.331 mm (1.4241 to 1.4303 in).
The minimum intake camshaft lobe height is 36.071 mm (1.4202 in). |
| 30.2. | Measure the exhaust camshaft lobe height. The standard exhaust
camshaft lobe height is 36.356 to 36.516 mm (1.4314 to 1.4376 in).
The minimum exhaust camshaft lobe height is 36.256 mm (1.4275 in). |
| 30.3. | Replace the camshaft if any of the intake or exhaust camshaft
lobes are below the minimum lobe height. |
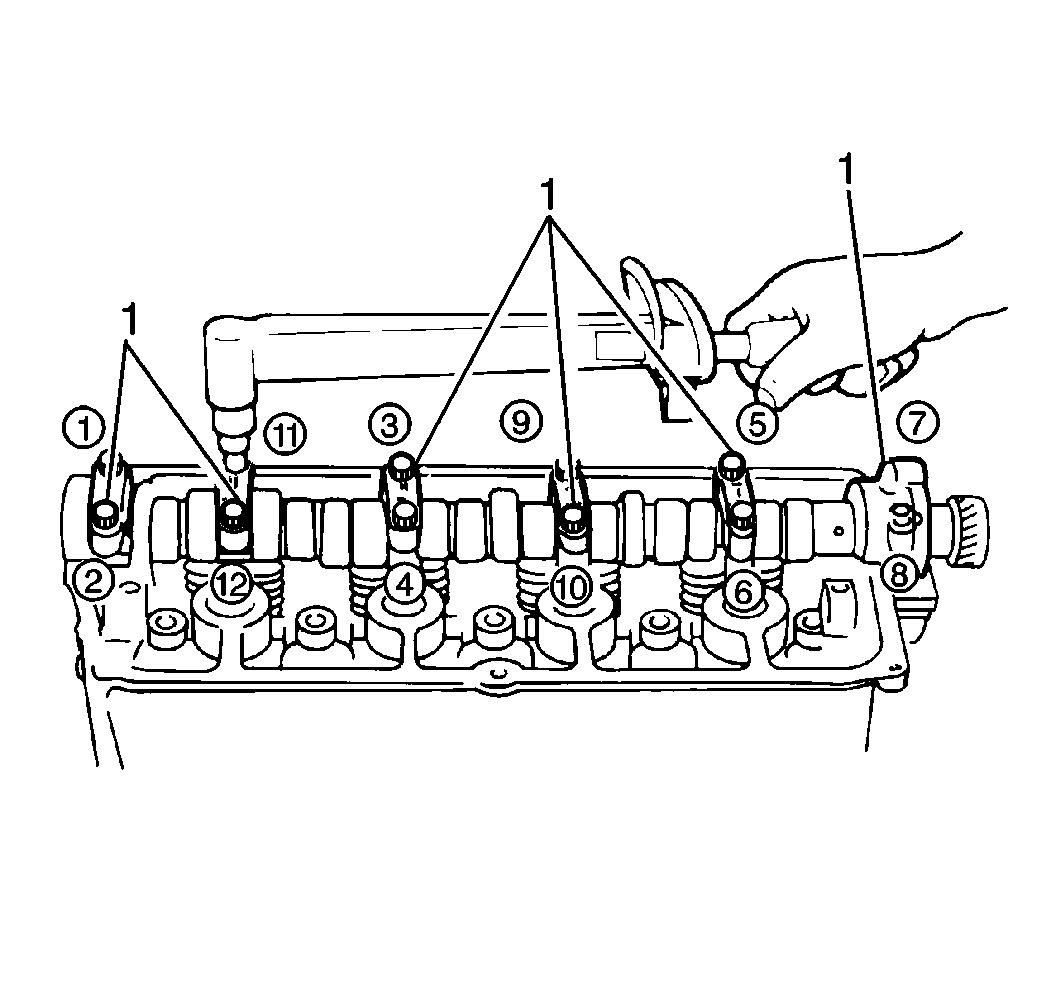
Important: Do not rotate the camshaft with the plastic-type gaging material installed.
- Use a plastic-type gaging material in order to measure the camshaft
journal clearance.
| 31.1. | Place one piece of the plastic-type gaging material the full width
of a journal on each camshaft journal parallel to the camshaft. |
| 31.2. | Install the camshaft into the camshaft carrier in the cylinder
head. |
Notice: Use the correct fastener in the correct location. Replacement fasteners
must be the correct part number for that application. Fasteners requiring
replacement or fasteners requiring the use of thread locking compound or sealant
are identified in the service procedure. Do not use paints, lubricants, or
corrosion inhibitors on fasteners or fastener joint surfaces unless specified.
These coatings affect fastener torque and joint clamping force and may damage
the fastener. Use the correct tightening sequence and specifications when
installing fasteners in order to avoid damage to parts and systems.
| 31.3. | Install the camshaft
carrier caps (1). Tighten the carrier cap bolts gradually in the specified
order. |
Tighten
Tighten the camshaft carrier cap bolts to 10 N·m (89 lb in).
| 31.4. | Remove the camshaft carrier caps (1) carefully without disturbing
the plastic-type gaging material. |
| 31.5. | Measure each piece of plastic-type gaging material at its widest
point using the gaging scale provided on the plastic-type gaging material
packaging. |
| • | The standard camshaft journal clearance is 0.040 to 0.082 mm
(0.0016 to 0.0032 in). |
| • | The maximum camshaft journal clearance is 0.12 mm (0.0047 in). |
| 31.6. | Install the camshaft carrier caps onto the camshaft carrier. Tighten
the camshaft carrier bolts to specification if the camshaft journal clearance
exceeds 0.12 mm (0.0047 in). |
| 31.7. | Use a telescopic micrometer in order to measure the camshaft journal
bore of the inside diameter. |
| 31.8. | Use the J 26900-1
in order to measure the camshaft journal outside diameter. |
| • | The standard camshaft journal bore inside diameter is 28.000 to
28.021 mm (1.1024 to 1.1031 in). |
| • | The standard camshaft journal outside diameter is 27.939 to 27.960 mm
(1.1000 to 1.1008 in). |
| 31.9. | Replace the camshaft if the camshaft journal outside diameter
is farther out of specification than the camshaft journal bore inside diameter. |
| 31.10. | Replace the cylinder head if the camshaft journal bore inside
diameter is farther out of specification than the camshaft journal outside
diameter. |
Installation Procedure
Tools Required
J 41040 Camshaft
Sprocket Spanner Wrench
- Apply clean engine oil to all rocker arm components to ensure
the ease of assembly.
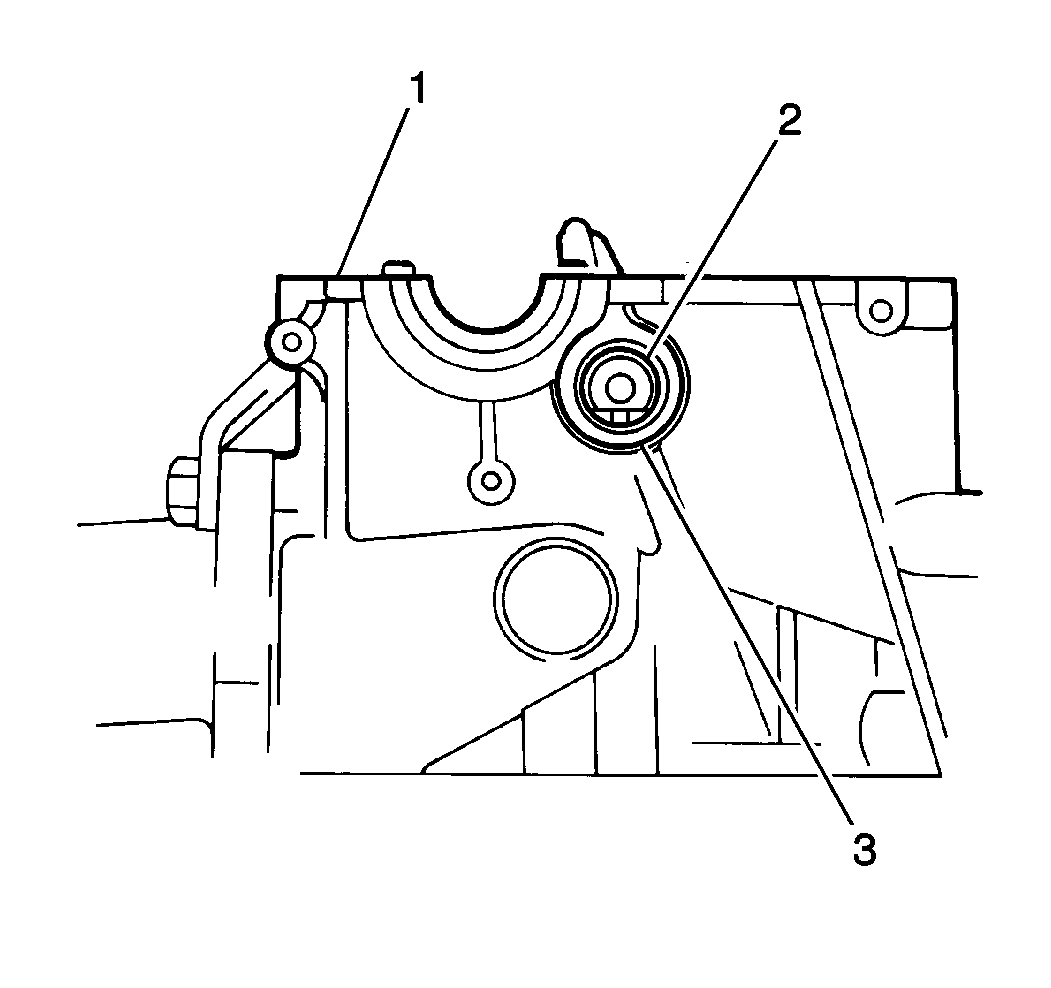
Important: Rotate the rocker arm shaft (2) so that the flat machined surface is
horizontal and facing down parallel with the cylinder head (1) mating surface.
- Install the rocker arm shaft (2) by pushing the rocker arm shaft through
the front of the cylinder head (1).
- Slide the exhaust rocker arms and rocker arm springs as the rocker
arm shaft is being installed.
- Push the rocker arm shaft back through the rear of the cylinder
head until the end of the rocker arm shaft appears.

- Install a new O-ring (2)
onto the rear of the rocker arm shaft (1).

Notice: Use the correct fastener in the correct location. Replacement fasteners
must be the correct part number for that application. Fasteners requiring
replacement or fasteners requiring the use of thread locking compound or sealant
are identified in the service procedure. Do not use paints, lubricants, or
corrosion inhibitors on fasteners or fastener joint surfaces unless specified.
These coatings affect fastener torque and joint clamping force and may damage
the fastener. Use the correct tightening sequence and specifications when
installing fasteners in order to avoid damage to parts and systems.
- Install the six
rocker arm shaft bolts (1) into the cylinder head.
Tighten
Tighten the rocker arm shaft bolts to 10 N·m (89 lb in).
- Fill the rocker arm shaft bolt holes with clean engine oil.
- Install all of the intake rocker arm with the clips onto the rocker
arm shaft (2).
- Apply a liberal amount of clean engine oil to the camshaft.
- Apply GM P/N 12346240 or the equivalent to the bottom of the number
six camshaft carrier cap.
Notice: Always tighten the camshaft carrier cap bolts gradually and in the specified
order. If the camshaft carrier cap bolts are tightened at random, damage to
the camshaft may occur.
Important: The camshaft carrier caps are embossed with numbers and arrows to ensure
correct assembly. The number 1 camshaft carrier cap must be installed at the
front of the cylinder head with the remaining carrier caps following in
numerical order. The directional arrows must always point toward the front
of the cylinder head.
- Install the camshaft and the camshaft carrier caps onto the cylinder
head. Secure the camshaft and the camshaft carrier caps with twelve bolts.
Tighten
Tighten the camshaft carrier cap bolts to 10 N·m (89 lb in).
- Apply engine oil to the new camshaft seal lip.
- Install the new camshaft seal into the cylinder head until the
camshaft seal is flush with the camshaft carrier surface.

- Install the new timing
belt cover (2) to the cylinder head. Secure the timing belt inside cover
(2) with two bolts.
Tighten
Tighten the timing belt inside bolts to 10 N·m (89 lb in).
- Install the rocker arm shaft plug (1) into the cylinder head.
Tighten
Tighten the rocker arm shaft plug to 33 N·m (24 lb ft).
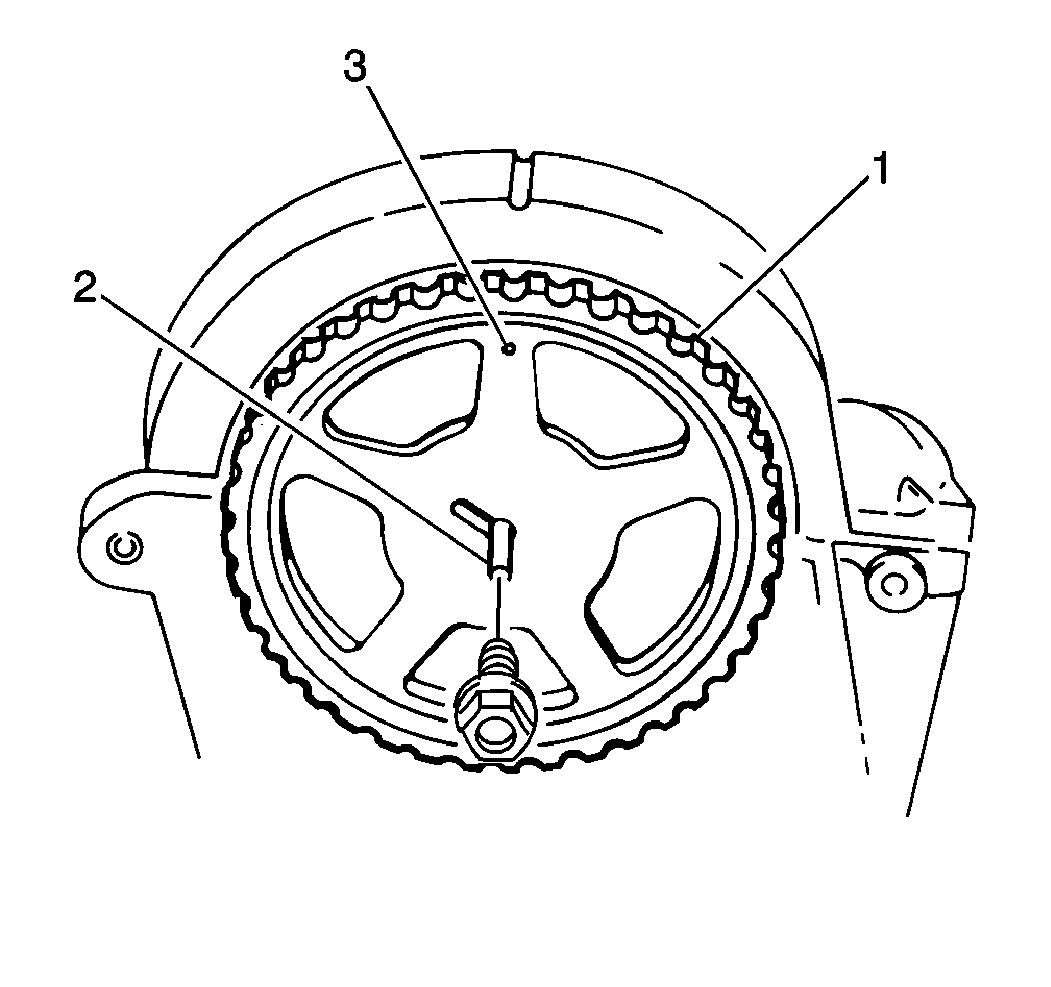
Important: During the camshaft timing belt gear installation align the camshaft
dowell pin (2) with the slot in the camshaft timing belt gear designated as
E (3).
- Using a J 41040
in
order to hold the camshaft timing belt gear (1) stationary, install the
camshaft timing belt gear onto the camshaft. Secure the camshaft timing
belt gear with a bolt.
Tighten
Tighten the camshaft timing belt gear bolt to 60 N·m (44 lb ft).
- Install the timing belt to the engine. Refer to
Timing Belt Replacement
.
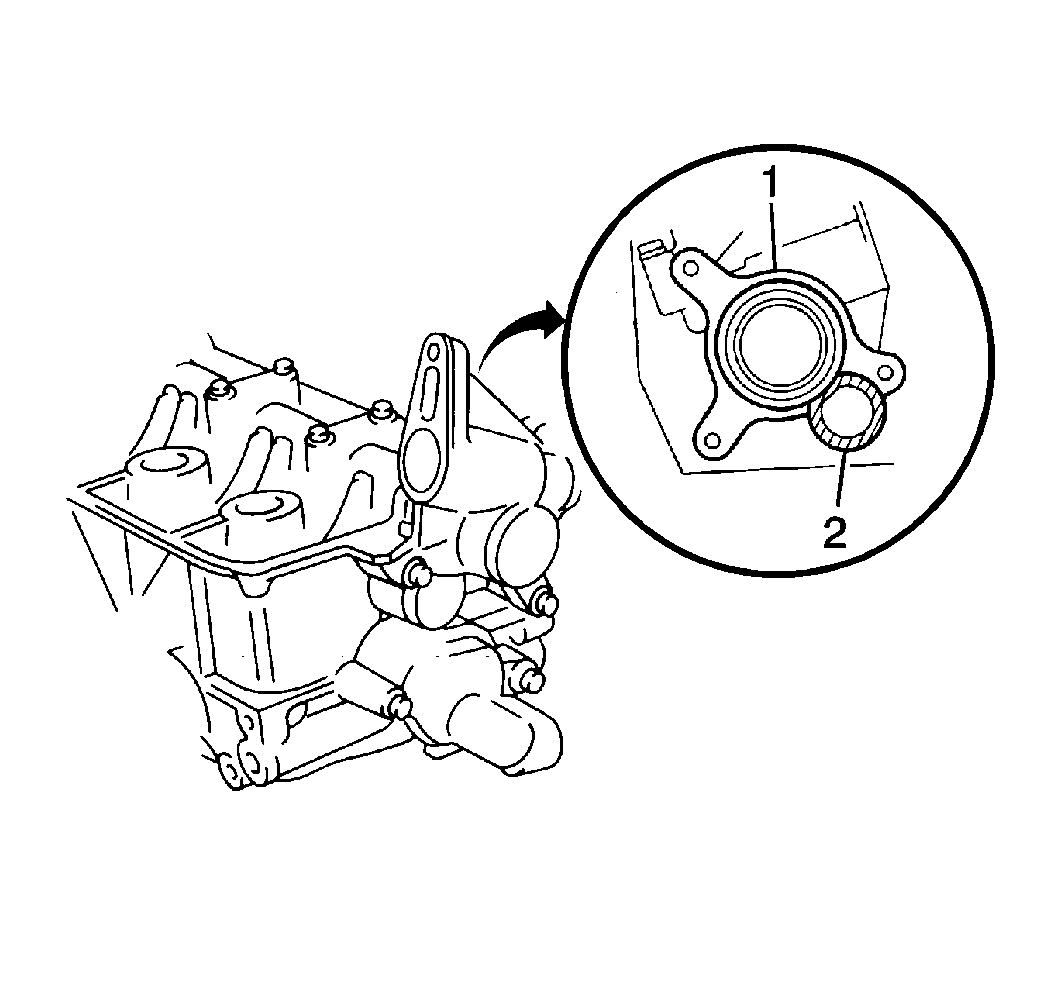
- Apply GM P/N 12346240
or the equivalent to the surface of the distributor case that mates with
the rear of the rocker arm shaft (2).
- Install the distributor case (1) to the cylinder head. Secure
the distributor case with three bolts.
Tighten
Tighten the distributor case bolts to 10 N·m (89 lb in).
- Install the distributor into the distributor case. Refer to
Distributor Replacement
in Engine
Electrical.
- Adjust the valve leash.
- Install the cylinder head cover onto the cylinder head.
- Install the radiator into the radiator core support. Refer to
Engine Cooling.

- Install the front end
panel (1) to the vehicle. Secure the front end panel with the twelve bolts.
Tighten
Tighten the front end panel bolts to 10 N·m (89 lb in).
- Install the two electrical connectors to the horn.
- Install the hood latch to the front end panel. Secure the hood
latch with two bolts.
Tighten
Tighten the hood latch bolts to 10 N·m (89 lb in).
- Install the grille to the vehicle. Refer to
Grille Replacement
in Exterior Trim.
- Connect the negative battery cable. Refer to
Battery Replacement
in Engine Electrical.


