Use the extended method when the old adhesive cannot serve as a base for the new window installation adhesive. Completely remove the old adhesive from the body window opening when the vehicle undergoes body damage repair or repainting. Apply tape around the body in order to prevent paint damage. Use a sharp scraper or chisel in order to remove the old adhesive.
With the exception of the use of primers and the amount of adhesive applied during installation, the short method is identical to the extended method.
Removal Procedure
- Remove the center high-mounted stoplamp.
- Remove the following components:
- Remove the rear wiper arm retaining nut and rear wiper arm from the vehicle, if equipped.
- Unclip the rear garnish.
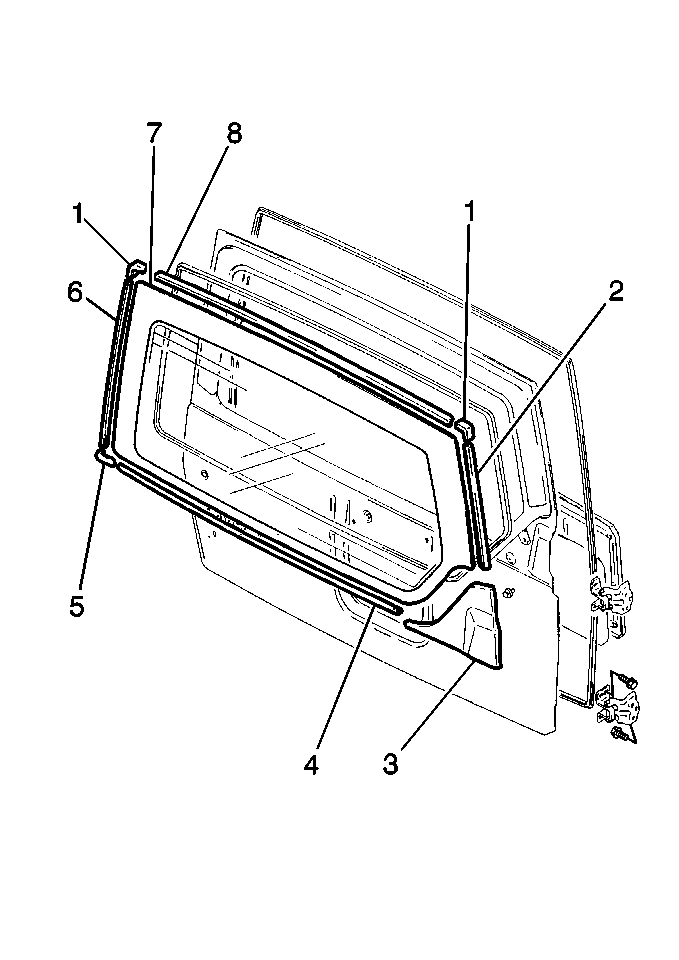
- Remove the rear garnish (3) from the lower right side of the rear door.
- Pull the 2 upper reveal molding joints (1) from the rear door.
- Pull the lower reveal molding joint (5) from the rear door.
- Cut the lower reveal molding (4) in order to remove the lower molding (4) from the rear door.
- Pull the left-side reveal molding (6) from the rear door.
- Pull the right-side reveal molding (2) from the rear door.
- Pull the upper reveal molding (8) from the rear door.
- Disconnect the rear defogger electrical connectors, if equipped.
- Cover the body surface around the rear door with tape in order to prevent damage.
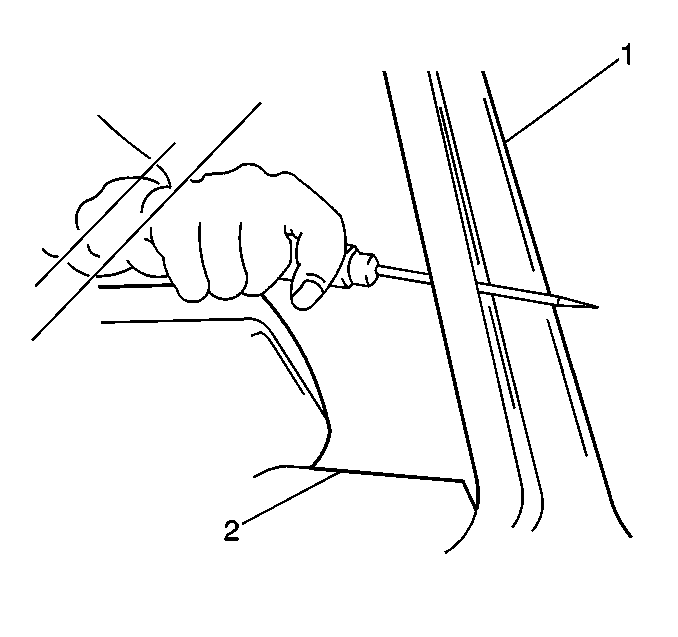
- Using an eyeletter, punch a hole through the adhesive, between the windshield side pillar (1) and the window (2).
- Stick the piano wire through the hole in the adhesive.
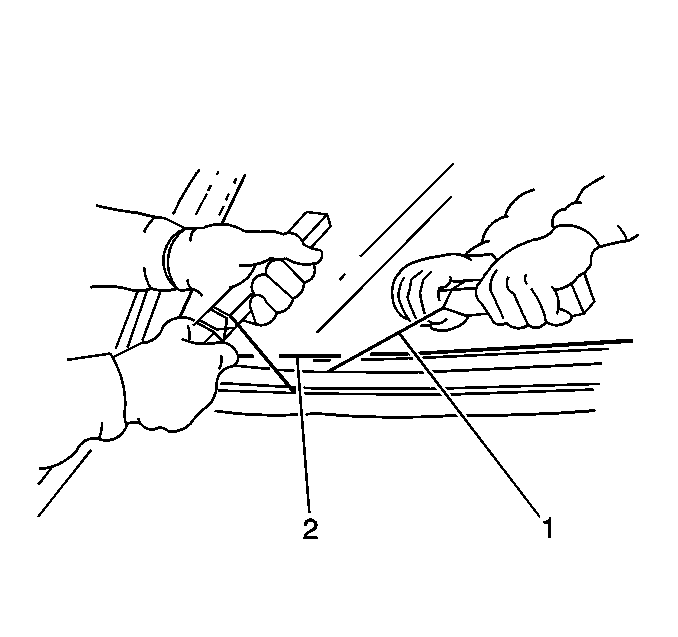
- Twist the ends of the piano wire (1) around wood dowels.
- Cut the adhesive all around the window (2) with the piano wire (1).
- Remove the rear door window from the vehicle.
- Remove the rubber dam from the rear door window opening.
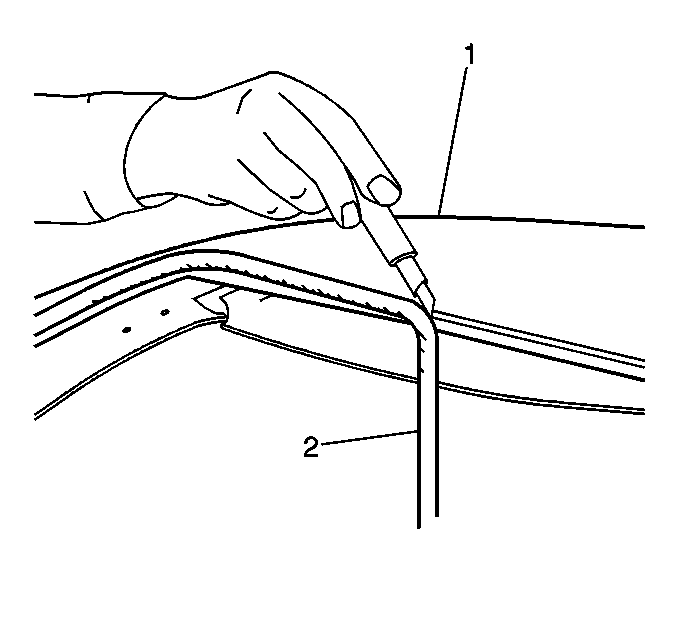
- Use an alcohol or petroleum distillate cleaned knife in order to trim the remaining adhesive (2) to uniform thickness.
- Clean any loose material from the rear door window opening.
- Remove all urethane adhesive from the rear door window if the rear door window will be reused.
Caution: When working with any type of glass or sheet metal with exposed or rough edges, wear approved safety glasses and gloves in order to reduce the chance of personal injury.
| • | The spare tire lock |
| • | The two wheel nuts |
| • | The spare tire |


Installation Procedure
- Clean around the edge of the inside surface of the window where applying the adhesive, using a clean, alcohol-dampened cloth.
- Use a new brush in order to apply primer #1 to the edge and inner surface of the rear door window.
- Use a new brush in order to apply #2 to the edge and inner surface of the rear door window.
- Use a cartridge-type caulking gun in order to apply a bead of urethane adhesive around the primed surface edge of the rear door window.
- Install the lower reveal molding to the rear door window.
- With an assistant, use suction grips in order to install the rear door window onto the rear door.
- Firmly press the rear door window in order to set the adhesive.
- Avoid excessive adhesive flash which causes an appearance problem.
- Use a small disposable brush or a flat-bladed too in order to paddle the material around the edge of the rear door window.
- Ensure a watertight seal.
- Apply more adhesive, as needed.
- Wipe away any excessive adhesive.
- Install the upper reveal molding to the rear door.
- Start from the center of the molding in order to press the upper reveal molding into place.
- Install the left and right-side reveal moldings to the rear door.
- Start at the center of the reveal moldings in order to press the moldings into place.
- Use a soft spray of water in order to immediately watertest the vehicle.
- Do not direct a hard stream of high-pressure water at the fresh adhesive material.
- If any leaks are found, dry the window.
- Use a plastic paddle, a flat-bladed tool, or a disposable brush in order to paddle in extra adhesive at the leak point.
- If the leak persists, remove the window in order to repeat the entire installation procedure. Refer to Water Hose Test in Waterleaks.
- Connect the rear defogger electrical connectors, if equipped.
- Install the rear wiper arm, if equipped. Secure the rear wiper arm with 1 retaining nut.
- Install the spare tire to the rear door. Secure the spare tire with 2 wheel nuts and the lock.
- Install the center high-mounted stoplamp.
- Apply water in order to speed the cure of the adhesive.
Allow the window to air dry for approximately 10 minutes.
Important:
• Refer to the primer manufacturer's instructions and warnings for
proper handling instructions and drying time. • Do not touch the primer-coated surface. • When installing the rear door window, use primer #3 provided in
the urethane adhesive kit. Use the black primer #3 for pinch-weld areas. • Once the primer is applied, immediately wipe off the excess. • The primer dries almost instantly and will stain the viewing area
of the glass. • Apply the primer evenly. • Keep the primer away from the viewing area. • Do not apply clear primer over black primer. • Vigorously shake the primer in order to ensure proper mixing.
Apply the bead of urethane adhesive to the following appropriate heights:
| • | For the extended method, ensure the adhesive bead height is 8-10 mm (0.3-0.4 inches) |
| • | For the short method, ensure the adhesive bead height is 3.5-5 mm (0.14-0.2 inches) |
Notice: Use the correct fastener in the correct location. Replacement fasteners must be the correct part number for that application. Fasteners requiring replacement or fasteners requiring the use of thread locking compound or sealant are identified in the service procedure. Do not use paints, lubricants, or corrosion inhibitors on fasteners or fastener joint surfaces unless specified. These coatings affect fastener torque and joint clamping force and may damage the fastener. Use the correct tightening sequence and specifications when installing fasteners in order to avoid damage to parts and systems.
Tighten
Tighten the rear wiper arm retaining nut to 20 N·m (15 lb ft).
Tighten
Tighten the spare tire wheel nuts to 54 N·m (40 lb ft).
Important:
• Do not drive the vehicle until the adhesive is set. • Do not use compressed air, heat, or infrared light in order accelerate
drying time. • Allow the adhesive to dry normally. • Do not slam the doors before the adhesive sets. Slamming doors may cause the quarter window to shift or become loose.
