Removal Procedure
- Remove the trim panel. Refer to
Door Trim Panel Replacement
or
Front Side Door Trim Panel Replacement
.
- Remove the water deflector. Refer to
Door Water Deflector Replacement
.
Important: Do not adjust the door after the glass adjustment.
- Adjust the door, as necessary. Refer to
Door Hinge Replacement
.
Glass Height (Rotational) Adjustment

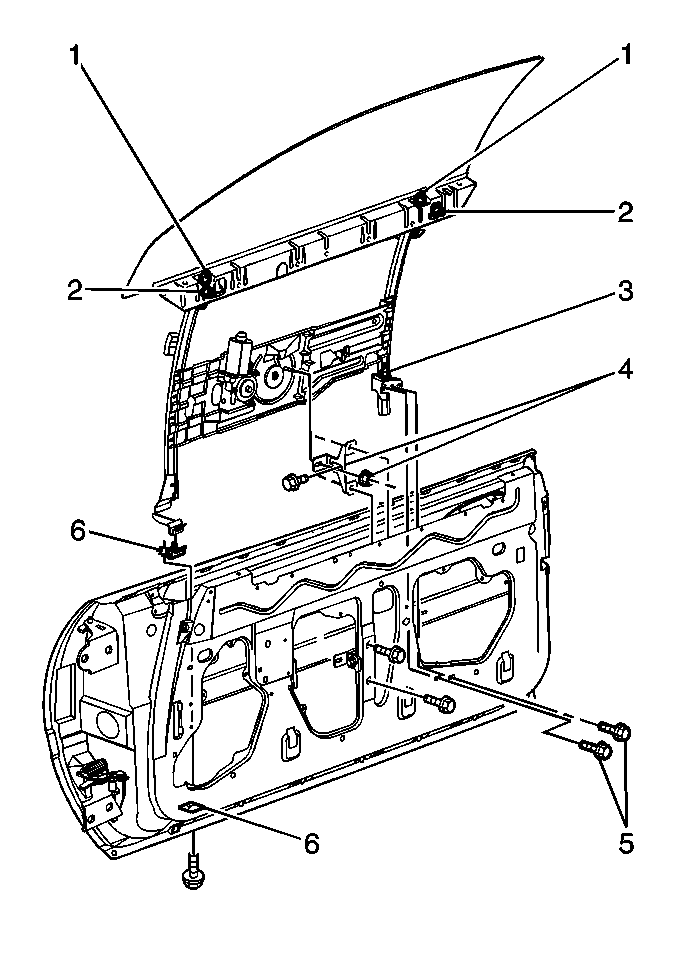
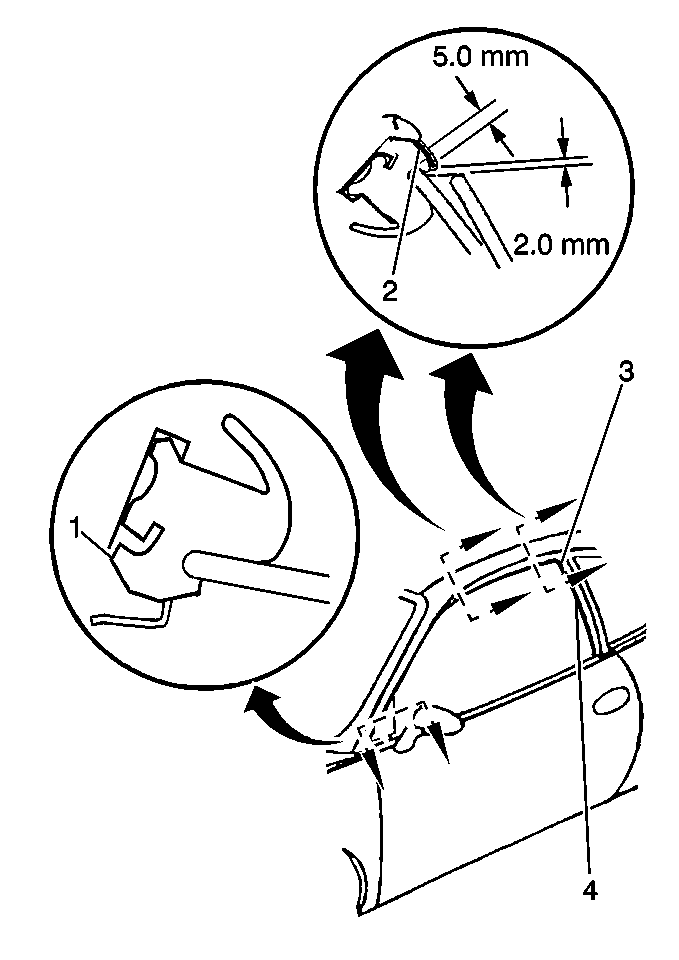
- Mark the up stop positions (2)
at the full up position.
- Lower the glass from the full up position in order to relieve
pressure on the up stops.
- Adjust the glass height adjusters (2), as necessary.

- Inspect the glass height
adjustment by completing the following steps:
| 4.1. | Apply masking tape over the top edge of the glass. |
| 4.2. | With the glass at the full up position, make a pen mark on the
tape along the molding (2). |
| 4.3. | Verify that The glass engagement is a minimum of 5.0 mm
(0.20 in). |
| 4.4. | Verify that the swing clearance of the door glass is a minimum
of 2.0 (0.08 in). |
| 4.5. | Verify that adequate power is available to the window motor so
that system is in maximum compression. |
- Lower the glass.
- Raise the glass.
- Verify the measurements.
- Repeat steps 1-3, as necessary.
- Close the door with the window in the full up position.
Observe whether the glass rubs or is very close to rubbing the roof
rail molding.
Window Tilt Adjustment (Outboard/Inboard)

- Mark all of the adjustments.
- Loosen the stabilizer bracket assembly fore/aft and glass tilt
adjustments (4).
- Loosen the secondary glass tilt adjustment (6).
- Adjust in or out as necessary the primary glass tilt adjustment (3)
in order to move the top of the glass.
- Tighten the primary glass tilt adjustment nut.
- Operate the window module in order to verify that the adjustments
do not restrain movement.
- Place the window in the full down position in order to ensure
that the front guide channel is free for movement.
- Tighten the secondary glass tilt adjuster (6).
- Sit inside the vehicle in order to observe the back channel guide.
- Close the door.

- Operating the window,
observe that glass moving upward does not damage the rear seal (4).
- If the glass may damage the seal (4), return to step 1.
| • | Damage to the seal indicates the glass tilts too far inboard. |
| • | If the glass does not tilt inboard enough for a proper position
at the full up position, move outboard the seal retainer. |
| • | If the glass does not tilt outboard enough for a proper position
at the full up position, move inboard the seal retainer. |
- Tighten all of the adjustments.
Glass Fore/Aft Adjustment

- Mark the following adjustments:
| • | The top fore/aft adjustments (1) |
| • | The bottom fore/aft adjustments (5) |
- Loosen the following components:
| • | The top fore/aft adjustments (1) |
| • | The bottom fore/aft adjustments (5) |
| • | The stabilizer bracket fore/aft adjustment (4) nut |
- Holding the glass, push the glass forward or rearward as necessary
in order to move the guidance system as a single assembly.
- Tighten the top fore/aft adjustments (s).
- Close the door.
- Inspect the adjustments for movement.

Important:
| • | When moving the glass forward, ensure the door glass does not
fold the seal lip (1) under the glass. This indicates the glass is
too far forward. |
| • | When moving the glass rearward, ensure that the door glass top
corner (3) does not come close to the rear pillar or the B pillar. |
| • | If the glass rubs the windshield pillar molding, the glass adjustment
is too far forward. |
- Tighten all of the adjustments.
Important: Do not slam the door. Air resistance may cause the glass to stand up
slightly. This may result in a reduced clearance condition between the glass
and the roof rail molding.
- Close the door.
- Inspect the door window for contact between the glass and the
roof rail molding.
Installation Procedure

- Install the water deflector. Refer to
Door Water Deflector Replacement
.
- Install the trim panel. Refer to
Door Trim Panel Replacement
or
Front Side Door Trim Panel Replacement
.


