Emblem/Nameplate Replacement Aurora
Nameplate Procedure

- Wash the affected panel
with a soap and water mixture.
- Dry the affected panel using a clean cloth.
- Remove all traces of adhesive from the rear deck lid (1)
and from the back of the emblem/nameplate (2) using 3M General Purpose
Adhesive Cleaner 08984 or equivalent.
- Wipe the panel with a clean cloth and an alcohol and water mixture.

- If the body is below 21°C
(70°F), warm the affected panel with a heat lamp or a heat gun while proceeding
with the following step.
Important: Care should be exercised not to touch the tape with your hands or allow
the adhesive tape to come in contact with any dirt or foreign matter.
- Peel the backing from the adhesive tape.
- Using the following dimensions align the nameplate (2)
to the rear compartment lid:
| • | 25.7 mm (+/- 2 mm) 1.01 in
(+/- 0.08 in) (A) from the horizontal edge (3). |
| • | 109.5 mm (+/-2.0 mm) 4.31 in (+/-
0.08 in) (B) from the centerline of the rear compartment lid 1. |
- Press the nameplate (2) firmly in place in order to ensure
proper adhesion to the rear compartment lid.
Hood Emblem Procedure

- Wash the affected panel
with a soap and water mixture.
- Dry the affected panel using a clean cloth.
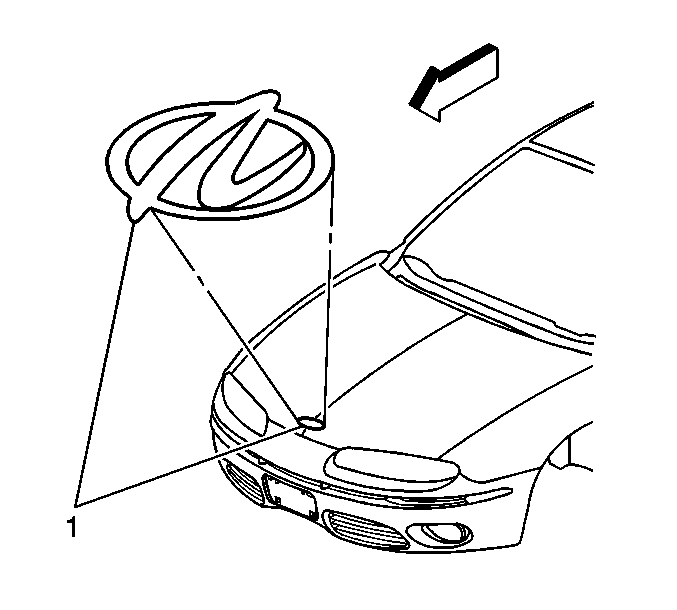
- Remove all traces of adhesive from the hood and from the back
of the emblem (1) using 3M General Purpose Adhesive Cleaner 08984 or
equivalent.
- Wipe the hood with a clean cloth and an alcohol and water mixture.

- If the body is below 21°C
(70°F), warm the affected panel with a heat lamp or a heat gun while proceeding
with the following steps.
Important: Care should be exercised not to touch the tape with your hands or allow
the adhesive tape to come in contact with any dirt or foreign matter.
- Peel the backing from the adhesive tape.
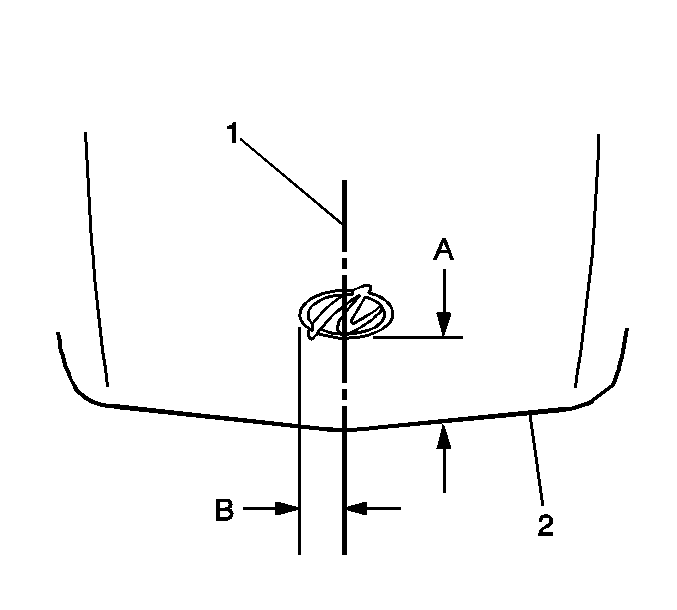
- Using the following dimensions align the emblem to the hood:
| • | 70.0 mm (+/- 2 mm) 2.76 in
(+/- 0.08 in) A from the front edge of the hood (1). |
| • | 43.5 mm (+/-2.0 mm) 1.71 in (+/- 0.08 in) B
from the centerline of the hood 1. |
- Press the emblem firmly in place in order to ensure proper adhesion
to the hood.
Emblem/Nameplate Replacement Rear Decklid Designation

- Wash the affected panel
with a soap and water mixture.
- Dry the affected panel using a clean cloth.
- Remove all traces of adhesive from the rear deck lid (3)
and from the back of the emblem (2) using 3M General Purpose Adhesive
Cleaner 08984 or equivalent.
- Wipe the panel with a clean cloth and an alcohol and water mixture.

- If the body
is below 21°C (70°F), warm the affected panel with a heat lamp or
a heat gun while proceeding with the following step.
Important: Care should be exercised not to touch the tape with your hands or allow
the adhesive tape to come in contact with any dirt or foreign matter.
- Peel the backing from the adhesive tape.
- Using the following dimensions align the emblem (1) with
the rear deck lid:
| • | 13.4 mm (+/- 2 mm) 0.53 in
(+/- 0.08 in) (A) from the top edge of the license plate pocket (2). |
| • | 41.25 mm (+/-2.0 mm) 1.62 in (+/-
0.08 in) (B) from the centerline of the rear deck lid (3). |
- Press the emblem (1) firmly in place in order to ensure
proper adhesion to the rear deck lid.
Emblem/Nameplate Replacement LX5 L47 Engine
Tools Required
J 25070 Heat Gun
Removal Procedure

- Wash the affected panel
with soap and water.
Wipe the panel dry with a lint-free cloth.
- Remove all traces of adhesive from therear deck lid and the back
of the emblem. Use 3M General Purpose Adhesive Cleaner 08984
or an equivalent.
- Wipe the panel with a clean lint-free cloth and an isopropyl
alcohol and water (50/50 mixture) by volume.
Installation Procedure

Important: The rear compartment lid must be in a secured position prior to the
emblem adhesion.
- Secure the rear compartment lid.
- Use a length of masking tape or magnetic strip in order to mark
the location of the emblem.

- If the body is below 21°C
(70°F) due to shop temperature or outside temperature, warm the body panel
using the J 25070
while
proceeding with the next step.
Important: Care should be exercised not to touch the tape with your hands or allow
the adhesive tape to come in contact with any dirt or foreign matter.
- Peel the backing from the adhesive tape.
- Use the following dimensions in order to mark the
proper position of the emblem on the right side of the rear compartment lid:
| • | The top edge of the emblem (1) should be 52.8 mm (+/- 2 mm)
3.34 in (+/- 0.08 in) (B) from the horizontal edge of
the rear compartment lid. |
| • | The right edge of the emblem (1) should be 84.7 mm (+/- 2 mm)
2.08 in (+/- 0.08 in) (A) from the vertical edge of
the rear compartment lid. |
- Press the emblem (1) firmly in place in order to ensure
proper adhesion to the rear deck lid.

- If the body is below 21°C
(70°F) due to shop temperature or outside temperature, warm the body panel
using the J 25070
while
proceeding with the next step.
Important: Care should be exercised not to touch the tape with your hands or allow
the adhesive tape to come in contact with any dirt or foreign matter.
- Peel the backing from the adhesive tape.
- Use the following dimensions in order to mark the proper position
of the emblem on the right side of the rear compartment lid:
| • | The top edge of the emblem (1) should be 42.0 mm (+/- 2 mm)
1.65 in (+/- 0.08 in) (B) from the horizontal edge of
the rear compartment lid. |
| • | The right edge of the emblem (1) should be 69.9 mm (+/- 2 mm)
2.75 in (+/- 0.08 in) (A) from the vertical edge of
the rear compartment lid. |
- Press the emblem (1) firmly in place in order to ensure
proper adhesion to the rear deck lid.


