Tools Required
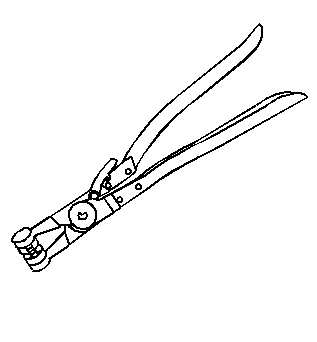
| • | J 38185 Hose Clamp Pliers |
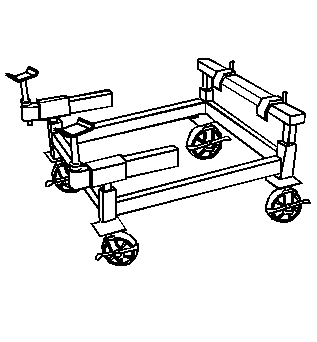
| • | J 39580 Universal Engine Support Table |
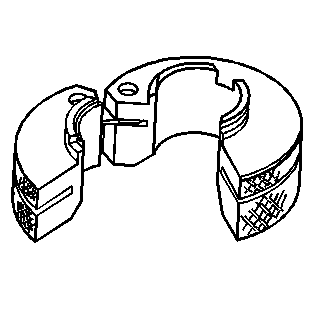
| • | J 41623-B Cooler Quick Connect Tool |
| • | J 42640 Steering Column Lock Pin |
Removal Procedure
- Disconnect the battery negative cable. Refer to Battery Negative Cable Disconnection and Connection in Engine Electrical.
- Recover the A/C refrigerant system. Refer to Refrigerant Recovery and Recharging in Heating, Ventilation and Air Conditioning.
- Disconnect the vacuum brake booster hose from the vacuum brake booster and secure to the top of the engine.
- Disconnect the fuel inlet and return quick-connect fittings at the fuel rail and secure to the air inlet grille. Refer to Metal Collar Quick Connect Fitting Service or Plastic Collar Quick Connect Fitting Service in Engine Controls-3.5 L.
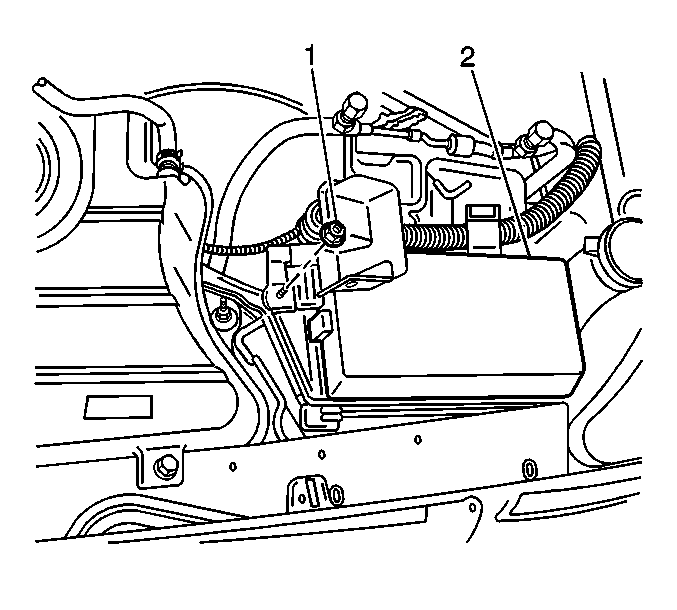
- Disconnect the hose (4) from the evaporative emission canister purge valve (3) and secure to the air inlet grille.
- Remove the air cleaner assembly. Refer to Air Cleaner Assembly Replacement in Engine Controls-3.5 L.
- Remove the 2 fuel injector sight shield nuts at the front of the fuel injector sight shield.
- Lift the fuel injector sight shield up at the front and slide out of the engine bracket.
- Remove the nut (1) securing the battery positive cable to the remote positive terminal and secure to the top of the engine.
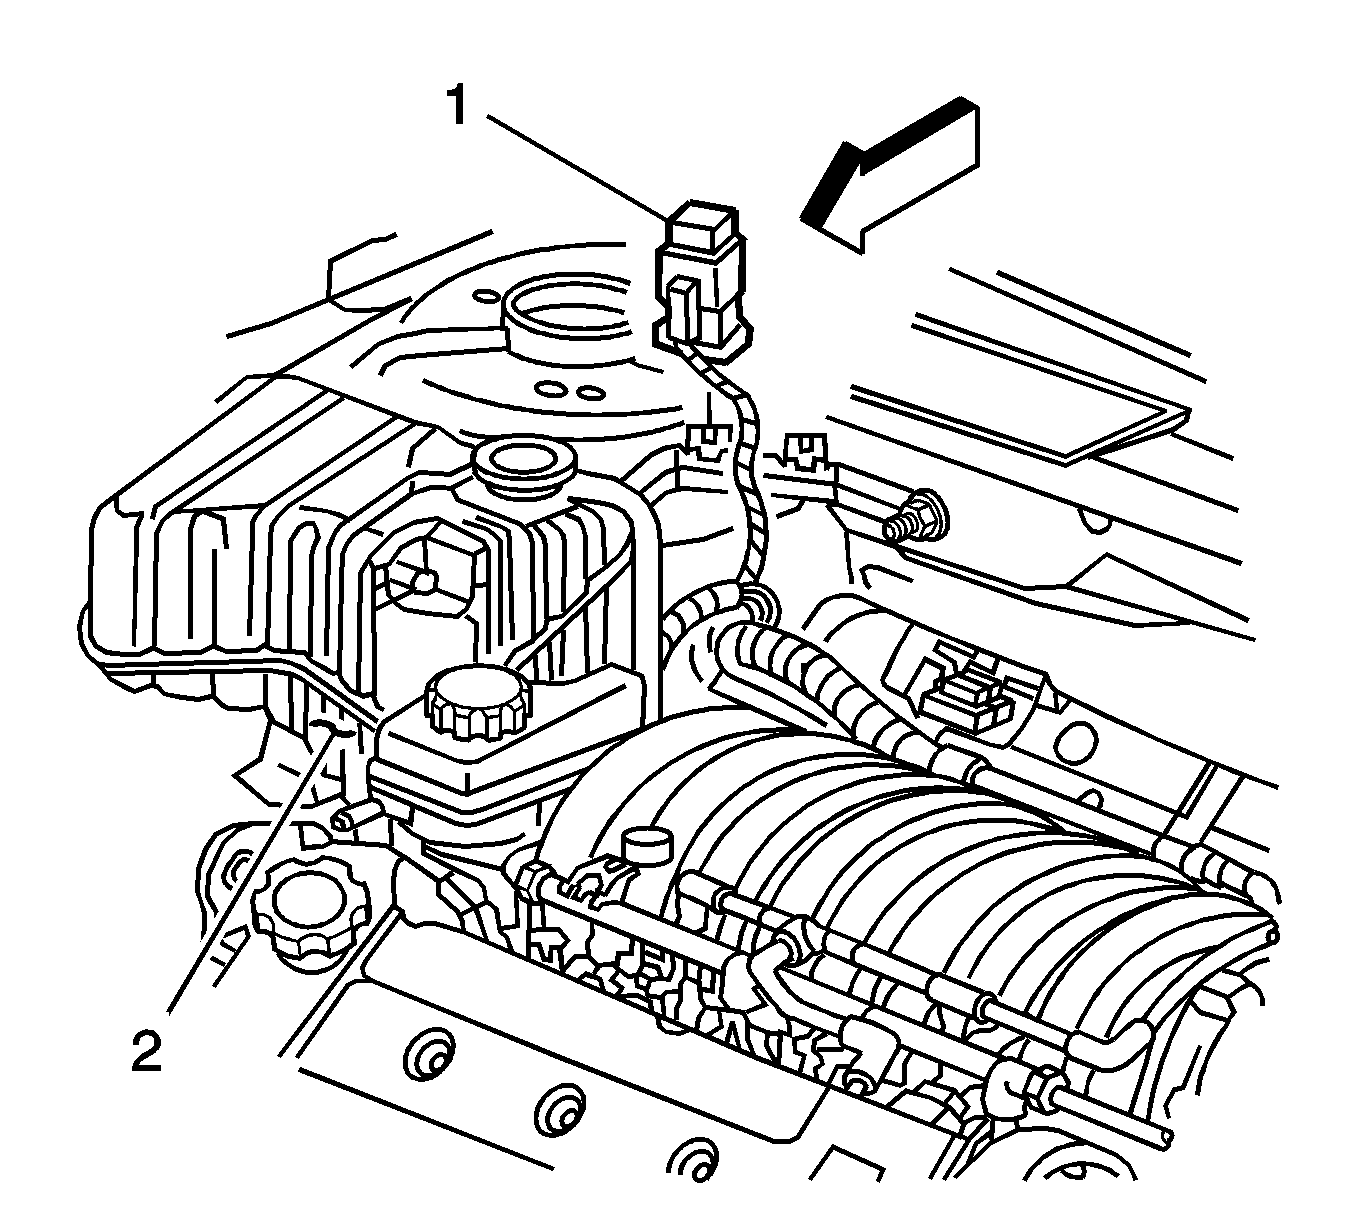
- Disconnect the secondary AIR relay (1) from the relay bracket and secure to the top of the engine.
- Disconnect and secure the following wiring harness electrical connectors to the top of the engine:
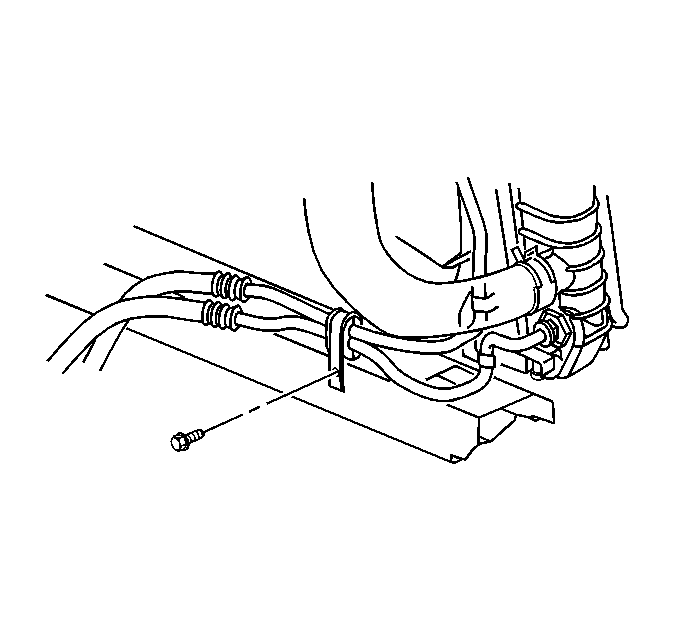
- Remove the bolt (1) securing the engine ground cable (2) from the right side body frame rail.
- Push the lock release and remove the cruise control cable (2) from the throttle body bracket and lever.
- Remove the accelerator control cable from the throttle body. Refer to Accelerator Control Cable Replacement in Engine Controls-3.5 L.
- Set the park brake and chock the wheels.
- Fully lift the retainer from the transaxle range selector cable mechanism.
- Disconnect the transaxle range selector cable terminal from the transaxle manual shift lever pin.
- Press the locking tabs inward in order to release the transaxle range selector cable from the bracket.
- Remove the transaxle range selector cable and position aside.
- Drain the cooling system. Refer to Cooling System Draining and Filling in Engine Cooling.
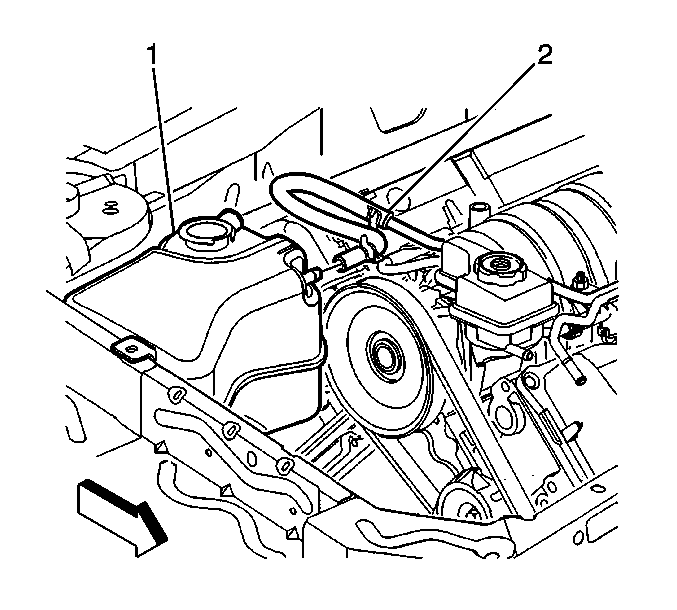
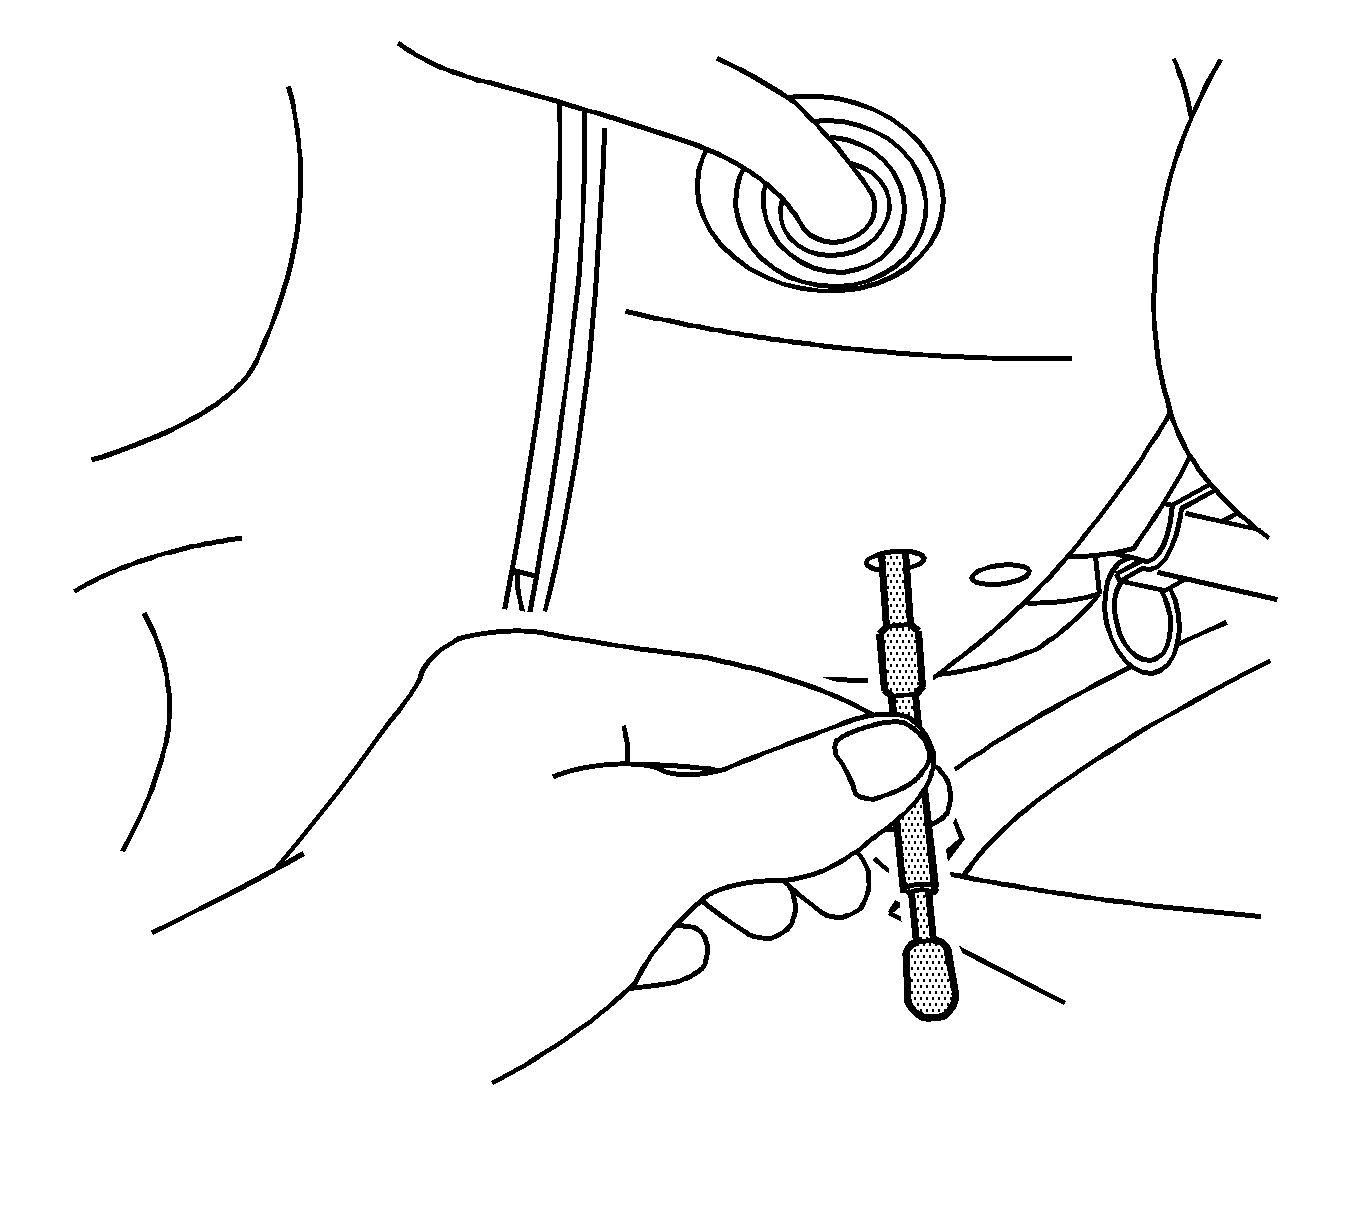
- Position the J 38185 to the clamp in order to remove the radiator inlet hose (2) from the water housing crossover and position aside.
- Position the J 38185 to the clamp in order to remove the radiator outlet hose (1) from the thermostat housing and position aside.
- Disconnect the surge tank inlet hose (2) from the surge tank (1).
- Position the J 38185 to the clamp in order to remove the heater outlet hose from the thermostat housing.
- Position the J 38185 to the clamp in order to remove the heater inlet hose from the water crossover.
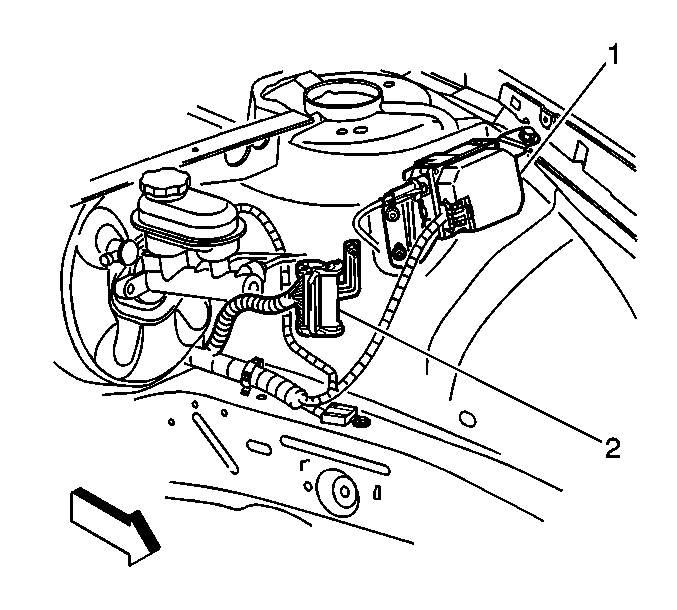
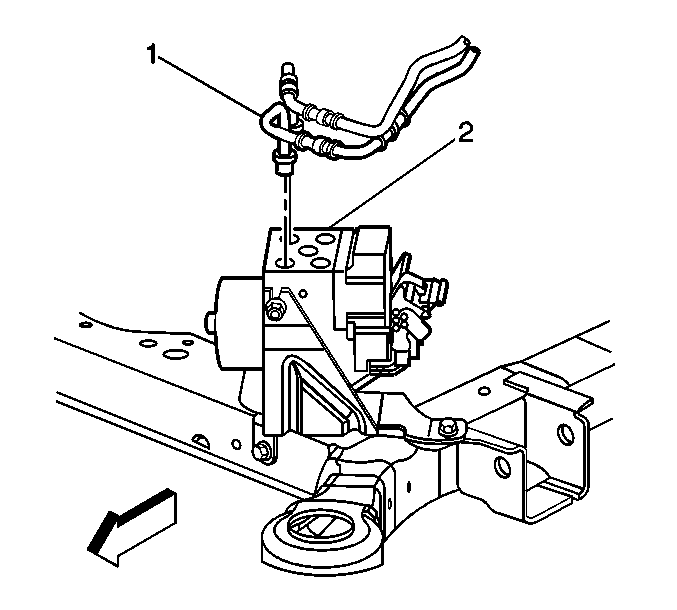
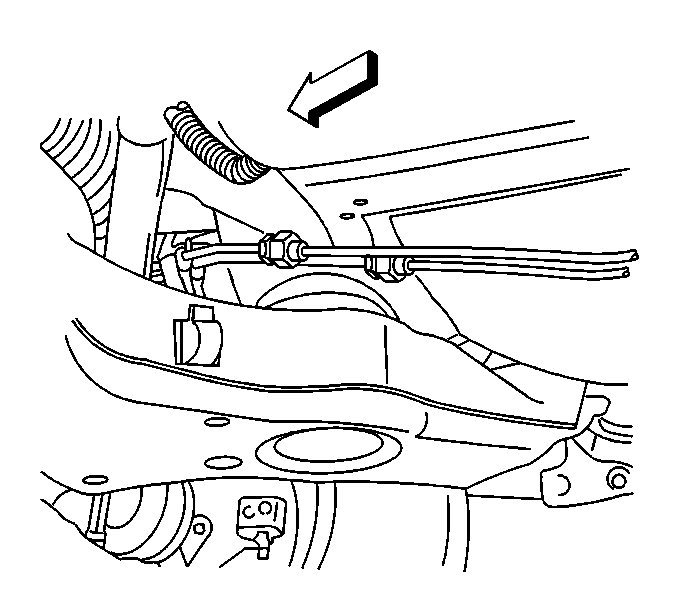
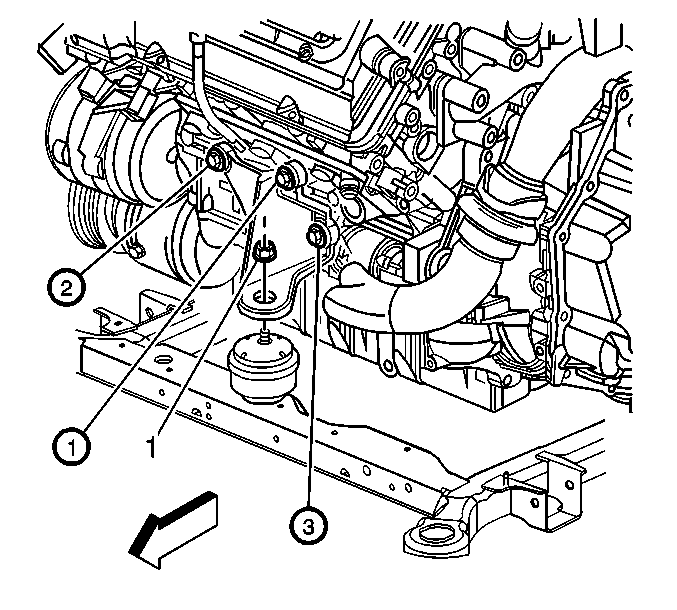
- Remove the two master cylinder brake pipes (1) from the BPMV (2).
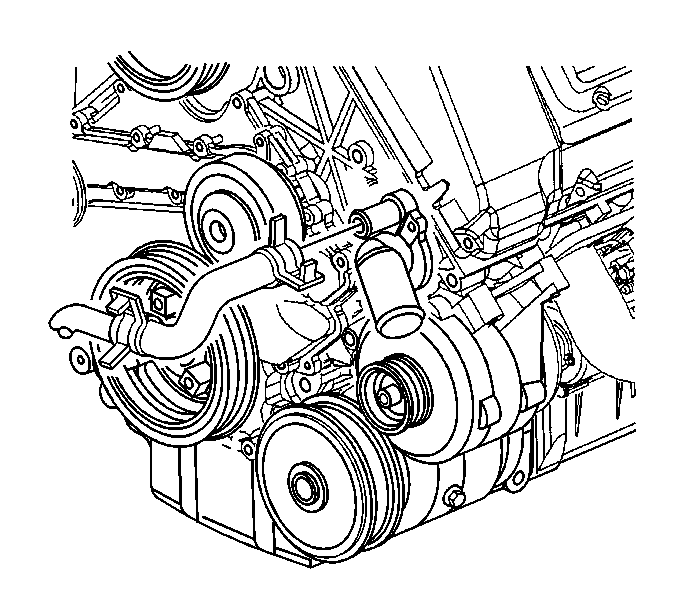
- Remove the transaxle oil cooler pipe bracket bolt from the fan shroud.
- Slide the plastic cap off the transaxle oil cooler pipe quick connect fittings.
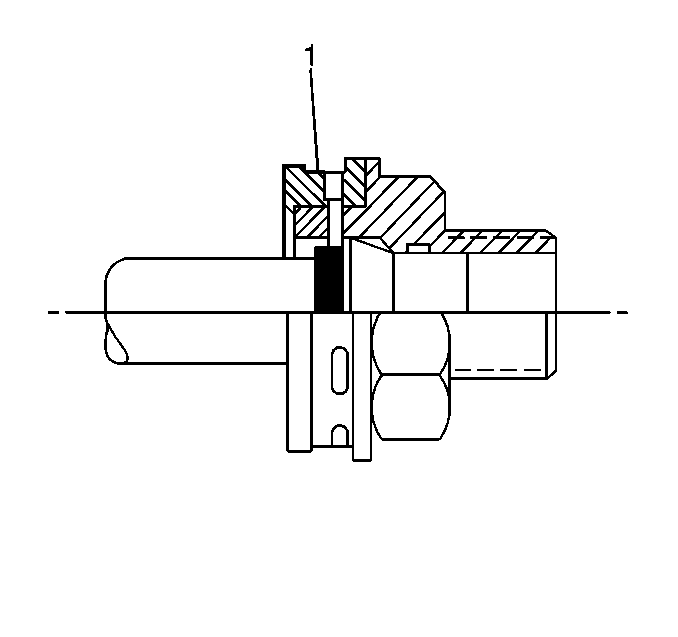
- Disconnect the upper (1) and lower (2) transaxle oil cooler pipes from the radiator using the J 41623-B .
- Lock the steering column by installing the J 42640 into the underside of the steering column.
- Remove the right and left side strut tower bolts.
- Raise and support the vehicle. Refer to Lifting and Jacking the Vehicle in General Information.
- Remove the transaxle oil cooler pipe bracket bolt from the lower tie bar.
- Remove the exhaust manifold pipe. Refer to Exhaust Manifold Pipe Replacement in Engine Exhaust.
- Remove the front wheels. Refer to Tire and Wheel Removal and Installation in Tires and Wheels.
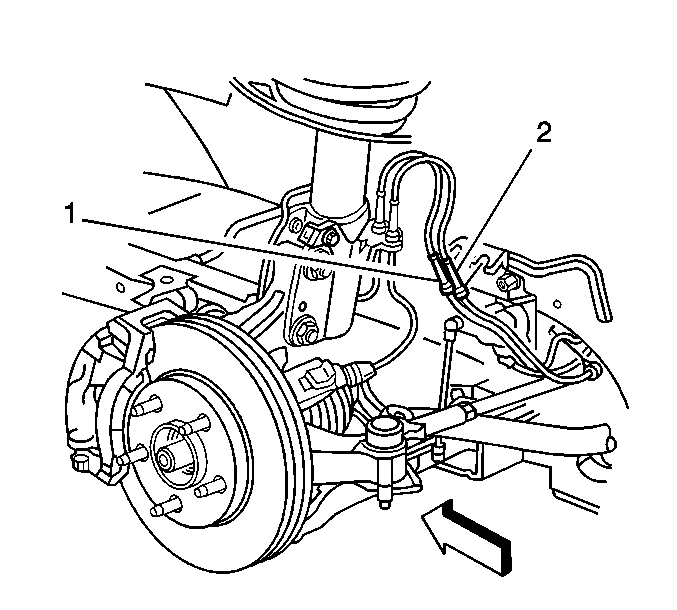
- Disconnect the front wheel speed sensor electrical leads (2) from the body frame rail.
- Remove the front air deflector. Refer to Front Air Deflector Replacement in Body Front End.
- Remove the front fascia extensions. Refer to Front Bumper Fascia Extension Replacement in Bumpers.
- Disconnect the secondary AIR inlet hose from the secondary AIR pump.
- Loosen the nuts (2) securing the front brake pipe frame brackets (1) to the body frame rails.
- Disconnect the front brake pipes from the retainers at the body frame rails.
- Carefully pull the front brake pipes away from the body frame rails.
- Disconnect the 2 rear brake pipes at the rear of the engine frame.
- Disconnect the A/C pressure sensor (1).
- Disconnect the A/C discharge hose (3) from the compressor and secure to the cooling fan assembly.
- Disconnect the A/C suction hose from the compressor and secure to the cooling fan assembly.
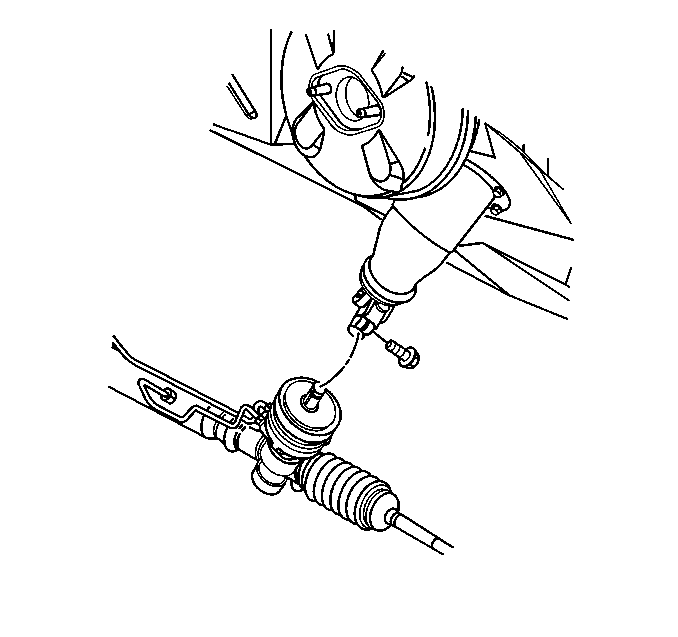
- Remove the intermediate shaft pinch bolt.
- Remove the steering gear from the intermediate shaft.
- Disconnect the post HO2S at the sensor pigtail. Refer to Oxygen Sensor Wiring Harness Heat Shield Replacement in Engine Exhaust.
- Remove the torque converter cover. Refer to Torque Converter Cover Replacement in Automatic Transaxle-4T65-E.
- Remove the torque converter to the flywheel bolts.
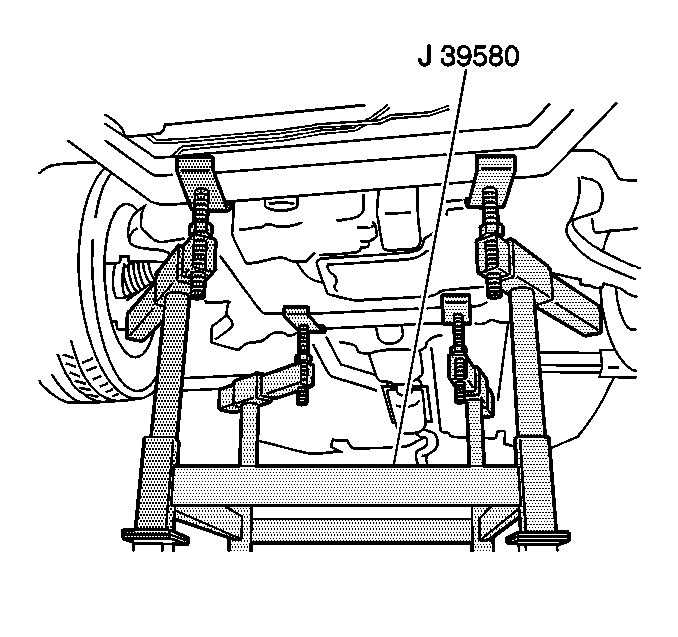
- Position the J 39580 powertrain support dolly under the engine frame.
- Lower the vehicle on to the J 39580 .
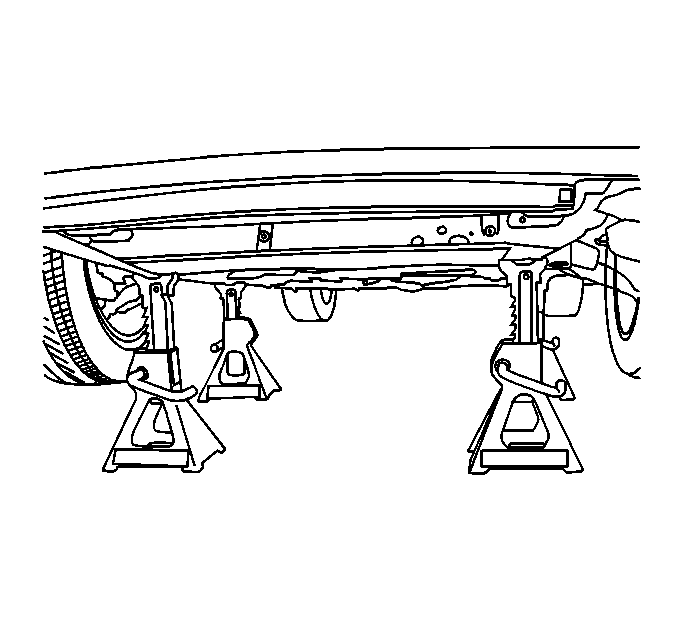
- If the powertrain support dolly is unavailable. Support the powertrain with 4 suitable jackstands.
- Place a 2 in x 4 in block of wood between the front of the engine oil pan and the engine frame.
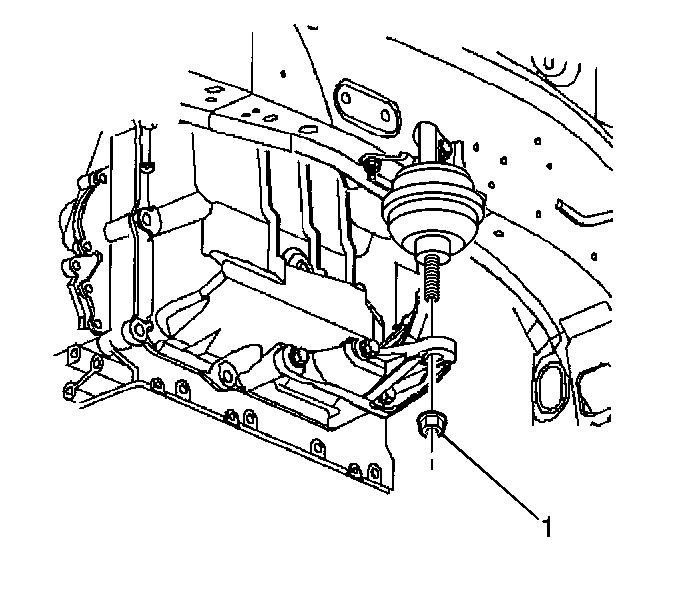
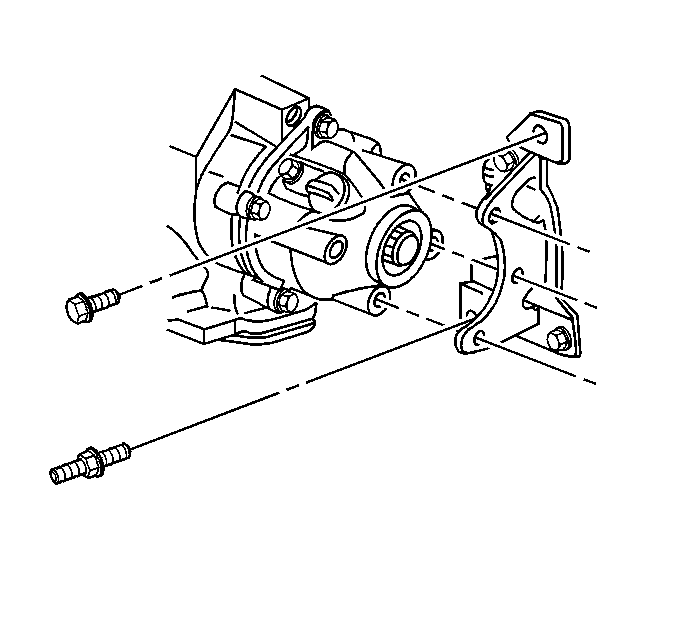
- Remove the nut securing the right engine mount to the engine mount bracket.
- Remove the nut (1) securing the left transaxle mount to the transaxle mount bracket.
- Secure the front hoist pads to the vehicle.
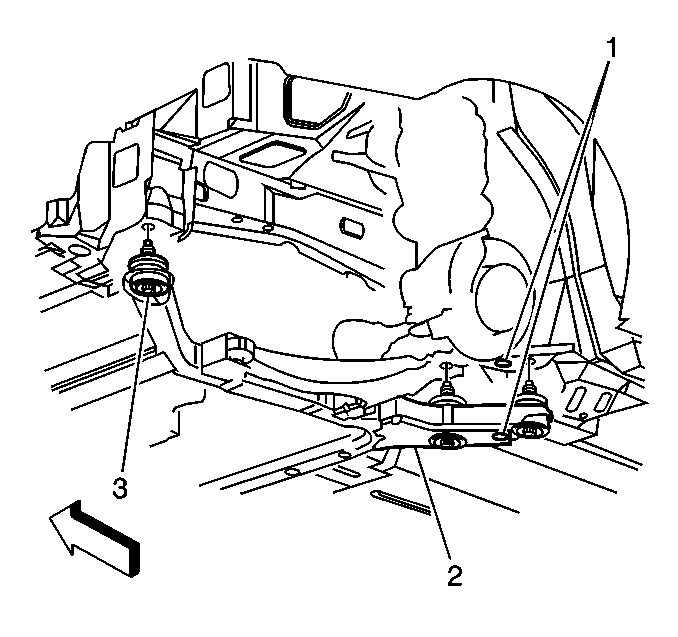
- Remove the 6 frame to body mounting bolts (3).
- Carefully raise the vehicle in order to clear the supported engine/transaxle assembly.
- Drain the engine oil. Refer to Engine Oil and Oil Filter Replacement .
- Remove the secondary air injection crossover pipe/hose. Refer to Secondary Air Injection Crossover Pipe/Hose Replacement in Engine Controls-3.5 L.
- Disconnect the engine wiring harness from the engine. Refer to Engine Controls Component Views in Engine Controls-3.5 L.
- Disconnect the power steering return hose from the power steering pump reservoir.
- Remove the power steering return hose retaining bolt from the cylinder head.
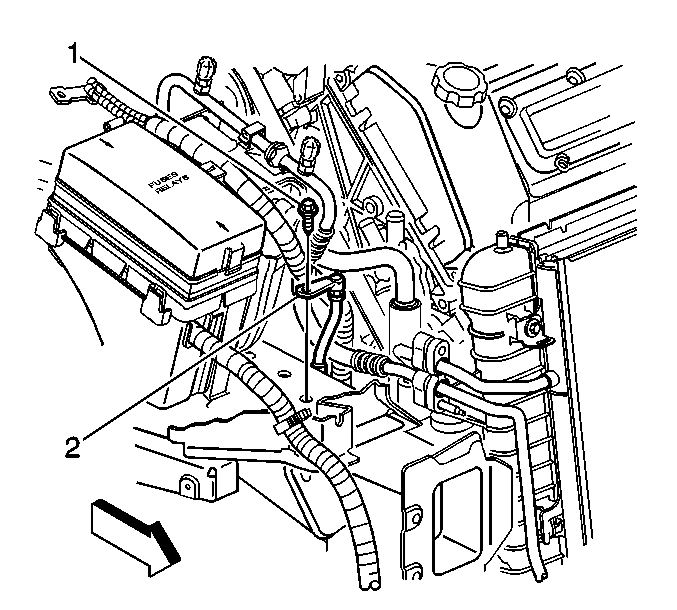
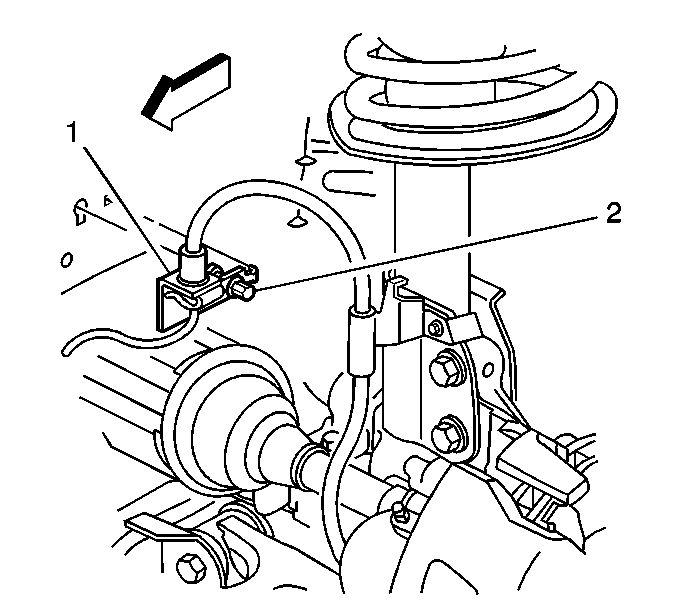
- Remove the power steering pressure hose (1) from the power steering pump.
- Remove the bolt (2) securing the power steering pressure hose to the secondary AIR valve bracket.
- Remove the 3 bolts securing the right engine mount bracket to the engine.
- Remove the right engine mount bracket.
- Remove the bolts securing the transaxle brace to the engine and transaxle .
- Install a engine lift chain to the engine lift brackets and attach to an engine lift devise.
- Remove the nut (1) securing the front engine mount to the front engine mount bracket.
- Remove the bolts attaching the engine to the transaxle.
- Raise the engine from the supported frame and transaxle assembly.
- Remove the front engine mount bracket. Refer to Engine Front Mount Bracket Replacement .

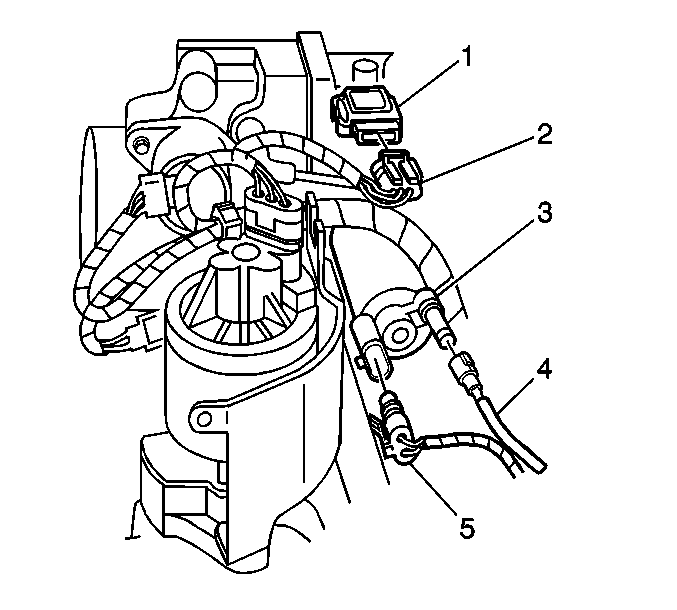

| • | The PCM. Refer to Powertrain Control Module Replacement in Engine Controls-3.5 L. |
| • | The C101 (2) |
| • | The engine electrical harness. Refer to Underhood Electrical Center or Junction Block Replacement in Wiring Systems. |

Caution: In order to avoid possible injury or vehicle damage, always replace the accelerator control cable with a NEW cable whenever you remove the engine from the vehicle.
In order to avoid cruise control cable damage, position the cable out of the way while you remove or install the engine. Do not pry or lean against the cruise control cable and do not kink the cable. You must replace a damaged cable.


Caution: Brake fluid may irritate eyes and skin. In case of contact, take the
following actions:
• Eye contact--rinse thoroughly with water. • Skin contact--wash with soap and water. • If ingested--consult a physician immediately.
Important: Record the location of the brake pipes to the brake pressure modulator valve (BPMV) for use as an aid during installation.
Plug the open outlet ports to prevent fluid loss and contamination.


Notice: The wheels of the vehicle must be straight ahead and the steering column in the LOCK position before disconnecting the steering column or intermediate shaft from the steering gear. Failure to do so will cause the SIR coil assembly to become uncentered, which may cause damage to the coil assembly.


Plug the open outlet ports to prevent fluid loss and contamination.


Caution: Failure to disconnect the intermediate shaft from the rack and pinion stub shaft can result in damage to the steering gear and/or damage to the intermediate shaft. This damage may cause loss of steering control which could result in personal injury.
Important: Mark the flywheel to torque converter relationship prior to removal of the bolts.

Caution: To avoid any vehicle damage, serious personal injury or death when major components are removed from the vehicle and the vehicle is supported by a hoist, support the vehicle with jack stands at the opposite end from which the components are being removed and strap the vehicle to the hoist.
Important: Ensure clearance is maintained between the engine/transaxle assembly
and the following:
• The A/C accumulator hose • The A/C compressor hose • The brake pipes • The heater hoses • The radiator hoses • The wheel speed sensor leads • The wiring harnesses


Installation Procedure
- Install the front engine mount bracket. Refer to Engine Front Mount Bracket Replacement .
- Carefully position the engine to the supported frame and transaxle assembly, aligning the engine dowels to the transaxle cover.
- Install the bolts attaching the engine to the transaxle.
- Install the nut (1) securing the front engine mount to the front engine mount bracket.
- Place a block of wood between the front of the engine oil pan and the engine frame.
- Remove the engine lift chain from the engine lift brackets.
- Install the bolts securing the transaxle brace to the engine and transaxle.
- Position the right engine mount bracket to the engine.
- Install the 3 bolts securing the right engine mount bracket to the engine.
- Install the power steering pressure hose (1) to the power steering pump.
- Install the bolt (2) securing the power steering pressure hose to the secondary AIR valve bracket.
- Connect the power steering return hose to the power steering pump reservoir.
- Install the power steering return hose retaining bolt to the cylinder head.
- Install the secondary air injection crossover pipe/hose. Refer to Secondary Air Injection Crossover Pipe/Hose Replacement in Engine Controls-3.5 L.
- Connect the engine wiring harness to the engine. Refer to Engine Controls Component Views in Engine Controls-3.5 L.
- Position the engine/transaxle assembly under the vehicle.
- Carefully lower the vehicle over the engine/transaxle assembly, aligning the struts to the strut towers.
- Install the 6 frame mounting bolts (3) retaining the frame (2) to the vehicle.
- Install the nut securing the right engine mount to the engine mount bracket.
- Remove the block of wood between the front of the engine oil pan and the engine frame.
- Install the nut (1) securing the left transaxle mount to the transaxle mount bracket.
- Raise and support the vehicle. Refer to Lifting and Jacking the Vehicle in General Information.
- Remove the J 39580 powertrain support dolly from under the engine frame.
- Install the bolts securing the flywheel to the torque converter.
- Install the torque converter cover. Refer to Torque Converter Cover Replacement in Automatic Transaxle-4T65-E.
- Connect the post HO2S at the sensor pigtail. Refer to Oxygen Sensor Wiring Harness Heat Shield Replacement in Engine Exhaust.
- Connect the intermediate shaft to the steering gear.
- Install the pinch bolt.
- Connect the A/C suction hose to the compressor.
- Connect the A/C discharge hose (3) to the compressor.
- Connect the A/C pressure sensor (1).
- Connect the 2 rear brake pipes at the rear of the engine frame.
- Connect the front brake pipes to the retainers at the body frame rails.
- Install the nuts (2) securing the front brake pipe frame brackets (1) to the body frame rails.
- Connect the secondary AIR inlet hose to the secondary AIR pump.
- Install the front fascia extensions. Refer to Front Bumper Fascia Extension Replacement in Bumpers.
- Install the front air deflector. Refer to Front Air Deflector Replacement in Body Front End.
- Attach the front wheel speed sensor electrical leads (2) to the body frame rail.
- Install the exhaust manifold pipe. Refer to Exhaust Manifold Pipe Replacement in Engine Exhaust.
- Install the front wheels. Refer to Tire and Wheel Removal and Installation in Tires and Wheels.
- Install the transaxle oil cooler pipe bracket bolt to the lower tie bar.
- Lower the vehicle ONLY enough to allow the threaded holes in the strut to align with the holes in the strut towers.
- Install the right and left side strut tower bolts.
- Lower the vehicle.
- Remove the J 42640 from the steering column.
- Push the upper (1) and lower (2) transaxle oil cooler pipes into the radiator quick connect fitting, until a click is heard.
- Tug gently on the cooler pipe to ensure proper retention.
- Slide the plastic caps (1) over the quick connect joints.
- Align the transaxle oil cooler pipes with the routing features (1, 2) on the fan shroud.
- Install the transaxle oil cooler pipe bracket bolt to the fan shroud.
- Install the 2 master cylinder brake pipes (1) to the BPMV (2) using the location recorded during the removal procedure.
- Position the J 38185 to the clamp in order to connect the heater inlet hose to the water crossover.
- Position the J 38185 to the clamp in order to connect the heater outlet hose to the thermostat housing.
- Connect the surge tank inlet hose (2) to the surge tank (1).
- Position the J 38185 to the clamp in order to connect the radiator outlet hose (1) to the thermostat housing.
- Position the J 38185 to the clamp in order to connect the radiator inlet hose (2) to the engine.
- Insert the transaxle range selector cable into the bracket.
- Connect the transaxle range selector cable terminal to the transaxle manual shift lever pin.
- Install the retainer to the transaxle range selector cable mechanism.
- Adjust the transaxle range selector cable. Refer to Range Selector Lever Cable Adjustment in Automatic Transaxle - 4T65-E.
- Install a NEW accelerator control cable to the throttle body. Refer to Accelerator Control Cable Replacement in Engine Controls-3.5 L.
- Slide the cruise control cable (2) fully into the throttle body bracket until it snaps into place.
- Install the cruise control cable (1) to the throttle body lever.
- Install the bolt (1) securing the engine ground cable (2) to the right side body frame rail.
- Connect the wiring harness electrical connectors to the following components:
- Install the nut (1) securing the battery positive cable to the remote positive terminal.
- Attach the secondary AIR relay (1) to the relay bracket.
- Install the air cleaner assembly. Refer to Air Cleaner Assembly Replacement in Engine Controls-3.5 L.
- Connect the hose (4) to the evaporative emission canister purge valve (3).
- Connect the fuel inlet and return quick-connect fittings at the fuel rail. Refer to Metal Collar Quick Connect Fitting Service or Plastic Collar Quick Connect Fitting Service in Engine Controls-3.5 L.
- Connect the vacuum brake booster hose to the vacuum brake booster.
- Insert the tab of the fuel injector sight shield under the engine bracket.
- Lower the fuel injector sight shield, aligning the holes with the studs.
- Install the 2 fuel injector sight shield nuts onto the studs.
- Connect the battery negative cable. Refer to Battery Negative Cable Disconnection and Connection in Engine Electrical.
- Fill the engine with oil. Refer to Engine Oil and Oil Filter Replacement .
- Fill the cooling system. Refer to Cooling System Draining and Filling in Engine Cooling.
- Bleed the hydraulic brake system. Refer to Hydraulic Brake System Bleeding in Hydraulic Brakes.
- Recharge the A/C refrigerant system. Refer to Refrigerant Recovery and Recharging in Heating, Ventilation and Air Conditioning.
- Bleed the power steering system. Refer to Power Steering System Bleeding in Power Steering System.
- Measure the wheel alignment. Refer to Wheel Alignment Measurement in Wheel Alignment.

Notice: Use the correct fastener in the correct location. Replacement fasteners must be the correct part number for that application. Fasteners requiring replacement or fasteners requiring the use of thread locking compound or sealant are identified in the service procedure. Do not use paints, lubricants, or corrosion inhibitors on fasteners or fastener joint surfaces unless specified. These coatings affect fastener torque and joint clamping force and may damage the fastener. Use the correct tightening sequence and specifications when installing fasteners in order to avoid damage to parts and systems.
Important: The bolt installed in position (5) is two millimeters shorter than the other engine-to-transaxle bolts and requires the use of thread sealant.
Tighten
Tighten the engine to transaxle mounting bolts to 75 N·m (55 lb ft).
Tighten
Tighten the front engine mount to bracket nut to 55 N·m (41 lb ft).
Tighten
Tighten the transaxle brace bolts to 50 N·m (37 lb ft).
Tighten
Tighten the right engine mount bracket bolts to 60 N·m (44 lb ft).
Tighten
Tighten the power steering pressure hose to power steering pump to 30 N·m (22 lb ft).
Tighten
Tighten the power steering pressure hose retaining bolt to 9 N·m (80 lb in).
Tighten
Tighten the power steering return hose retaining bolt to 17 N·m (13 lb ft).
Important: Ensure clearance is maintained between the engine/transaxle assembly
and the following:
• The A/C accumulator hose • The A/C compressor hose • The brake pipes • The heater hoses • The radiator hoses • The wheel speed sensor leads • The wiring harnesses
Using dowel pins in the alignment holes (1), align the engine frame (2) with the vehicle.
Tighten
Tighten the frame mounting bolts to 191 N·m (141 lb ft).
Tighten
Tighten the right engine mount nut to 80 N·m (59 lb ft).
Tighten
Tighten the left transaxle mount nut to 80 N·m (59 lb ft).
Important: Line up the flywheel and converter, using the alignment marks made during disassembly.
Tighten
Tighten the flywheel to torque converter bolts to 65 N·m (48 lb ft).
Caution: When installing the intermediate shaft make sure that the shaft is seated prior to pinch bolt installation. If the pinch bolt is inserted into the coupling before shaft installation, the two mating shafts may disengage. Disengagement of the two mating shafts will cause loss of steering control which could result in personal injury.
Tighten
Tighten the intermediate shaft to steering gear pinch bolt to 45 N·m (33 lb ft).
Tighten
Tighten the A/C suction hose nut to 20 N·m (15 lb ft).
Tighten
Tighten the A/C discharge hose nut to 20 N·m (15 lb ft).
Tighten
Tighten the brake pipes to 15 N·m (11 lb ft).
Tighten
Tighten the brake pipe frame bracket nuts to 15 N·m (11 lb ft).
Tighten
Tighten the transaxle oil cooler pipe bracket to lower tie bar bolt
to 9 N·m (80 lb in).
Tighten
Tighten the strut tower bolts to 45 N·m (33 lb ft).

Tighten
Tighten the transaxle oil cooler pipe bracket to fan shroud bolt to
6 N·m (53 lb in).
Tighten
Tighten the brake pipes to 15 N·m (11 lb ft).
Caution: In order to avoid possible injury or vehicle damage, always replace the accelerator control cable with a NEW cable whenever you remove the engine from the vehicle.
In order to avoid cruise control cable damage, position the cable out of the way while you remove or install the engine. Do not pry or lean against the cruise control cable and do not kink the cable. You must replace a damaged cable.
Tighten
Tighten the engine ground cable bolt to 36 N·m (27 lb ft).
| • | The PCM. Refer to Powertrain Control Module Replacement in Engine Controls-3.5 L. |
| • | The C101 (2) |
| • | The engine electrical harness. Refer to Underhood Electrical Center or Junction Block Replacement in Wiring Systems. |
Tighten
Tighten the battery positive cable to remote positive terminal nut to
12 N·m (106 lb in).
Tighten
Tighten the fuel injector sight shield nuts to 3 N·m (27 lb in).
Engine Final Test and Inspection
Complete the following procedure after the engine is installed in the vehicle.
- With the ignition OFF or disconnected, crank the engine several times. Listen for any unusual noises or evidence that any parts are binding.
- Start the engine and listen for abnormal conditions.
- Check the vehicle oil pressure gauge or light and confirm that the engine has acceptable oil pressure.
- Run the engine at approximately 1000 RPM until the engine reaches normal operating temperature.
- While the engine continues to idle raise and support the vehicle. Refer to Lifting and Jacking the Vehicle in General Information.
- Inspect for oil, coolant and exhaust leaks while the engine is idling.
- Lower the vehicle.
- Perform the CKP system variation learn procedure. Refer to Crankshaft Position System Variation Learn in Engine Controls-3.5 L.
- Perform a final inspection for the proper engine oil and coolant levels.
- Road test the vehicle.
