CAMPAIGN:REAR SUSPENSION NOISE WITH FE1 OR FE2 SUSPENSION

CERTAIN 1988 CUTLASS SUPREME MODELS WITH FE1 OR FE2 SUSPENSION CONDITION --------- General Motors has determined that certain 1988 Cutlas Supreme models with FE1 (standard) level suspension or FE2 Level II suspension were produced with rear strut upper mounts that could in cold weather allow an increase in noise from rough roads to pass into the passenger compartment.
VEHICLES INVOLVED
Certain 1988 Cutlass Supreme models produced with FE1 suspension or FE2 Level II suspension within the following vehicle breakpoints:
Plant Beginning Through and Including ----- --------- --------------------- Doraville Start of Production JD304100
Some of the subject vehicles within the breakpoints listed above were corrected at the assembly plant prior to being shipped to the dealer and will not require correction by the dealer. All subject vehicles which are listed on the dealer's campaign printout will require correction as outlined in the Service Procedure section of this bulletin.
Should a question exist concerning the campaign involvement of a specific vehicle(s) within the breakpoints listed above, dealers should call the Computerized Recall Information System (C.R.I.S.) for verification.
DEALER ACTION
Dealers are to replace both left and right rear Strut Upper Mounts.
Dealers are to perform this campaign on all involved vehicles at no charge to owners, regardless of mileage, age of vehicle, or ownership from this time forward.
Whenever a vehicle subject to this campaign is taken into your new or used car inventory, or it is in your dealership for service, you are to ensure the campaign correction has been made before selling or releasing the vehicle.
Dealers are to contact owners of vehicles recently sold from your new vehicle inventory and arrange for the campaign correction to be performed.
SERVICE PROCEDURE
This Procedure is to be performed on both the left and right rear struts of the vehicle.
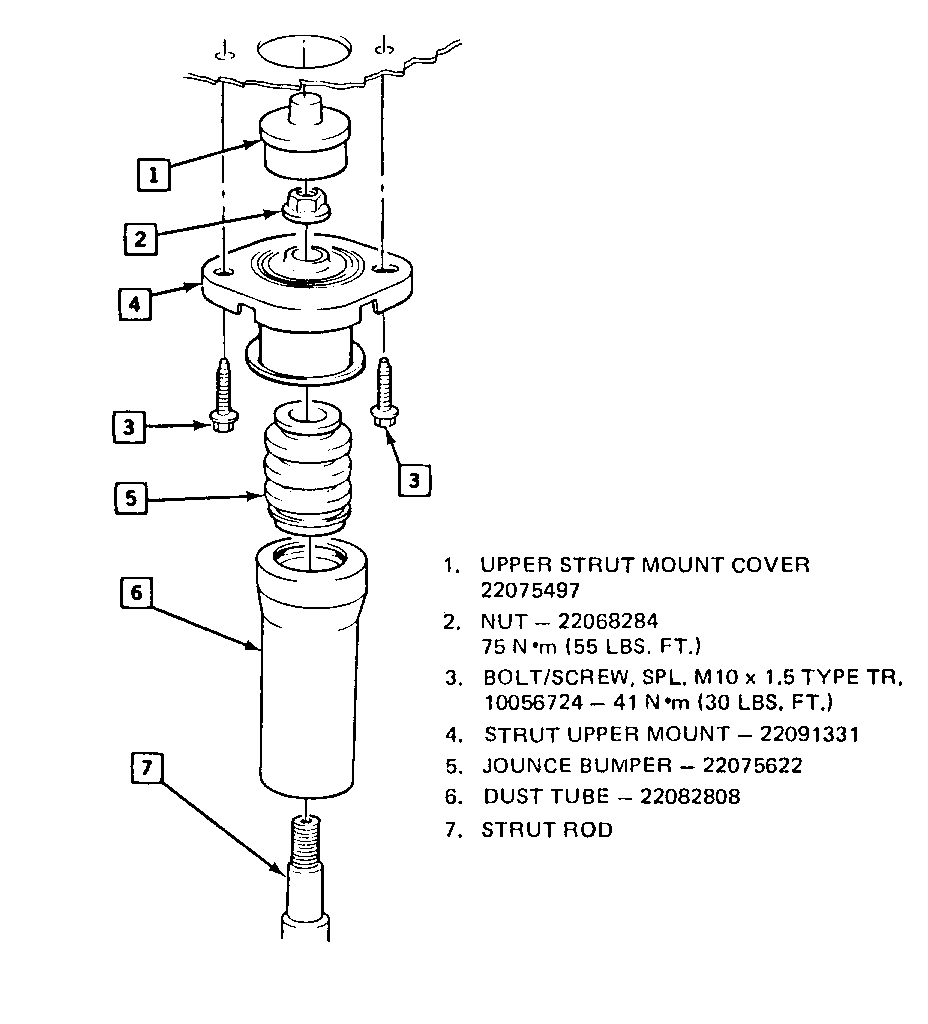
1. Enter rear compartment (trunk) and remove the Upper Strut Mount Cover, (1) shown in illustration. Screw off by hand like a nut.
2. Place vehicle on hoist so that rear suspension hangs in rebound (down) position.
3. Place protective shield/tape around wheel house edge to prevent damage.
4. Remove rear wheel/tire assemblies from vehicle.
5. Remove two screws, Strut Upper Mount to Body, (3) as shown illustration and set aside for later reinstallation.
6. Compress strut by hand and pull outboard past the wheel house opening to provide access to top of strut.
7. Using a T50 Torx(R) head wrench to prevent rotation of the Strut Rod (7), remove Strut Rod Nut (2). Discard nut.
8. Remove Strut Upper Mount (4), Jounce Bumper (5), and Dust Tube (6) as an assembly from the Strut Rod.
9. Separate Dust Boot (6) from the Jounce Bumper (5). Save the Dust Boot for reinstallation. Discard the old Jounce Bumper (5) and Top Mount (4).
10. New Strut Upper Mount (4), part number 22091331, and new Jounce Bumper (5), part number 22075622, should arrive preassembled as a service assembly (Strut Upper Mount and Jounce Bumper Assembly, part number 22091330). If not, the top lip of the Jounce Bumper can be installed into the bottom cavity of the Strut Upper Mount by squeezing one side of the lip up into the cavity and working on around until the last part of the lip pops into place. This can be done by hand; to avoid tearing the Jounce Bumper, do NOT use a tool.
11. Install new Strut Upper Mount and Jounce Bumper Assembly, (4) and 5), to the old Dust Boot (6).
12. Install Mount/Bumper/Boot assembly onto the Strut Rod. Install new Nut (2), part number 22068284, onto Strut Rod, and torque to 75 N-m (55 lbs. ft.) while holding Strut Rod from rotating with a T50 Torx(R) head wrench.
13. Compress Strut Assembly by hand to get under the flange of the wheel house and swing back into place in wheel house.
14. Install Strut Upper Mount to body by reinstalling two screws (3) at 41 N-m (30 4lbs. ft.).
15. Reinstall wheel/tire assemblies to car, tightening wheel nut in a star pattern sequence to a final torque of 140 N-m (100 lbs. ft.). If provided with the vehicle, plastic caps are to be torqued to 2.5 N-m (22 lbs. in.).
CAUTION:
Before installing a wheel, remove any build-up of corrosion on the wheel mounting surface or rotor mounting surface by scraping and wire brushing. Installing wheels without good metal-to-metal contact at the mounting surfaces can cause wheel nuts to loosen, which may later allow the wheel to come off while the vehicle is in motion. This could cause a vehicle crash with possible personal injury.
16. Remove protective shield/tape from flanges of rear wheel houses.
17. Lower vehicle, enter trunk, and reinstall Upper Strut Mount Cover (1) on end of Strut Rod by pressing on. If Upper Strut Mount Cover was torn during earlier removal, replace with new Cover, part number 22075497.
18. Install Campaign Identification Label.
CAMPAIGN IDENTIFICATION LABEL
Each label provides space to print the campaign number, and the five (5) digit dealer code of the dealer performing the campaign. Insert this information with a typewriter, ballpoint pen. When installing label, clean and dry the surface of the radiator support tie bar and apply the campaign label where it is readily visible.
PARTS INFORMATION
Parts will be preshipped to dealers at no charge. If extra parts are required, telephone Product Service Engineering at (517) 885-6537.
Description Part Number Quantity Per Vehicle ----------- ----------- ---------------------- Strut Upper Mount & Jounce Bumper 22091330 2 Assembly (Strut Upper Mount) 22091331 (Jounce Bumper)* 22075622
Upper Strut Mount Cover 22075497 2
Nut 22068284 2
* Jounce Bumper color is yellow or yellow/white.
WARRANTY CLAIM INFORMATION
PC PART-NO. TOT-PTS TC LAB-OP LHRS ST SUBLET -- -------- ------- -- ------ ---- -- ------ Replace left and right rear Top Mounts
96 V4450 1.3* -- 2.92
* .1 hour clerical administration may be added to the above operation.
Parts Allowance: A parts allowance of $2.92 (30% of the dealer price of the preshipped "furnished" parts) may be applied for in the dealer material allowance column (Sublet Column) of the claim submission.
General Motors bulletins are intended for use by professional technicians, not a "do-it-yourselfer". They are written to inform those technicians of conditions that may occur on some vehicles, or to provide information that could assist in the proper service of a vehicle. Properly trained technicians have the equipment, tools, safety instructions and know-how to do a job properly and safely. If a condition is described, do not assume that the bulletin applies to your vehicle, or that your vehicle will have that condition. See a General Motors dealer servicing your brand of General Motors vehicle for information on whether your vehicle may benefit from the information.
