CAMPAIGN: SHOULDER BELT GUIDE LOOP CRACKING-NEW P/N RELEASED

Subject: SHOULDER BELT GUIDE LOOP CRACKING
Models/Years: 1991 CUTLASS SUPREME
CONDITION
General Motors has determined that certain 1991 Oldsmobile Cutlass Supreme model vehicles fail to comply to Federal Motor Vehicle Safety Standard 208, "Occupant Crash Protection". Some of these vehicles have been built with cracked front door shoulder belt guide loops which may not provide front seat occupants with proper protection in the event of a vehicle crash.
To correct this condition, dealers are to inspect the front door shoulder belt guide loops for possible cracks. If a cracked guide loop is found, both front door guide loops will have reinforcing plates installed.
VEHICLES INVOLVED
Certain 1991 Oldsmobile Cutlass Supreme model vehicles built within the following VIN breakpoints:
Beginning Through & Including --------- ------------------- MD300001 MD344760
DEALER ACTION
Dealers are to perform this campaign on all vehicles involved at no charge to owners, regardless of mileage, age of vehicle, or ownership, from this time forward.
Whenever a vehicle subject to this campaign is taken into your new or used vehicle inventory, or it is in your dealership for service, dealers are to ensure the campaign correction has been made before selling or releasing the vehicle.
Dealers are to contact owners of vehicles recently sold from your new or used vehicle inventory and arrange for the campaign correction to be performed.
SERVICE PROCEDURE
Tools Required: J 39425-4 Magnetic Inspection/Drilling Fixture J 39425-1 T-Handle Cutting Bit PT 7190-12 Powder Dispenser Bulb
INSPECTION PROCEDURE:
1. Lower front door window glass and remove plastic shoulder belt guide loop plug cover, nut and rubber washer. DO NOT USE POWER TOOLS TO REMOVE GUIDE LOOP NUT.
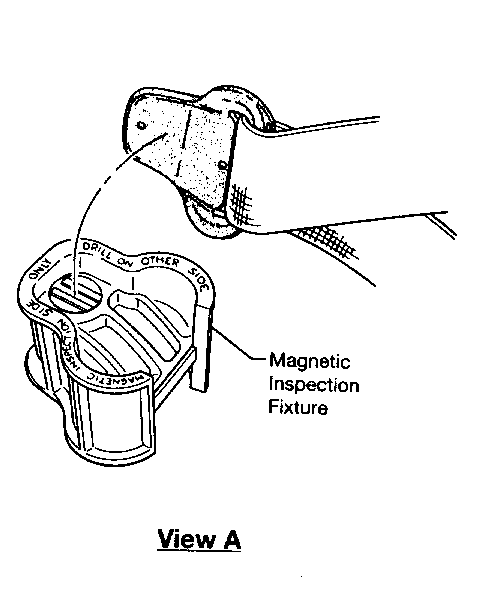
2. Pull guide loop outside of the vehicle and place in the Magnetic Inspection/Drilling Fixture J 39425-4 (see View A). Use "MAGNETIC INSPECTION" side of fixture for this step.
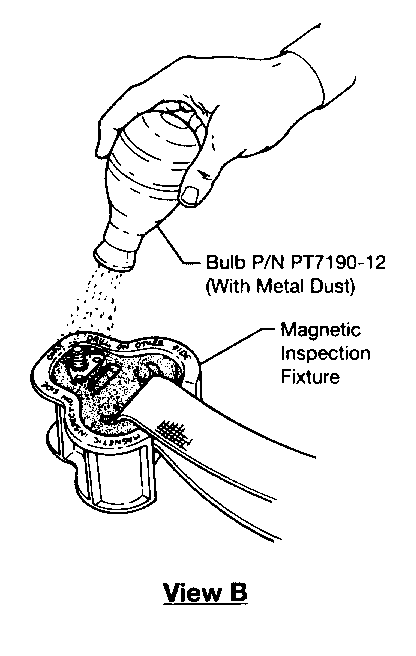
3. Apply a small amount of Crack Detection Powder (metal dust) to the guide loop (see View B).
4. With the guide loop still in the fixture, gently shake the fixture (and the dust) from side to side to highlight any possible crack.
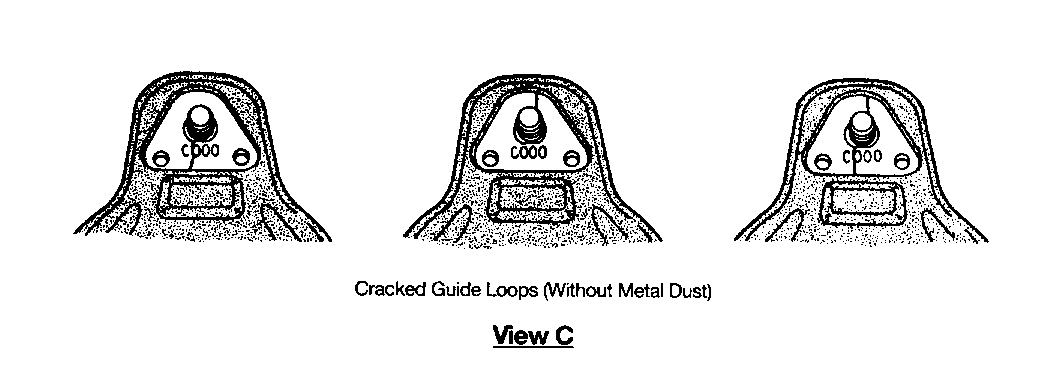
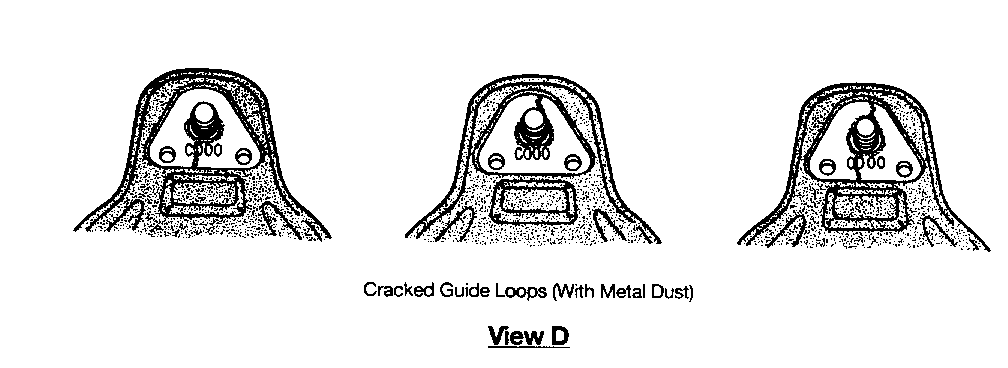
5. Inspect the guide loop for cracks. If the guide loop is cracked, metal dust will have been drawn to the crack line (see Views C & D) and a guide loop reinforcement kit must be installed on both sides of the vehicle (for appearance reasons).
If the first guide loop inspected does not have a crack, perform steps 1 through 5 on the opposite front door guide loop to determine if that guide loop is cracked. DO NOT REINSTALL GUIDE LOOP UNTIL BOTH SIDES HAVE BEEN INSPECTED.
6. Remove all traces of dust from the guide loop(s) and from the Magnetic Inspection/Drilling Fixture by brushing or blowing.
CAUTION:
PROPER EYE PROTECTION SHOULD BE WORN TO PROTECT EYES FROM DUST.
7. If cracks were NOT found, reinstall the guide loop rubber washers and install NEW guide loop nuts (to be ordered separately).
Torque the nuts to 28 N.m (21 lb. ft.).
NOTICE: USE ONLY NEW P/N 101 15018 GUIDE LOOP NUTS. DO NOT SUBSTITUTE OR REUSE OLD NUTS.
Reinstall the nut covers and install a Campaign Identification Label.
8. If cracks were found on either guide loop, reinforcement plates must be installed on both sides following the "INSTALLING REINFORCEMENT PLATES" instructions on page 4.
INSTALLING REINFORCEMENT PLATES
(To be performed on BOTH front door guide loops when EITHER front door guide loop is cracked)
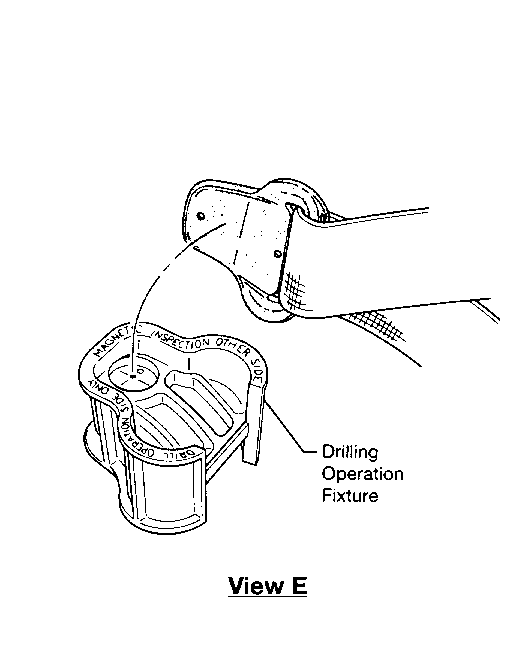
1 Using the "DRILL OPERATION" side of the Magnetic Inspection/Drilling Fixture J 39425-4, place the guide loop in fixture (see View E).
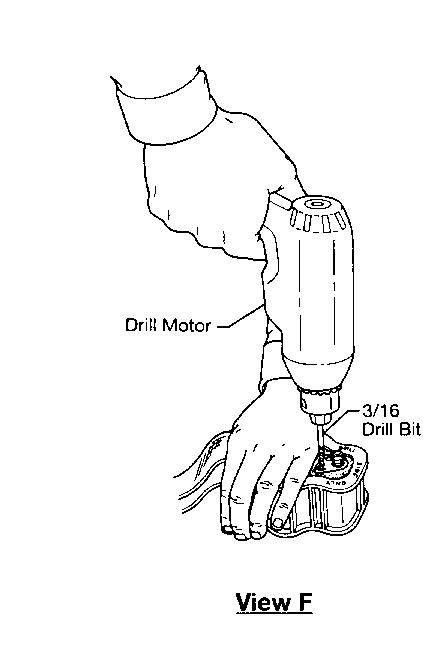
2. Locate two holes in the guide loop late on either side of the threaded stud. While holding the guide loop in the fixture with palm, use a 3/16" drill bit to drill through the black plastic material (see View F).
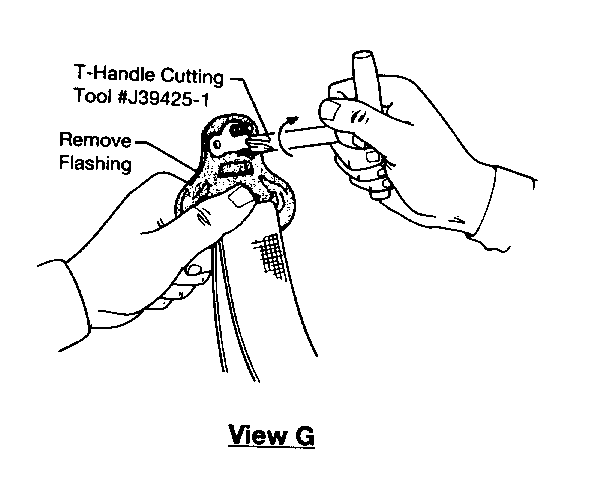
3. Use T-handle Cutting Bit J 39425-1 to remove all black plastic material from in and around the holes in the guide loop, as shown in View G on page 5. This creates two circular cutouts in the lower corners of the triangular are on the back side of the guide loop.
NOTE: Turning the handle back and forth while applying downward pressure has been found to do a better cleaning job than full rotation of the handle.
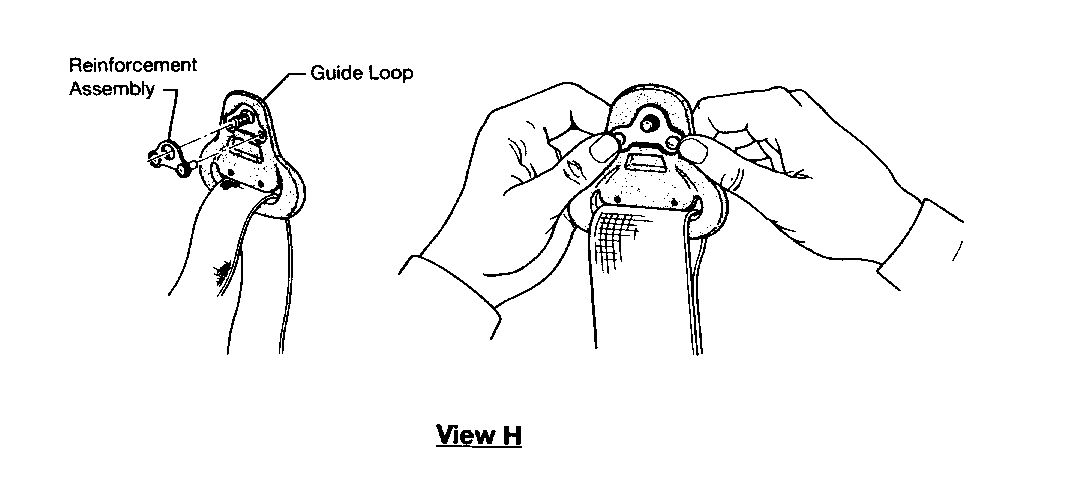
4. Install the reinforcement plate studs into the holes in the guide loop. Ensure the reinforcement plate is completely seated by firmly pressing the plate into the cutout area (see View H).
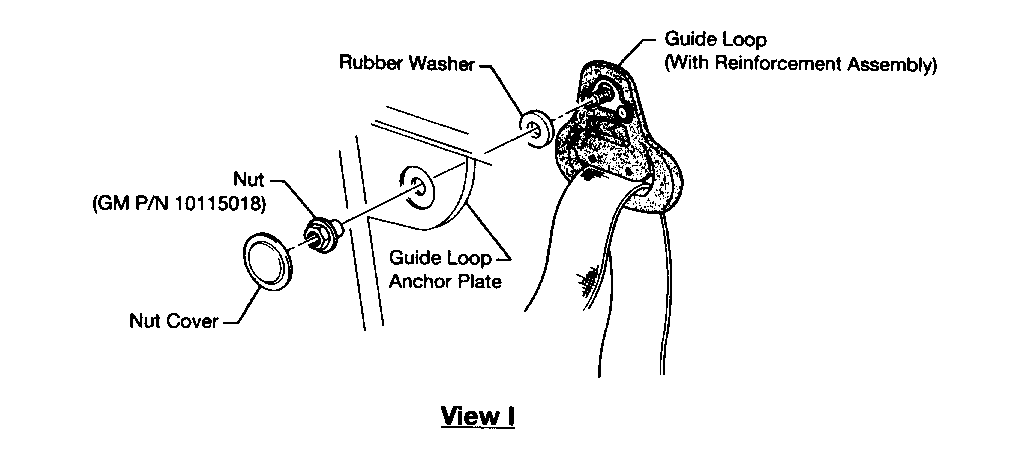
5. Reinstall the guide loop (with the reinforcement plate in place) using the rubber washer removed previously, and the new nut supplied in the reinforcement kit. Torque nut to 28 N.m (21 lb. ft.). Reinstall the nut cover. See View 1.
6. Repeat the reinforcement plate installation on the opposite front door guide loop. Then install a Campaign Identification Label.
CAMPAIGN IDENTIFICATION LABEL
Each label provides space to print the campaign number, and the five (5) digit dealer code of the dealer performing the campaign. Insert this information with a typewriter or ballpoint pen. When installing label, clean and dry the surface of the radiator support tie bar and apply the campaign label where it is readily visible.
PARTS INFORMATION
To ensure parts are obtained as soon as possible, order them from GM Service Parts Operations (GMSPO) on a C.I.O. order, with NO special instruction code, but order on an Advise Code (2). Use the following part numbers:
IF A GUIDE LOOP IS NOT CRACKED:
Description Part Number Quantity Per Vehicle ----------- ----------- -------------------- Guide Loop Nut 10115018 2
(Guide Loop Nuts are serviced in merchandized packages of 6)
NOTICE: DO NOT REUSE GUIDE LOOP NUT (P/N 101 15018) UNDER ANY CIRCUMSTANCES.
IF A GUIDE LOOP IS CRACKED:
Description Part Number Quantity Per Vehicle ----------- ----------- -------------------- Guide Loop Reinforcement Kit 10216391 1 kit
Kit consists of:
Guide Loop Nut 10115018 2 Reinforcement 10216392 2 Instruction Sheet 10216393 1
NOTICE: DO NOT REUSE GUIDE LOOP NUT (P/N 101 15018) UNDER ANY CIRCUMSTANCES.
It is anticipated that less than 3% of the vehicles (one in thirty vehicles) will require the guide loop reinforcement kit to complete this campaign. Please order parts accordingly.
During the early stages of this product safety campaign, GMSPO may restrict the number of kits which may be requested on any one order due to available parts quantities.
SPECIAL TOOL KIT AND VIDEO TRAINING TAPE
Each dealer was shipped a kit of special tools, J 39425, from Kent-Moore, the week of January 20, 1992. The tool kit consists of:
J 39425-1 T-handle Cutting Bit J 39425-2 Crack Detection Powder; two bottles, 1 pound each J 39425-3 Set of Instruction Sheets J 39425-4 Magnetic Inspection/Drilling Fixture PT 7190-12 Powder Dispenser Bulb NPN Instructional Video
The kit is furnished at no charge to the dealer. Each tool package will be identified by a florescent orange label with black letters that lists the tool number and Oldsmobile campaign number 91CO6. Additional tool kits, and/or additional crack detection powder, if required, may be ordered from Kent-Moore and will be charged to the dealer's open account. Fleet Warranty Stations may obtain information on how to purchase tool/video kits from Kent- Moore by calling 1-800-345-2233 and asking for the "order desk".
Technicians should be certain to view the video before attempting to perform the service procedure.
WARRANTY CLAIM INFORMATION
Submit claims using only one of the labor-ops below for each vehicle:
REPAIR PERFORMED TOT-PTS FC LAB-OP LHR ST ---------------- ------- -- ------ --- -- Inspect - No Reinforcement Kit Required 96 V7260 .3 .1*
Inspect and Install Reinforcement Kit 96 V7262 .5 .1*
* .1 hour for clerical administration may be applied for in the Straight Time (ST) column.
Parts allowance: Current dealer price, plus 30% allowance for handling.

General Motors bulletins are intended for use by professional technicians, not a "do-it-yourselfer". They are written to inform those technicians of conditions that may occur on some vehicles, or to provide information that could assist in the proper service of a vehicle. Properly trained technicians have the equipment, tools, safety instructions and know-how to do a job properly and safely. If a condition is described, do not assume that the bulletin applies to your vehicle, or that your vehicle will have that condition. See a General Motors dealer servicing your brand of General Motors vehicle for information on whether your vehicle may benefit from the information.
