Tools Required
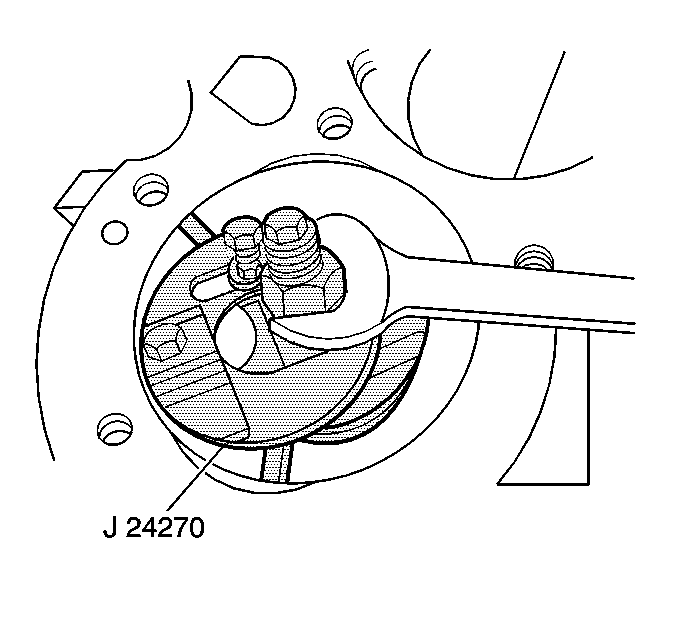
| • | J 24270 Ridge Reamer |
| • | J 8037 Piston Ring Compressor |
Removal Procedure
- Remove the engine. Refer to Engine Replacement .
- Remove the cylinder head. Refer to Cylinder Head Replacement .
- Remove the crankshaft oil deflector. Refer to Crankshaft Oil Deflector Replacement .
- Mark the piston with the number of the cylinder from which it is being removed.
- Mark the connecting rod and the rod cap. Each rod cap must be reassembled with the connecting rod from which it was removed.
- Turn the crankshaft to bottom dead center (BDC).
- Clean the carbon from the top end of the cylinder.
- If there is a pronounced ridge in the cylinder at the top of the piston travel, remove the ridge by performing the following procedure:
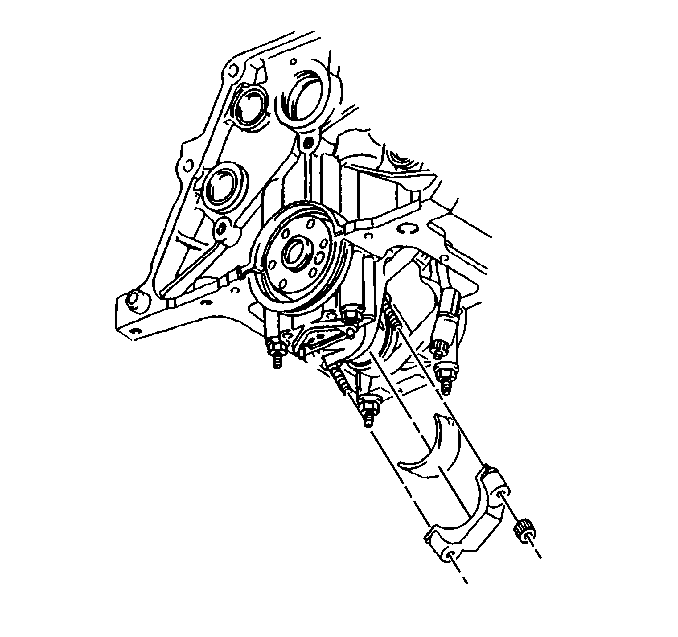
- Remove the connecting rod cap.
- Install the thread protector in order to avoid damage to the crankshaft journal.
- Push out the piston and connecting rod with a suitable tool. Do not use force. Avoid breaking the piston rings. Do not damage the piston.

Notice: If there is a pronounced ridge at the top of the piston travel, the ridge must be removed with a ridge reamer before the piston and connecting rod assembly are removed. Applying force may break the piston rings or damage the piston.
| 8.1. | Rotate the crankshaft until the piston is at bottom dead center (BDC). |
| 8.2. | Place a cloth on top of the piston. |
| 8.3. | Perform the cutting operation using the J 24270 . |
| 8.4. | Remove the cloth and the cuttings. |


Caution: Handle the piston carefully. Worn piston rings are sharp and may cause bodily injury.
Installation Procedure
- Lubricate the cylinder wall and the piston rings with clean engine oil.
- Turn the crankcase to bottom dead center (BDC).
- Install the connecting rod thread protector.
- In order to provide an effective compression seal, stagger the ring gaps.
- Install the J 8037 .
- Align the piston and the connecting rod with the arrow on the piston top toward the front of the engine.
- Be sure the arrow on the top of the piston faces towards the front of the engine.
- Install the piston with the "L" stamp in the left bank only. Install the piston with the "R" stamp in the right bank only.
- Remove the thread protectors.
- Install the bearing inserts onto the clean and dry connecting rod and cap.
- Measure the bearing clearance. Refer to Main Bearing and Rod Bearing Selection .
- If the readings are within limits, select a suitable set of inserts. If the readings are unsatisfactory and available inserts will not correct the clearance, replace the crankshaft.
- Lubricate the bearing surfaces and the crankshaft journal surfaces with engine oil supplement (EOS) GM P/N 1052367 or equivalent.
- Install the bearing cap.
- Pry the connecting rod back and forth with a suitable tool. Check for binding. If necessary, loosen and retighten the bearing cap.
- Measure the connecting side clearance. Refer to Fastener Tightening Specifications.
- Install the crankshaft oil deflector. Refer to Crankshaft Oil Deflector Replacement .
- Install the cylinder head. Refer to Cylinder Head Replacement .
- Install the engine. Refer to Engine Replacement .


Notice: Guide the lower connecting rod end carefully to avoid damaging the crankshaft journal.
Notice: Do not shim, scrape, or file bearing inserts. Do not touch the bearing surface of the insert with bare fingers. Skin oil and acids will etch the bearing surface.
Important: Make sure the bearing cap bolt holes and the cap mating surfaces are clean and dry.
Notice: Upper and lower inserts may be different. Do not obstruct any oil passages.
Important: The inserts will project slightly when put into place. Make sure the inserts project an equal distance on both sides. Make sure the insert tangs are engaged.

Notice: Use the correct fastener in the correct location. Replacement fasteners must be the correct part number for that application. Fasteners requiring replacement or fasteners requiring the use of thread locking compound or sealant are identified in the service procedure. Do not use paints, lubricants, or corrosion inhibitors on fasteners or fastener joint surfaces unless specified. These coatings affect fastener torque and joint clamping force and may damage the fastener. Use the correct tightening sequence and specifications when installing fasteners in order to avoid damage to parts and systems.
Important: Carefully tap the bearing cap into place. Do not pull the cap into place with the cap bolts or nuts.
Tighten
Tighten the bearing cap nuts to 20 N·m (15 lb ft)
+ 75 degrees.
