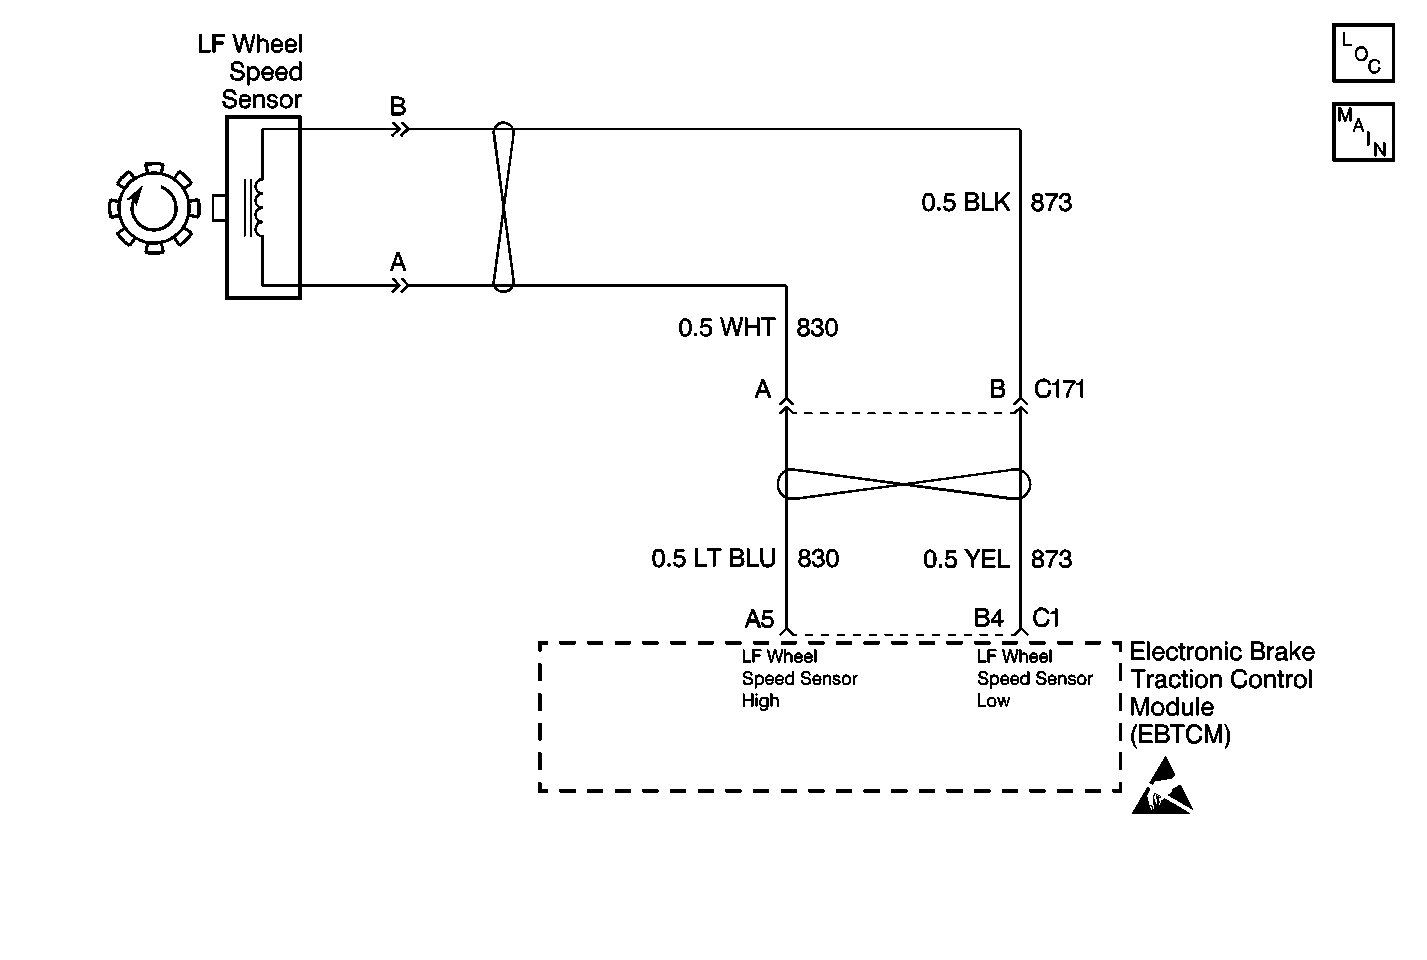
Circuit Description
As a toothed ring passes by the wheel speed sensor, changes in the electromagnetic field cause the wheel speed sensor to produce a AC voltage signal. The frequency of the sinusoidal (AC) voltage signal is proportional to the wheel speed. The amplitude of the AC voltage signal is directly related to wheel speed and the proximity of the wheel speed sensor to the toothed ring. The proximity of the wheel speed sensor to the toothed ring is also referred to as the air gap.
Conditions for Setting the DTC
DTC C1221 can set when the vehicle is not in an ABS stop.
A malfunction exists if both of the following conditions occur:
| • | The left front wheel speed sensor input signal equals zero. |
| • | The vehicle's reference speed is greater than 8 km/h (5 mph) |
Action Taken When the DTC Sets
| • | A malfunction DTC stores. |
| • | The ABS/ETS disables. |
| • | The amber ABS/ETS warning indicators turn on. |
Conditions for Clearing the DTC
| • | The condition responsible for setting the DTC no longer exists and the Scan Tool Clear DTCs function is used. |
| • | 100 drive cycles pass with no DTCs detected. |
Diagnostic Aids
Many conditions may cause an intermittent malfunction. Proper use of the scan tool enhanced diagnostic function can be used in order to measure the frequency of the fault. Thoroughly inspect any circuitry that may be causing the intermittent complaint for the following conditions:
| • | Backed out terminals |
| • | Improper mating |
| • | Improperly formed or damaged terminals |
| • | Poor terminal-to-wiring connections |
| • | Rubbed-through wire insulation |
| • | A broken wire inside the insulation |
If the customer's comments reflect that the amber ABS warning indicator is on only during moist environmental changes (rain, snow, vehicle wash), inspect all the wheel speed sensor circuitry for signs of water intrusion. If the DTC is not current, clear all DTCs and simulate the effects of water intrusion by using the following procedure:
- Spray the suspected area with a five percent saltwater solution.
- Test drive the vehicle over various road surfaces (bumps, turns, etc.) above 24 km/h (15 mph) for at least 30 seconds.
- If the DTC returns, replace the suspected harness.
Add two teaspoons of salt to twelve ounces of water to make a five percent saltwater solution.
Difficulty may occur when trying to locate intermittent malfunctions in the wheel speed sensor. Do not disturb any of the electrical connections. Change electrical connections only when instructed to do so by a step in the diagnostic table. Changing the electrical connections at the correct time will ensure that the intermittent concern has been found.
Front Wheel Speed Sensor Resistance
Resistance of the wheel speed sensor will increase with an increase in sensor temperature.
The following table contains resistance values for the front wheel speed sensors at varying temperatures for use in diagnosis. The values are approximate and should be used as a guideline for diagnosis.
Temperature (°C) | Temperature (°F) | Resistance (Ohms) |
|---|---|---|
-34 to 4 | -30 to 40 | 804 to 1066 |
5 to 43 | 41 to 110 | 956 to 1240 |
44 to 93 | 111 to 200 | 112 to 1463 |
Step | Action | Value(s) | Yes | No | ||||||||
|---|---|---|---|---|---|---|---|---|---|---|---|---|
1 | Was the Diagnostic System Check performed? | -- | ||||||||||
2 |
Is there any physical damage? | -- | ||||||||||
3 | Inspect the following components for physical damage:
Is there any physical damage? | -- | ||||||||||
4 |
Is the resistance within the specified range? | 1020-1137 ohms at 20°C (68°F) | ||||||||||
5 |
Is the voltage equal to or greater than the specified voltage? | 100 mV | ||||||||||
6 |
Is the resistance within the specified range? | OL (Infinite) | ||||||||||
7 | Inspect the 24-way EBTCM connector C1 for the following conditions:
Are there signs of poor terminal contact, corrosion, or damaged terminals? | -- | ||||||||||
8 | Inspect the wiring of CKT 873 and CKT 830 for signs of damage that may cause a short between CKT 873 and CKT 830. Are there any signs of damaged wiring? | -- | ||||||||||
9 | Inspect the harness connectors of CKT 873 and CKT 830 for signs of damage that may cause a short between CKT 873 and CKT 830. Are there any signs of damaged connectors? | -- | ||||||||||
10 |
Does DTC C1221 set as a current DTC? | -- | Go to Diagnostic Aids | |||||||||
11 |
Is the speed of the left front wheel speed sensor constantly higher than the speed of the three remaining wheel speed sensors? | -- | ||||||||||
12 | Replace all of the terminals that exhibit signs of poor terminal contact, corrosion, or damaged terminals. Is the repair complete? | -- | -- | |||||||||
13 | Replace the damaged wiring harness that causes the short between CKT 873 and CKT 830. Is the repair complete? | -- | -- | |||||||||
14 | Replace the damaged wiring harness connectors that cause the short between CKT 873 and CKT 830. Is the repair complete? | -- | -- | |||||||||
15 | Replace the left front wheel speed sensor jumper harness. Refer to Wheel Speed Sensor Jumper Harness Replacement . Is the repair complete? | -- | -- | |||||||||
16 | Replace the left front wheel speed sensor. Refer to Wheel Speed Sensor Replacement . Is the repair complete? | -- | -- | |||||||||
17 | Replace the EBTCM. Refer to Electronic Brake and Traction Control Module Replacement . Is the repair complete? | -- | -- |
