Important:
| • | If evidence of contamination is present in the vehicle's brake fluid,
flush the entire brake system following one of the following procedures. |
| • | Flush the system under the following conditions: |
| • | If there is any doubt about the condition of the fluid in the system |
| • | If the fluid that is used contains the slightest trace of mineral oil
(from such things as engine oil, transmission fluid, etc.) |
| • | After flushing the entire brake system, replace all rubber components. |
| • | Replace the following components: |
| • | The brake hose assemblies |
| • | The master cylinder rubber parts |
| • | The brake caliper seals |
| • | The brake solenoid valves |
| • | Refer to the appropriate replacement procedures. |
| • | After replacing all rubber components, re-flush the entire brake system
by performing one of the following procedures. |
Caution: Use only Delco Supreme 11, GM P/N 12377967 (Canadian P/N 992667), or
equivalent DOT 3 brake fluid from a clean, sealed container. Do not
use fluid from an open container that may be contaminated with water.
Improper or contaminated fluid could result in damage to components, or
loss of braking, with possible injury.
Caution: Do not overfill the brake fluid reservoir. Overfilling the brake fluid
reservoir may cause the brake fluid to overflow onto the engine exhaust components
during brake system service. The brake fluid is flammable and
may cause a fire and personal injury if the brake fluid contacts the engine
exhaust system components.
Pressure Flushing
Tools Required
| • | J 29532 Diaphragm
Type Brake Bleeder |
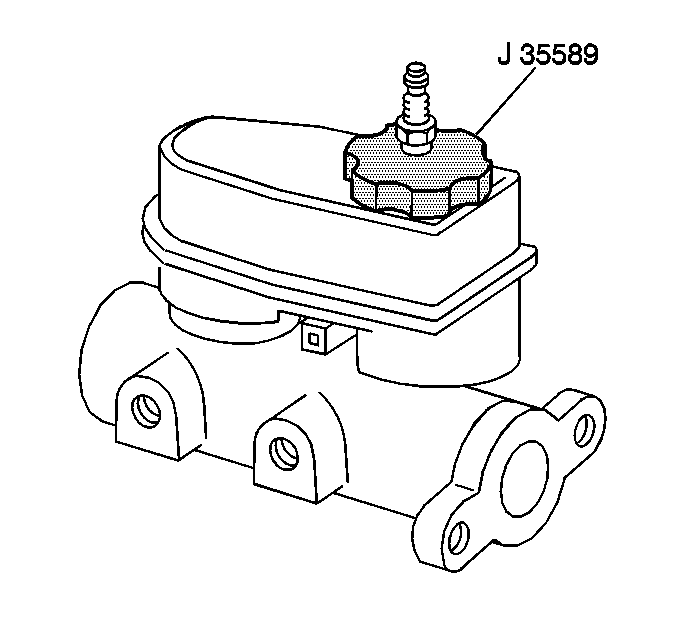
| • | J 35589 Compact
Brake Bleeder Adapter |

Notice: Pressure Bleeding equipment can be used to perform the flush procedure.
The pressure bleeding equipment used for flushing must be of the diaphragm
type. It must a have a rubber diaphragm between the air supply and the brake
fluid to prevent air, moisture, and other contaminants from entering the hydraulic
system.
- Clean the brake fluid reservoir cover and the surrounding
area.
- Remove the brake fluid reservoir cover.
- Remove any remaining brake fluid in the reservoir.
- Refill the brake fluid reservoir with clean DOT 3 brake
fluid to the proper level.
- Install the J 35589
to the brake fluid reservoir.
- Install the J 35589
to the pressure bleeding equipment.
- Adjust the pressure bleeding equipment to 35-70 kPa
(5-10 psi) and wait for approximately 30 seconds in order
to ensure there is no leakage.
- Adjust the pressure bleeding equipment to 205-240 kPa
(30-35 psi).
- Raise and suitably support the vehicle. Refer to
Lifting and Jacking the Vehicle
in General Information.
Notice: Use the correct fastener in the correct location. Replacement fasteners
must be the correct part number for that application. Fasteners requiring
replacement or fasteners requiring the use of thread locking compound or sealant
are identified in the service procedure. Do not use paints, lubricants, or
corrosion inhibitors on fasteners or fastener joint surfaces unless specified.
These coatings affect fastener torque and joint clamping force and may damage
the fastener. Use the correct tightening sequence and specifications when
installing fasteners in order to avoid damage to parts and systems.

Important: The following list indicates the wheel position flush sequence:
- Right rear
- Left front
- Left rear
- Right front
Important: Ensure that the bleeder valves do not leak.
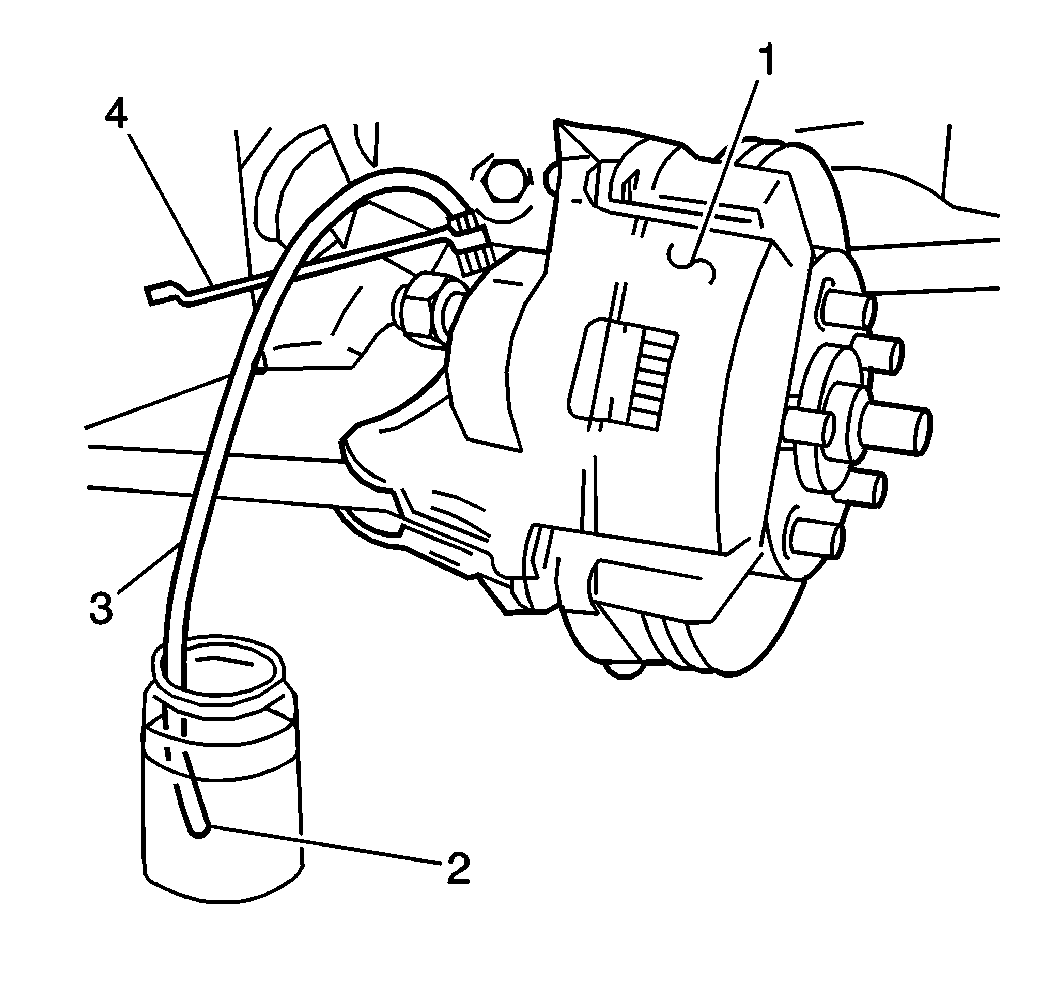
- Use the following procedure in order to flush the brakes:
| 10.1. | Attach the bleeder hose (3) to the bleeder valve at each wheel. |
| 10.2. | Place the other end of the bleeder hose (2) into a container in
order to collect the draining brake fluid. Do not submerge the hose end in
fluid. |
| 10.3. | Slowly open the bleeder valve and allow the fluid to flow. |
| 10.4. | Close the valve when clean brake fluid begins to flow or at least
235 ml (8 oz) of fluid accumulates. |
Tighten
- Tighten the front caliper bleeder valves to 13 N·m
(115 lb in).
- Tighten the rear caliper bleeder valves to 7 N·m
(62 lb in).
- Lower the vehicle.
- Remove the bleeder adapter.
- Replace all the rubber components listed under Flushing Procedure.
Refer to the appropriate On-Vehicle Service section.
- Repeat the flushing procedure one more time.
- Inspect the brake fluid level in the reservoir. Fill the reservoir
to the correct level if necessary.
- Install the brake fluid reservoir cap.
- Bleed the entire brake hydraulic system. Refer to
Hydraulic Brake System Bleeding
.
Manual Flushing
Important: Use a suitable container and/or shop rags in order to catch fluid and
prevent the fluid from contacting any painted surfaces.
- Clean the brake fluid reservoir cover and the surrounding area.
- Remove the brake fluid reservoir cover.
- Remove any remaining brake fluid in the brake fluid reservoir.
- Refill the brake fluid reservoir with clean DOT 3 brake
fluid to the proper level.
- Install the brake fluid reservoir cover.
- Raise and suitably support the vehicle. Refer to
Lifting and Jacking the Vehicle
in General Information.

Important: The following list indicates the wheel position flush sequence:
- Right rear
- Left front
- Left rear
- Right front
Important: Ensure that the bleeder valves do not leak.
- Use the following procedure in order to flush the wheel brakes:
| 7.1. | Attach the bleeder hose to the bleeder valve at each wheel. |
| 7.2. | Place the other end of the bleeder hose into a container in order
to collect the draining brake fluid. Do not submerge the hose end in fluid. |
| 7.3. | Slowly open the bleeder valve and allow the fluid to flow. |
| 7.4. | Close the valve when clean brake fluid begins to flow or at least
235 ml (8 oz) of fluid accumulates. |
Tighten
| • | Tighten the front caliper bleeder valves to 13 N·m
(115 lb in). |
| • | Tighten the rear caliper bleeder valves to 7 N·m
(62 lb in). |
- Lower the vehicle.
- Replace all of the following rubber components:
| • | The brake hose assemblies |
| • | The master cylinder rubber parts |
| • | The brake caliper seals |
| • | The brake solenoid valves |
- Repeat this manual flushing procedure one more time.
- Inspect the brake fluid level in the reservoir. Fill the reservoir
to the correct level if necessary.
- Replace the brake fluid reservoir cap.
- Bleed the entire brake hydraulic system. Refer to
Hydraulic Brake System Bleeding
.


