CAMPAIGN: DIGITAL CLUSTERS (U52) DIMMER CONTROL

Subject: DIGITAL CLUSTER (U52)
Models/Years: CERTAIN 1990 EIGHTY-EIGHT ROYALE BROUGHAMS
CONDITION
General Motors has determined that certain 1990 Oldsmobile Eighty-Eight Royale Broughams equipped with Digital (electronic) Instrument Cluster fail to conform to the requirements of Federal Motor Vehicle Safety Standard (FMVSS) 1 01, "Controls and Displays". The above referenced vehicles were built missing a wire between the Digital Cluster and the dimmer control, thereby failing to provide at least two levels of lighting.
VEHICLES INVOLVED
Certain 1990 Oldsmobile Eighty-Eight Royale Broughams equipped with Digital Cluster (RPO U52), and without Driver Information System (RPO U51) and without Canadian content (RPO T61 or Z49) within the following VIN breakpoints:
Through & Plant Beginning Including -------- ------------------ ----------- Flint LH300296 LH309518
Flint Plus one isolated VIN: LH309679
Wentzville L1800079 L1804455
NOTE: At Wentzville, VIN Ll 800793 was repaired prior to shipping.
In this campaign, there are only 93 Flint built vehicles, and only 23 Wentzville built vehicles to be corrected.
All vehicles listed on the dealer printout will require correction. Should a question arise concerning the campaign involvement of a specific vehicle within the breakpoints listed above that does not appear on the dealer printout, dealers should access the Vehicle Information Service System (V.I.S.S.) for verification.
DEALER ACTION
To correct this condition on involved vehicles, dealers are to install a jumper wire as instructed in the SERVICE PROCEDURE of this Product Campaign Bulletin.
Dealers are to perform this campaign on all vehicles involved at no charge to owners, regardless of mileage, age of vehicle, or ownership, from this time forward.
Whenever a vehicle subject to this campaign is taken into your new or used vehicle inventory, or it is in your dealership for service, dealers are to ensure the campaign correction has been made before selling or releasing the vehicle.
Dealers are to contact owners of vehicles recently sold from your new or used vehicle inventory and arrange for the campaign correction to be performed.
SERVICE PROCEDURE
1. Write down the owner's preset memory settings which will be lost when the battery is disconnected for reference later when resetting memory functions. If a memory retention device is plugged into the cigarette lighter socket (such as "Memor-Eze", Snap-On Tool YA960, or Kent Moore Tools KS295A or BT9027), this step can be omitted. Then, with the ignition in the "off" position, disconnect the negative battery cable.
CAUTION:
If vehicle is equipped with inflatable Restraint System (SIR), refer to SUPPLEMENTAL INFLATABLE RESTRAINT Section (9J) of the 1990 Oldsmobile Eighty Eight Royale/Ninety Eight Regency Service Manual. Further, if a memory retention device is used, disconnect the SIR inflator module circuit by disconnecting the YELLOW connector at the base of the steering column. Failure to disconnect the yellow connector may result in airbag deployment with personal injury.
2. Remove instrument panel center trim plate (Torx # 1 5).
3. Remove three screws from cluster trim plate and pull trim plate rearward to remove.
4. Remove five screws from cluster.
5. Remove digital cluster from Instrument Panel. The tube to the Automatic Electronic Comfort Control sensor can be removed by twisting it 90 degrees.
6. Remove the two mounting screws on Headlight Switch, and pull the switch rearward. Disconnect the fiber optic lead (it has a small retainer). Remove the panel lamp dimmer switch connector (black) from the Instrument Panel Carrier and pull it out of the panel far enough to allow access to the rear of the connector.
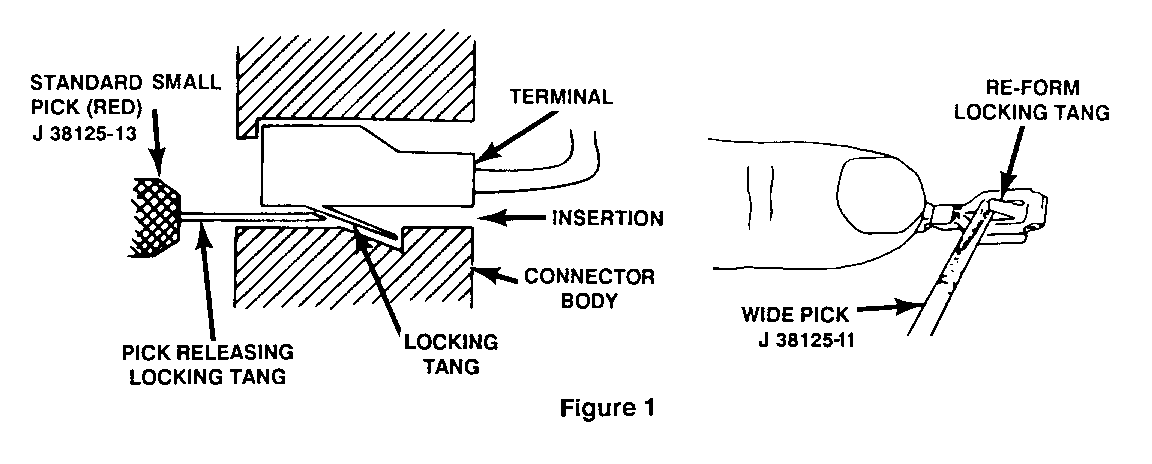
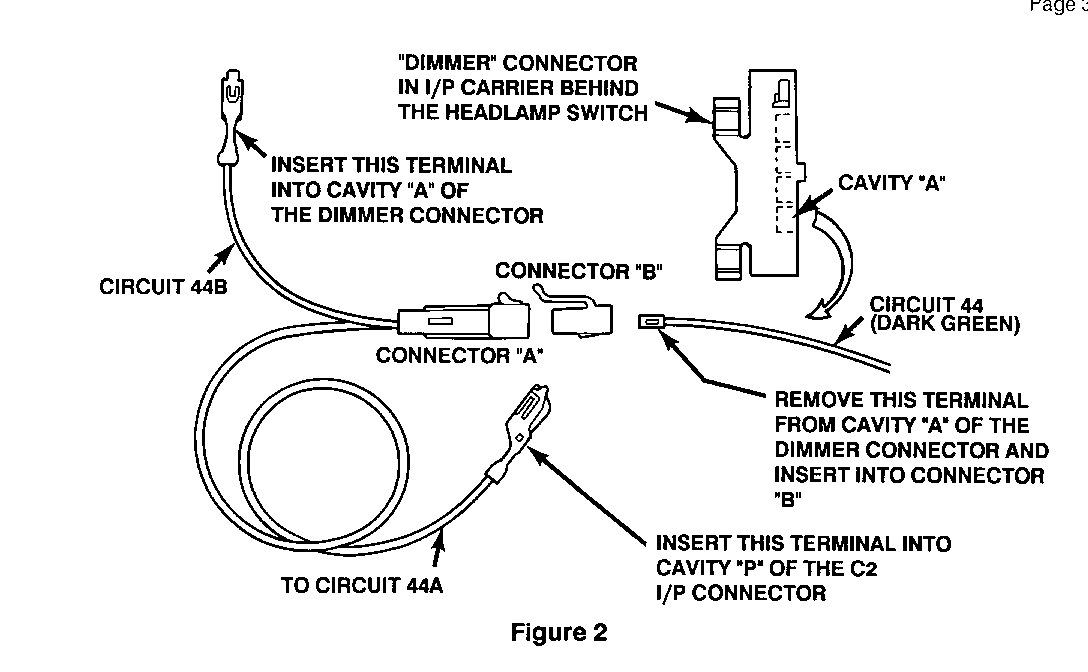
7. Open the terminal cover on the connector. See figure 2. Remove Circuit 44 (dark green) terminal from cavity "A" of the panel lamp dimmer switch connector. Refer to Figure 1 for the proper technique for backing the terminal out of the connector and re-forming the locking tang on the terminal.
8. Obtain Jumper Wire (Service P/N 12102548), and remove connector "B" from connector "A" (see Figure 2). Install the Circuit 44 terminal into connector "B" and plug connector "B" back into "A".
9. Plug the short green wire terminal (labelled "44B" in Figure 2) into the now empty cavity "A" of the panel lamp dimmer switch connector. Close the terminal cover on the connector.
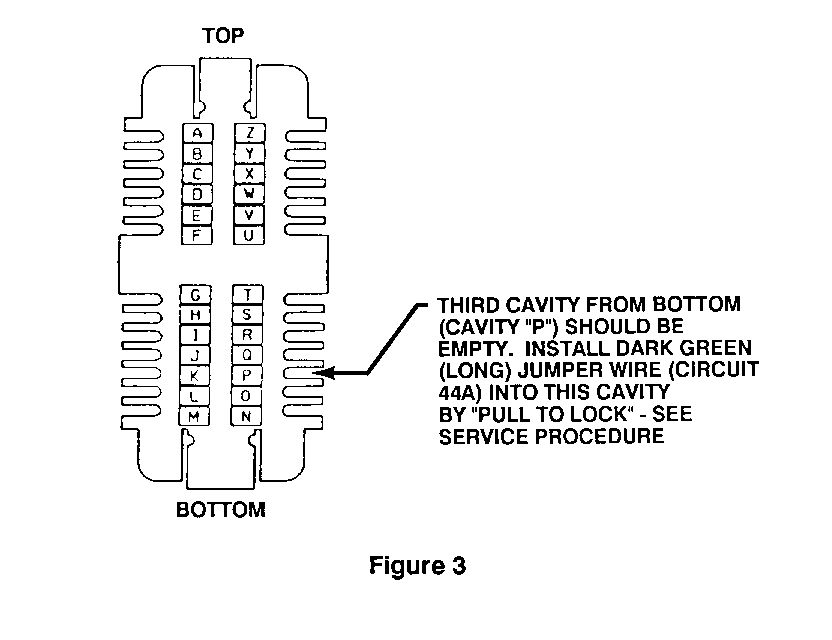
10. Remove cluster connector # 2 (left of the steering column) from the Instrument Panel Carrier. Fish the long green wire on the jumper (labelled "44A" in Figure 2) through the Instrument Panel dimmer connector hole up to the cluster connector # 2. Plug this wire terminal into the empty cavity "P" of connector 2. The bottom edge & locking tab of the terminal fits into a pocket in the connector. Pull on the wire in the direction of the harness to install and lock the terminal into the connector. Refer to Figure 3.
11. Tape the one-way connector "A" and "B" of the jumper to the dimmer harness to prevent rattling. Do not pull any of the three leads taut.
12. Reinstall the panel lamp dimmer switch connector to the Instrument Panel Carrier; plug in the fiber optic lead and reinstall retainer; remount the headlamp switch in the panel and reinstall the two mounting screws. Reinstall cluster connector # 2 to the Instrument Panel Carrier.
13. Reinstall digital cluster into the instrument panel and reinstall five screws. Reinstall tube to the Automatic Electronic Confort Control sensor, if previously removed.
14. Reinstall cluster trim plate and three screws. Install center trim plate.
15. Turn on headlamps and cycle panel/cluster lamp dimmer switch to confirm that digital cluster (and other panel lights) can be varied in brightness.
16. Reconnect negative battery cable. If a memory retention device was not used, please reset (to the extent possible) all devices that lost their memory after the battery was disconnected.
17. Install a Campaign Identification Label.
CAMPAIGN IDENTIFICATION LABEL
Each label provides space to print the campaign number, and the five (5) digit dealer code of the dealer performing the campaign. Insert this information with a typewriter or ballpoint pen. When installing label, clean and dry the surface of the radiator support tie bar and apply the campaign label where it is readily visible.
PARTS INFORMATION
One Jumper Wire (P/N 12102548) for each involved vehicle may be obtained by calling Wonderland Business Forms in Grand Rapids, Michigan, at (616) 942-7725 (FAX: 616-942-2245). Be prepared to provide the VIN of the involved vehicle, the Product Campaign Bulletin number (90-C-09), the dealership parts mailing address, and to whose attention the part should be sent. The jumper wire will be provided to the dealer at no charge.
NOTICE: BECAUSE THE SUPPLY OF PARTS IS LIMITED, PLEASE DO NOT ORDER PARTS UNTIL OWNERS HAVE BEEN CONTACTED AND THEY AGREE TO HAVE THE CAMPAIGN PERFORMED AT YOUR DEALERSHIP.
WARRANTY CLAIM INFORMATION
Submit claims using the labor-op below:
TC LAB-OP SUBLET LHRS -- ------ ------ ---- Remove & Reinstall Cluster 96 V5840 .21 .7* and Install Jumper Wire
* .1 hour for clerical administration may be added to the above operation.
Parts Allowance: A parts handling allowance of $.21 (30% of the dealer price of the furnished parts) is to be entered in the Sublet Column of the claim as shown above.
General Motors bulletins are intended for use by professional technicians, not a "do-it-yourselfer". They are written to inform those technicians of conditions that may occur on some vehicles, or to provide information that could assist in the proper service of a vehicle. Properly trained technicians have the equipment, tools, safety instructions and know-how to do a job properly and safely. If a condition is described, do not assume that the bulletin applies to your vehicle, or that your vehicle will have that condition. See a General Motors dealer servicing your brand of General Motors vehicle for information on whether your vehicle may benefit from the information.
