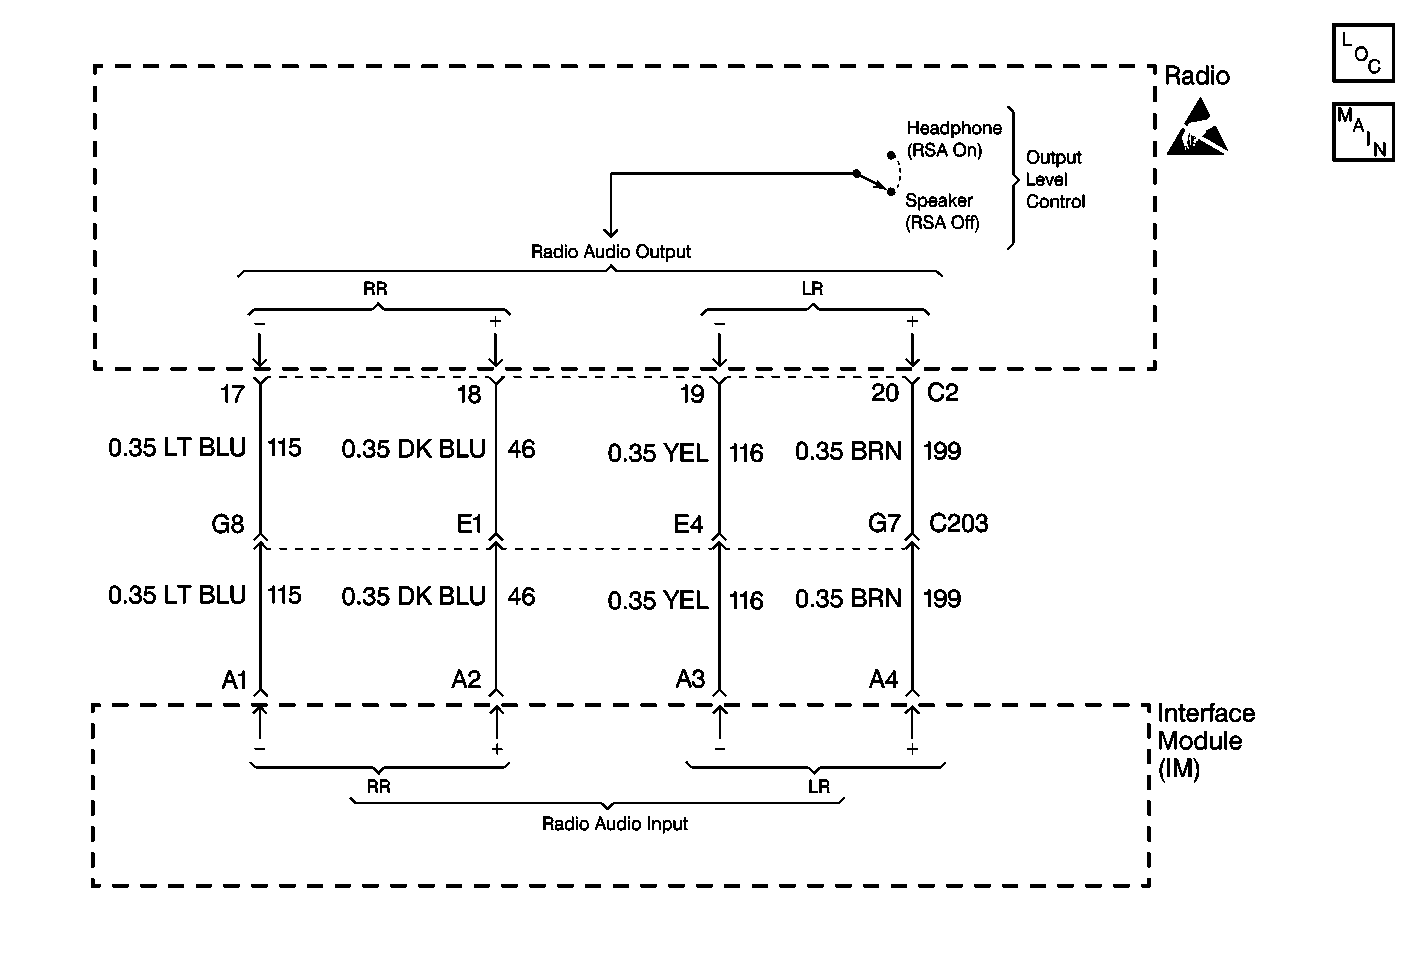
Circuit Description
The Video Entertainment System (VES) controls the operation of the rear speakers. The Auxiliary Video Module (AVM) has an audio amplifier, which is used to sound video audio through the rear speakers. The Interface Module (IM) senses when the radio is in use through circuit 145; when the radio is off, the IM allows the rear speakers to sound video audio. However, when the radio is turned on, the IM mutes the rear speakers; video audio is then available through the headphone jacks at the Second and Third Seat Audio (SSA/TSA) controls only. This action prevents two sources of audio to be heard at the same time (radio audio through the front speakers and video audio through the rear speakers.)
The radio outputs its rear speaker audio channels directly to the Rear Seat Audio (RSA) control. When the RSA is turned on, the RSA routes these audio channels to the headphone jacks, thus muting the rear speakers. When the RSA is turned off, the RSA routes the radio audio channels to the Interface Module (IM). When the VES is off, the IM routes the radio audio channels to the rear speakers. If the VES is on, then the IM routes radio audio channels to the Second and Third Seat Audio (SSA/TSA) controls, muting the rear speakers.
The Rear Seat Audio (RSA) control provides second row passengers access to the radio audio system. The RSA, when turned on, allows the user to listen to the radio, audio cassette, or compact disc (if equipped) through headphones. When the RSA is turned on, the RSA automatically mutes the rear speakers. The controls on the radio allow the driver and front passenger to adjust radio audio coming through the front speakers. At the same time, the second (and third row) passengers can listen to the audio cassette or CD while the front passengers are listening to the radio, and vice versa. The RSA provides volume controls, mode selection (radio/tape/cd), seek, among other features. The audio selected at the RSA controls is also routed to the Second and Third Seat (SSA/TSA) audio controls. The RSA headphone jacks do not provide access to the video audio channel; it is only available at the SSA and TSA controls.
Diagnostic Aids
| • | Check for the following conditions: |
| - | An open in circuit 46 and/or 115 between the radio and the IM (when the right channel is inoperative). |
| - | An open in circuit 116 and/or 199 between the radio and the IM (when the left channel is inoperative). |
| - | A faulty radio. |
| - | A faulty IM. |
| • | An intermittent failure may be very difficult to detect and to diagnose accurately. Faulty electrical connections or wiring causes most intermittent problems. When an intermittent condition is suspected, check the suspected circuits for the following conditions: |
| - | Poor mating of connector halves or backed out terminals. |
| - | Improperly formed or damaged terminals. |
| - | Wire chafing. |
| - | Poor wire to terminal connections. |
| - | Dirty or corroded terminals. |
| - | Damage to connector bodies. |
| - | Wire broken inside the insulation. |
Test Description
The number(s) below refer to the step number(s) on the diagnostic table.
-
Tests the radio for audio output.
-
Determines whether the fault is due to an open in the audio output channel(s) or the IM is faulty.
-
Verifies repairs made to the VES.
Step | Action | Value(s) | Yes | No | ||||
|---|---|---|---|---|---|---|---|---|
While the radio is playing music, does the voltage measure in the specified range? | 0-3 V AC (Varies as Music Plays) | Go to Step 3 | Go to Step 2 | |||||
2 | Replace the radio. Refer to Radio Replacement or to Radio Replacement . Is the repair complete? | -- | Go to Step 6 | -- | ||||
While the radio is playing music, does the voltage measure in the specified range? | 0-3 V AC (Varies as Music Plays) | Go to Step 4 | Go to Step 5 | |||||
4 |
Is the repair complete? | -- | Go to Step 6 | -- | ||||
5 | Repair poor connection or open in:
Is the repair complete? | -- | Go to Step 6 | -- | ||||
Does the VES operate normally? | -- | System OK |
