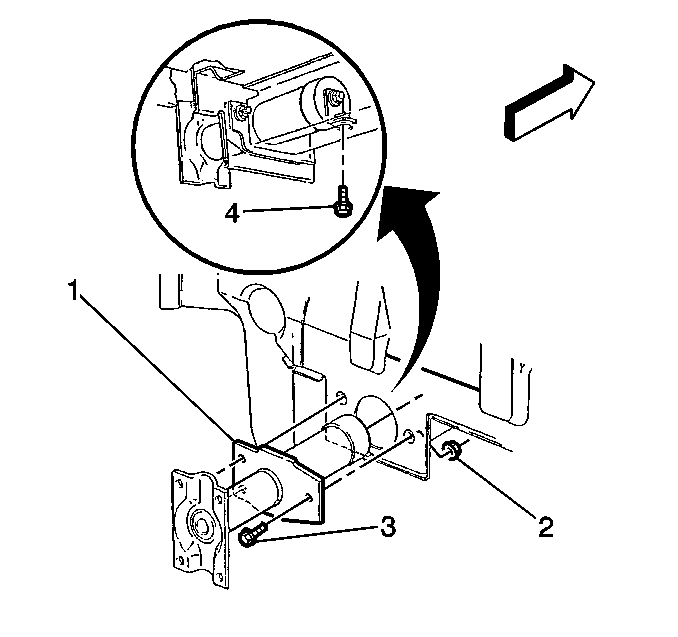
Removal Procedure
- Raise and support the vehicle. Refer to Lifting and Jacking the Vehicle in General Information.
- Remove the bumper assembly. Refer to Rear Bumper Replacement .
- Remove the side rail bolt (4).
- Remove the following components:
- Remove the energy absorber (1).
Caution: Failure to observe the following procedure when handling energy absorbers
could cause personal injury.
• Do not apply heat to an energy absorber. • Do not weld in the area of an energy absorber. • Do not attempt to repair a damaged energy absorber. Always replace
the damaged energy absorber with a new part. • If an energy absorber is bound-up as a result of a collision such
that it cannot extend, take precautions to avoid spring-back when bending
sheet metal. Provide a positive restraint, such as a chain or cable to hold
the bumper in the position it is in. Wear approved safety glasses and using
a 3mm (1/8 inch) drill bit, drill a small hole in the piston tube near the
bumper bracket to relieve gas pressure. Remove the energy absorber after
gas pressure has been relieved. • If an energy absorber is to be scrapped, relieve the gas pressure
prior to disposal of the part. Make an indentation with a center punch in
the small cylinder section of the energy absorber.
Notice: An energy absorber that has a dislodged blowout plug (due to an above 8 km/h (5 mph) impact) could have insufficient absorber action in impacts below 8 km/h (5 mph). Complete diagnosis procedures must be followed after a collision to prevent excessive vehicle damage in any future low speed impacts.

| • | The bolts (3) |
| • | The nuts (2) |
Installation Procedure
- Install the energy absorber (1).
- Install the side rail bolt (4).
- Install the following components:
- Install the bumper assembly. Refer to Rear Bumper Replacement .

Notice: Use the correct fastener in the correct location. Replacement fasteners must be the correct part number for that application. Fasteners requiring replacement or fasteners requiring the use of thread locking compound or sealant are identified in the service procedure. Do not use paints, lubricants, or corrosion inhibitors on fasteners or fastener joint surfaces unless specified. These coatings affect fastener torque and joint clamping force and may damage the fastener. Use the correct tightening sequence and specifications when installing fasteners in order to avoid damage to parts and systems.
Tighten
Tighten the side rail bolt to 4 N·m (35 lb in).
| • | The bolts (3) |
| • | The nuts (2) |
Tighten
Tighten the bolts and the nuts to 27 N·m (20 lb ft).
