Removal Procedure
Tools Required
| • | J 39243 Water
Pump Driveshaft Assembly Remover |
- Remove the water pump. Refer to
Water Pump Replacement
in Engine Cooling.
- Remove the distributor. Refer to
Distributor
in Engine Electrical.
- Remove the engine front cover. Refer to
Engine Front Cover Replacement
.
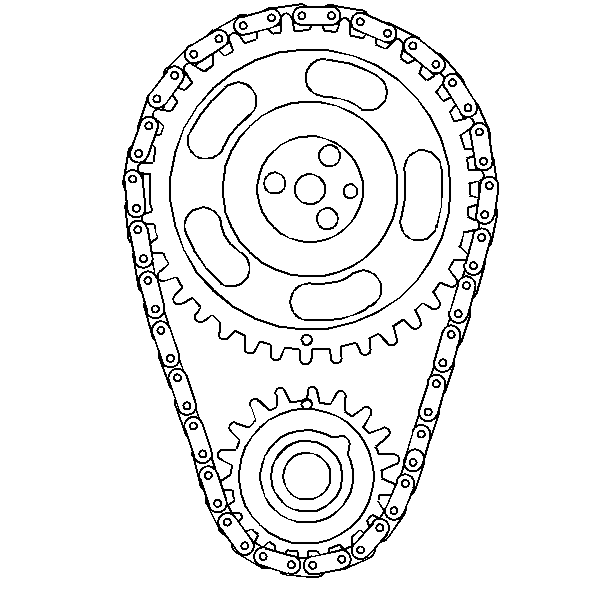
- Rotate the crankshaft until the sprocket alignment marks on the
crankshaft sprocket and the camshaft sprocket are aligned.
- Remove the camshaft sprocket bolts.
Important: Do not turn the crankshaft after the timing chain has been removed in
order to prevent damage to the pistons and the valves.
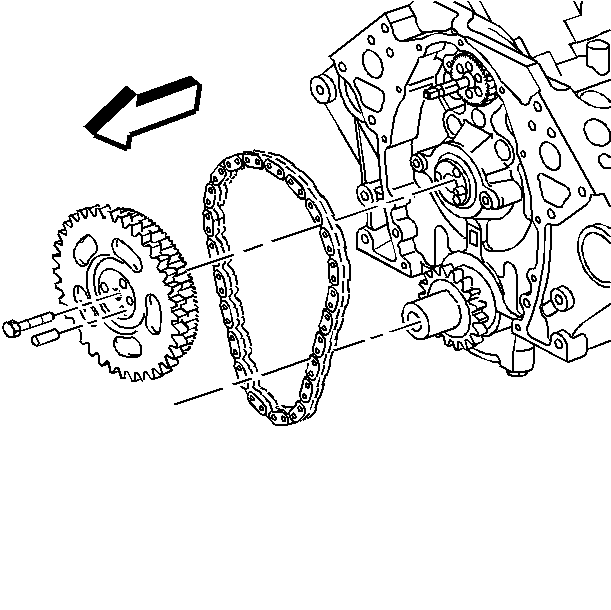
- Remove the camshaft sprocket and the camshaft timing chain.
- Remove the water pump driveshaft bolts.
- Remove the water pump driveshaft using the J 39243
.
- Remove and discard the O-ring seal from the water pump driveshaft.
- Remove the crankshaft sprocket using the J 5825-A
.
- Remove the key if necessary.
Installation Procedure
Tools Required
| • | J 5590 Crankshaft
Sprocket Installer |
| • | J 41546 Water
Pump Driveshaft Assembly Installer |
| • | J 39087 Water
Pump Driveshaft Front Cover Oil Seal Protector |
| • | J 39089 Water
Pump Driveshaft O-ring Seal Installer |
- Install the key, if previously removed.
- Install the crankshaft sprocket using the J 5590
.
- Install the water pump driveshaft using the J 41546
.
- Install the water pump driveshaft bolts.
Tighten
Tighten the water pump driveshaft bolts to 12 N·m (106 lb in).
Notice: Use the correct fastener in the correct location. Replacement fasteners
must be the correct part number for that application. Fasteners requiring
replacement or fasteners requiring the use of thread locking compound or sealant
are identified in the service procedure. Do not use paints, lubricants, or
corrosion inhibitors on fasteners or fastener joint surfaces unless specified.
These coatings affect fastener torque and joint clamping force and may damage
the fastener. Use the correct tightening sequence and specifications when
installing fasteners in order to avoid damage to parts and systems.
Important: The camshaft sprocket and the water pump driveshaft gears must mesh
or damage to the camshaft retainer may occur.
- Install the camshaft sprocket.
- Install the timing chain.
- Install the camshaft sprocket bolts. Ensure the camshaft and the crankshaft
sprocket alignment marks align as shown.
Tighten
Tighten the camshaft sprocket bolts to 25 N·m (18 lb ft).
- Install the new O-ring seal to the water pump driveshaft
using the J 39089
.
- Install the engine front cover. Refer to
Engine Front Cover Replacement
.
- Install the distributor. Refer to
Distributor
in Engine Electrical.
- Install the water pump. Refer to
Water Pump Replacement
in Engine Cooling.
