Removal Procedure
- Relieve the fuel pressure. Refer to Fuel Pressure Relief Procedure
in Engine Controls.
Caution: Unless directed otherwise, the ignition and start switch must be in the OFF or LOCK position, and all electrical loads must be OFF before servicing
any electrical component. Disconnect the negative battery cable to prevent an electrical spark should a tool or equipment come in contact with an exposed electrical terminal. Failure to follow these precautions may result in personal injury and/or damage to
the vehicle or its components.
- Disconnect
the negative battery cable.
- Drain the coolant system. Refer to
Cooling System Draining and Filling
in Engine Cooling.
- Remove the hood. Refer to
Hood Replacement
in Body and Accessories.
- Remove the air cleaner assembly.
- Remove the coil wire from the distributor.
- Remove the radiator with the cooling fan. Refer to
Radiator Replacement
Engine Cooling.
- Disconnect the following electrical connectors:
| • | The EVAP surge solenoid electrical connector |
| • | The distributor electrical connector and ground wire to distributor |
| • | The engine coolant temperature (ECT) sensor electrical connector |
| • | The coolant temperature sending unit electrical connector |
| • | The throttle position (TP) sensor electrical connector |
| • | The exhaust gas recirculation (EGR) solenoid vacuum valve electrical
connector |
| • | The idle speed control (ISC) motor electrical connector |
| • | The ground wires from the intake manifold |
| • | The heated oxygen sensor (HO2S1) electrical connector |
| • | The throttle body fuel injection (TBI) unit electrical connector |
| • | The early fuel evaporation (EFE) heater electrical connector (if
equipped) |
| • | The oil pressure switch electrical connector |
| • | The generator electrical connectors |
| • | The starter solenoid electrical connectors |
| • | The air conditioning (A/C) compressor clutch coil electrical connector
(if equipped) |
- Release the wiring harness from the retaining clamps.
- Disconnect the following vacuum hoses:
| • | The EVAP canister hose from the EVAP canister pipe |
| • | The MAP sensor hose from the intake manifold or the throttle body
(TB) |
| • | The brake booster hose from the intake manifold |
- Disconnect the following cables:
| • | The accelerator cable from the throttle body |
| • | The clutch cable from the transaxle |
| • | The speedometer cable from the transaxle |
- Disconnect the heater inlet and outlet hoses.
- Disconnect the fuel return hose and the fuel feed hose from the
throttle body.
- Use the J 28467-A
and the J 28467-89
in
order to support the engine.
- Raise and support the vehicle. Refer to
Lifting and Jacking the Vehicle
in General Information.

- Remove the two nuts and
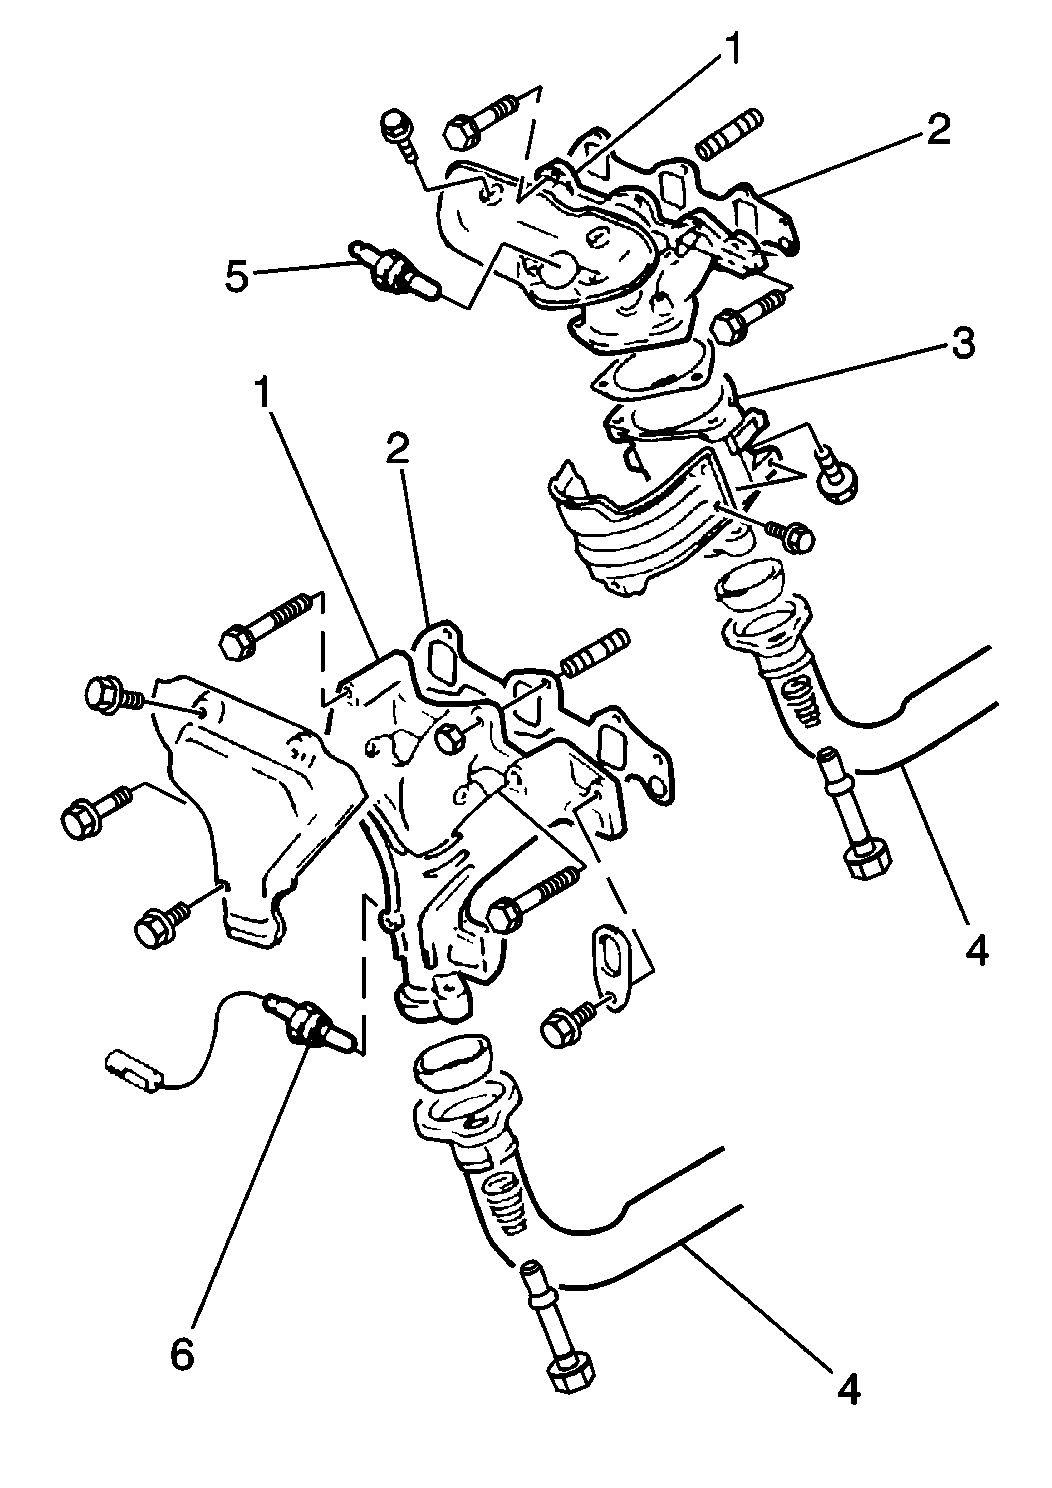
the front pipe/three way catalytic converter (TWC) assembly (4) from the
resonator/muffler/tail pipe assembly.
- Remove the gearshift control shaft and the extension rod from
the transaxle. Refer to
Gearshift Control Shaft and Extension Rod Replacement
in
Manual Transmission.
- Disconnect the back-up lamp switch.

- Disconnect the crankshaft
position sensor.
- Place a drain pan beneath the engine oil pan to catch the escaping
oil.
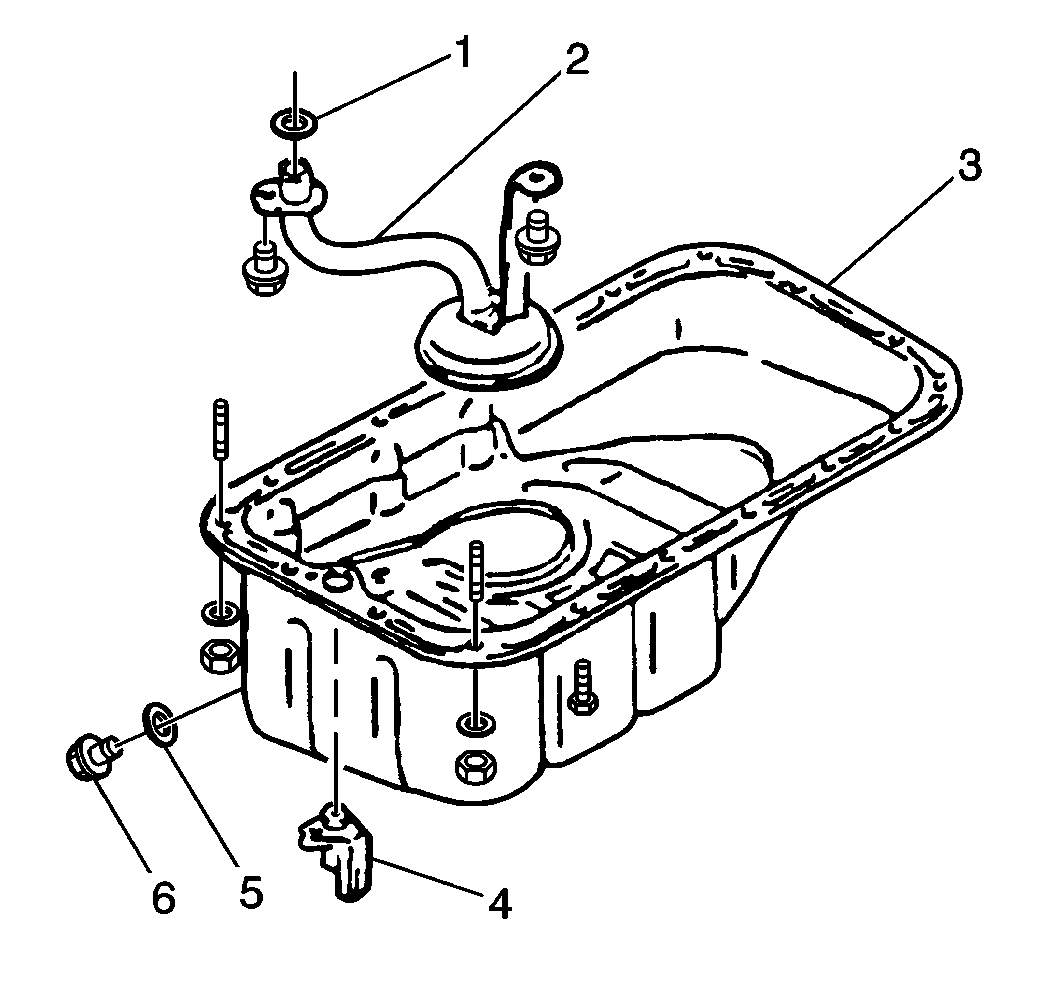
- Remove the engine oil drain plug (6) and the gasket (5), allowing
the engine oil to drain.

- Remove the two bolts and
the front pipe/TWC assembly (4) from the exhaust manifold (1).
- Remove the hanger assembly that supports the TWC and remove the
front pipe/TWC assembly from the vehicle.
- Drain the transaxle fluid. Refer to
Fluid Replacement
in Manual Transmission.
Important: For engine/transaxle removal, it is not necessary to remove the drive
axle from the steering knuckle.
- Remove the left and right drive axles from the transaxle. Refer to
Wheel Drive Shaft Replacement
in
Driveline/Axle.
- Remove the air conditioning (A/C) compressor (if equipped) from
the compressor bracket with the hose still attached.
- Lower the vehicle.
- Remove the J 28467-A
and the J 28467-89
.
- Install a suitable engine lifting device.
- Remove the left (transaxle) mount. Refer to
Engine Mount Replacement
in Engine Mechanical.
- Remove the right side engine mount. Refer to
Engine Mount Replacement
in
Engine Mechanical.
- Remove the rear engine mount. Refer to
Engine Mount Replacement
in Engine Mechanical.
- Remove the engine with the transaxle from the vehicle, ensuring
clearance on all sides.
Installation Procedure
- Ensure sufficient clearance around the engine before fitting the
engine and transaxle into the engine compartment.
- Lower the engine and the transaxle into the vehicle, but do not
remove the lifting device.
- Install the left (transaxle) mount. Refer to
Engine Mount Replacement
in Engine Mechanical.
- Install the right side engine mount. Refer to
Engine Mount Replacement
in
Engine Mechanical.
- Install the rear engine mount. Refer to
Engine Mount Replacement
in
Engine Mechanical.
- Remove the lifting device.
- Use the J 28467-A
and the J 28467-89
in
order to support the engine.
- Raise and suitably support the vehicle. Refer to
Lifting and Jacking the Vehicle
in General Information.
- Install the drive axles (left and right) to the transaxle. Refer
to
Wheel Drive Shaft Replacement
in Driveline/Axle.

- Install the front pipe/TWC
assembly (4) to the resonator/muffler/tail pipe assembly.
- Secure the front pipe/TWC assembly with the two nuts. Do not tighten
fully.
- Install the front pipe/TWC assembly to the vehicle.
- Support the front pipe/TWC assembly with the hanger.
- Install the front pipe/TWC assembly to the exhaust manifold (1).
Notice: Use the correct fastener in the correct location. Replacement fasteners
must be the correct part number for that application. Fasteners requiring
replacement or fasteners requiring the use of thread locking compound or sealant
are identified in the service procedure. Do not use paints, lubricants, or
corrosion inhibitors on fasteners or fastener joint surfaces unless specified.
These coatings affect fastener torque and joint clamping force and may damage
the fastener. Use the correct tightening sequence and specifications when
installing fasteners in order to avoid damage to parts and systems.
- Secure the front
pipe/TWC assembly with the two bolts.
Tighten
| • | Tighten the exhaust manifold-to-front pipe/TWC bolts to 45 N·m
(33 lb ft). |
| • | Tighten the two resonator/muffler/tail pipe-to-front pipe/TWC
nuts to 40 N·m (29 lb ft). |
- Install the gearshift control shaft and the extension rod to the
transaxle. Refer to
Gearshift Control Shaft and Extension Rod Replacement
in Manual
Transmission.
- Connect the back-up lamp switch.
- Connect the crankshaft position sensor.
- Lower the vehicle.
- Remove the J 28467-A
and the J 28467-89
.
- Connect the fuel return and the fuel feed hoses to the throttle
body.
- Connect the heater inlet and outlet hoses.
- Connect the coil wire to the distributor.
- Connect the following electrical connectors:
| • | The EVAP surge solenoid electrical connector |
| • | The distributor electrical connector and ground wire to distributor |
| • | The ECT sensor electrical connector |
| • | The coolant temperature sending unit electrical connector |
| • | The TP sensor electrical connector |
| • | The EGR solenoid vacuum valve electrical connector |
| • | The ISC motor electrical connector |
| • | The ground wires from the intake manifold |
| • | The HO2S1 electrical connector |
| • | The TBI unit electrical connector |
| • | The EFE heater electrical connector (if equipped) |
| • | The oil pressure switch electrical connector |
| • | The generator electrical connectors |
| • | The starter solenoid electrical connectors |
| • | The air conditioning (A/C) compressor clutch coil electrical connector
(if equipped) |
- Secure the wiring harness to the retaining clamps.
- Connect the following vacuum hoses:
| • | EVAP canister hose to the EVAP canister pipe |
| • | MAP sensor hose to the intake manifold or TB |
| • | Brake booster hose to the intake manifold |
- Connect the following cables:
| • | The accelerator cable to the throttle body |
| • | The clutch cable to the transaxle |
| • | The speedometer cable to the transaxle |
- Install the radiator with the cooling fan. Refer to Engine Cooling.
- Install the air cleaner assembly.
- Install the hood. Refer to
Hood Replacement
in Body and Accessories.
- Refill the transaxle as necessary. Refer to
Fluid Replacement
in Manual Transmission.
- Refill the engine with engine oil. Refer to
Approximate Fluid Capacities
Maintenance and Lubrication.
- Install the air conditioning (A/C) compressor to the compressor
bracket.
- Adjust the A/C belt tension. Refer to
Drive Belt Replacement
in Engine Mechanical.
- Refill the cooling system. Refer to
Cooling System Draining and Filling
in Engine Cooling.
- Adjust the following:
- Connect the negative battery cable.
- Verify that the following conditions do not exist upon completion
of installation:


