Removal Procedure
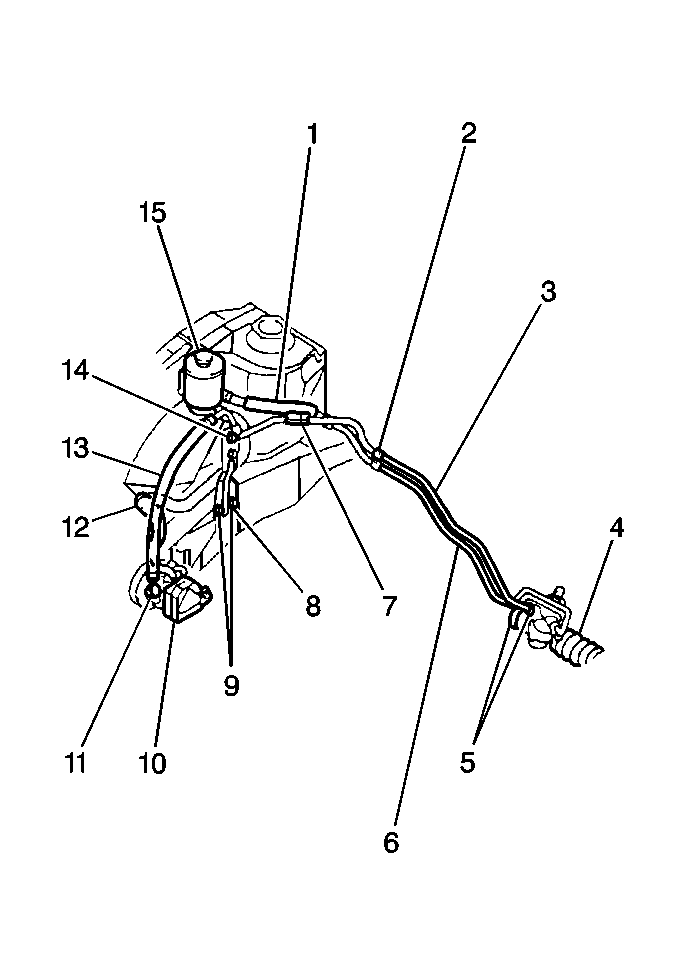
- Remove the bolt that retains the high pressure hose (13) to the core support.
- Separate the high pressure hose (13) from the high pressure pipe at the core support.
- Loosen the hose clamp and the return hose (12) from the reservoir (15).
- Disconnect the PSP switch connector.
- Raise and support the vehicle. Refer to Lifting and Jacking the Vehicle in General Information.
- Remove the power steering pump drive belt. Refer to Drive Belt Replacement in Engine Mechanical -- 1.3L.
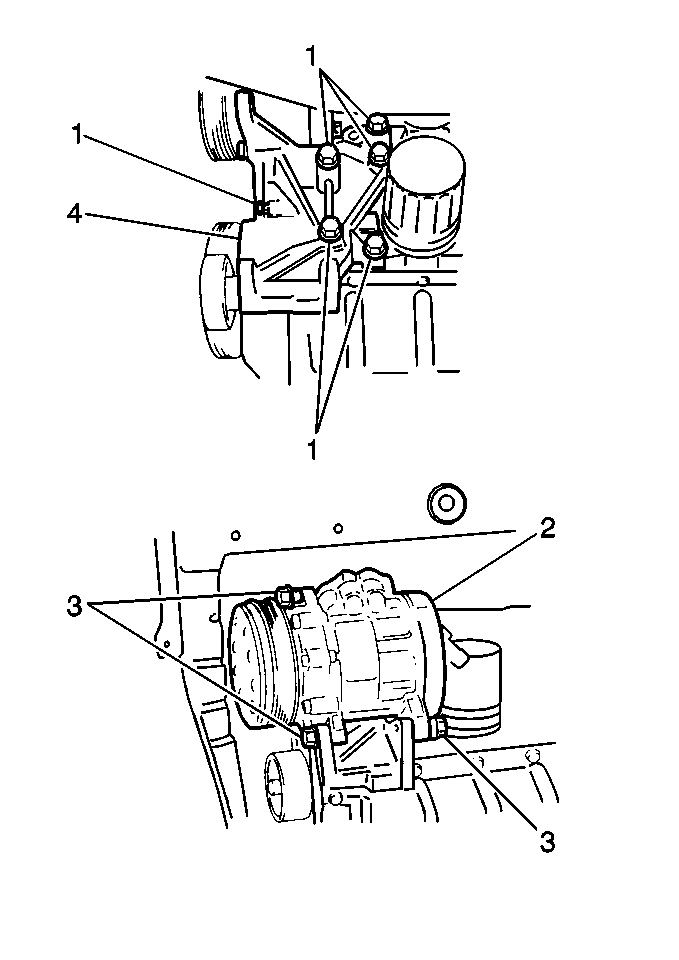
- If the vehicle has A/C, remove the 3 bolts (3) and the A/C compressor (2) from the mounting bracket (4).
- Remove the 4 bolts (1) that retain the mounting bracket to the engine.
- Remove the power steering hose (12) and the bracket, with the pump (10) attached, from the engine compartment.
- Remove the 3 bolts and the power steering pump from the mounting bracket.
- Remove the following components from the power steering pump:
- Remove the hose clamp and the return hose (12) from the pump.

Notice: Do not start the vehicle with any power steering gear inlet or outlet hoses disconnected. When disconnected, plug or cap all openings of components. Failure to do so could result in contamination or loss of power steering fluid and damage to the system.

If the vehicle has A/C, hang the A/C compressor off to the side.

| • | The nut |
| • | The lock washer |
| • | The high pressure hose (13) |
Installation Procedure
- Secure the return hose (12) to the pump with the hose clamp.
- Secure the high pressure hose (13) to the pump with the lock washer and with the nut.
- Secure the power steering pump to the mounting bracket with the 3 bolts.
- Install the mounting bracket (4) to the engine.
- Install the A/C compressor (2) to the mounting bracket (4).
- Install the power steering pump drive belt. Refer to Drive Belt Replacement in Engine Mechanical -- 1.3L.
- Lower the vehicle.
- Unplug the power steering pipes and the power steering hoses.
- Connect the PSP switch connector to the pump.
- Install the return hose (12) to the reservoir (15). Secure the hose to the reservoir with the hose clamp.
- Secure the high pressure hose (13) to the core support with the bolt.
- Install the high pressure hose (13) to the high pressure pipe (2) from the steering gear. Secure the hose to the pipe with the flare nut.
- Fill the power steering fluid reservoir (15) with new power steering fluid. Refer to Checking and Adding Power Steering Fluid .
- Bleed the power steering system. Refer to Power Steering System Bleeding .

Notice: Use the correct fastener in the correct location. Replacement fasteners must be the correct part number for that application. Fasteners requiring replacement or fasteners requiring the use of thread locking compound or sealant are identified in the service procedure. Do not use paints, lubricants, or corrosion inhibitors on fasteners or fastener joint surfaces unless specified. These coatings affect fastener torque and joint clamping force and may damage the fastener. Use the correct tightening sequence and specifications when installing fasteners in order to avoid damage to parts and systems.
Tighten
Tighten the nut to 25 N·m (18 lb ft).
Tighten
Tighten the bolts to 35 N·m (25 lb ft).

Secure the mounting bracket to the engine with the 4 bolts (1).
Tighten
Tighten the bolts to 46.8-50.4 N·m (63.7-68.6 lb ft).
Secure the A/C compressor to the mounting bracket with the 3 bolts (3).
Tighten
Tighten the A/C compressor mounting bolts to 22.5-27.4 N·m (16.5-20.1 lb ft).

Do not tighten the bolt completely.
Tighten
| • | Tighten the bolt that retains the high pressure hose to the core support to 10 N·m (89 lb in). |
| • | Tighten the flare nut to 40 N·m (30 lb ft). |
