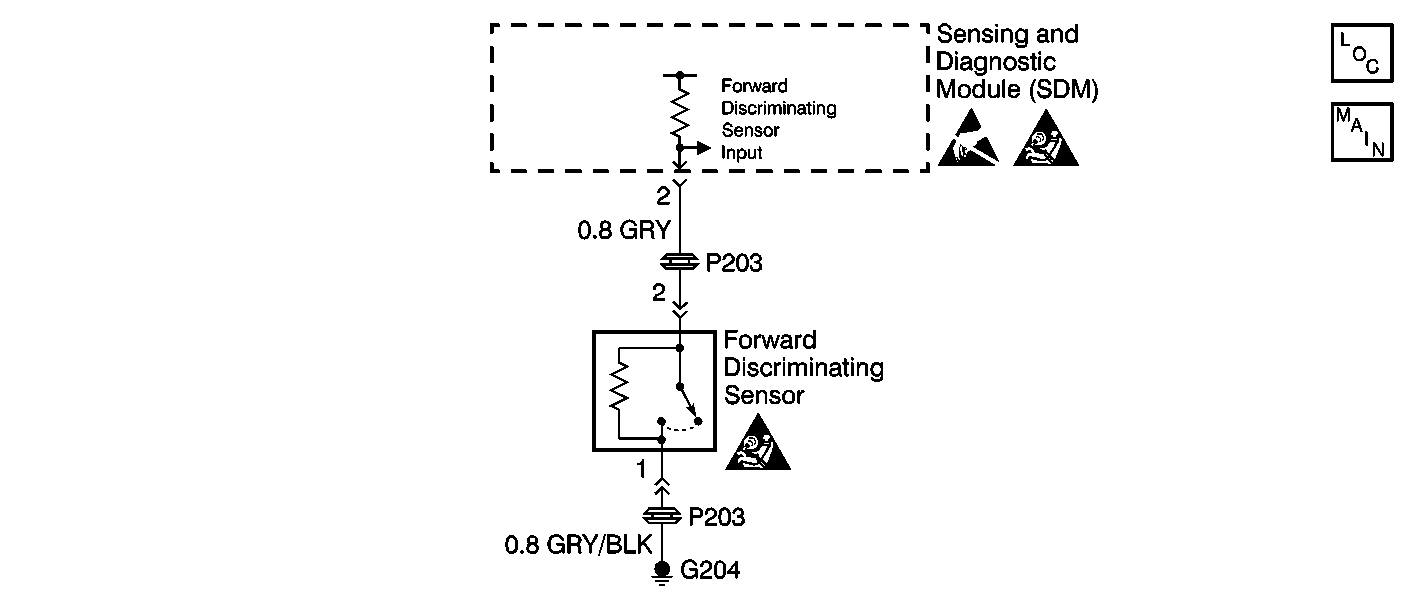
Circuit Description
When you turn the ignition switch to the ON position, the inflatable restraint Sensing and Diagnostic Module (SDM) performs tests in order to diagnose critical malfunctions. The SDM measures IGNITION 1 voltage, the 23-volt loop reserve, and the deployment loop voltages in order to verify the normal ranges. Next, the SDM proceeds to Continuous Monitoring. The SDM contains a network of resistors that is connected to 5 volts, to ground, and to the SDM sensor signal terminal 2. The 8.45K ohm resistor in the inflatable restraint forward discriminating sensor is parallel to the normally open switch, and provides a parallel path to ground. This causes a specified percentage of voltage to appear at the SDM sensor feed input. The SDM monitors this voltage in order to detect shorts to ground or a closed sensor.
Conditions for Setting the DTC
| • | The SDM has an inflatable restraint forward discriminating sensor. |
| • | The voltage at Sensor Feed terminal 2 is less than 0.5 volts for 500 milliseconds. |
The Continuous Monitoring test checks for this DTC. This test occurs if IGNITION 1 is within the normal operating voltage range.
Action Taken When the DTC Sets
| • | The SDM sets a diagnostic trouble code. |
| • | The SDM turns ON the AIR BAG warning lamp. |
Conditions for Clearing the DTC
| • | Current DTC |
| The voltage at Sensor Feed terminal 2 is more than 0.5 volts for 500 milliseconds. |
| • | History DTC |
| - | Use a scan tool in order to clear the DTC. |
| - | 250 ignition cycles occur without a malfunction. |
Diagnostic Aids
A short to ground in the circuit of the inflatable restraint forward discriminating sensor can cause an intermittent condition. Carefully inspect the input circuit and the pigtail of the inflatable restraint forward discriminating sensor.
When this table requests measurements, use the J 39200 Digital Multimeter with the correct terminal adapter from the J 35616 Connector Test Adapter Kit. If this table requests a check for a correct connection, refer to Testing for Intermittent Conditions and Poor Connections . If the table requests a wire repair, a connector repair, or a terminal repair, use the J-38125 Terminal Repair Kit, and refer to Wiring Repair .
Test Description
Caution: Be careful when you handle a sensor. Do not strike or jolt a sensor.
Before applying power to a sensor:
• Remove any dirt, grease, etc. from the mounting surface. • Position the sensor horizontally on the mounting surface. • Point the arrow on the sensor toward the front of the vehicle. • Tighten all of the sensor fasteners and sensor bracket fasteners
to the specified torque value.
The numbers below refer to the step numbers on the diagnostic table.
-
This test checks for a malfunctioning discriminating sensor.
-
This test checks for a short to ground in the GRN wire.
Step | Action | Value(s) | Yes | No |
|---|---|---|---|---|
1 | Was the SIR Diagnostic System Check performed? | -- | ||
Is the resistance reading more than the specified value? | 8.36 Kohms | |||
3 | Replace the inflatable restraint front end discriminating sensor. Refer to Inflatable Restraint Front End Discriminating Sensor Replacement . Did you replace the inflatable restraint front end discriminating sensor? | -- | -- | |
Is the resistance reading less than the specified value? | OL (Infinite) | |||
5 | Repair a short to ground condition in the GRY wire. Is the circuit repair complete? | -- | -- | |
6 | Reconnect and mount all the SIR system components. Are all the SIR components reconnected and properly mounted? | -- | -- | |
7 | Replace the AIR BAG Fuse. Did you replace the AIR BAG Fuse? | -- | -- | |
8 | Reconnect and mount all the SIR system components. Are all the SIR components reconnected and properly mounted? | -- | -- | |
9 | Clear the SIR diagnostic trouble codes. Did you clear the diagnostic trouble codes? | -- | -- |
